Advertisement
Connect the THINKTOOL Reader with your vehicle through the OBDII port

Usually, the OBD port is located under the dashboard, above the pedal on the driver's side. The five locations shown in the picture are common OBDII port locations.
Turn on the THINKTOOL Reader

After connecting with the car, the screen will display as shown in the picture.
Connect Wi-Fi

The system will automatically search all available Wi-Fi networks and you can choose the Wi-Fi needed. Notice the "Wi-Fi" must be set before use.
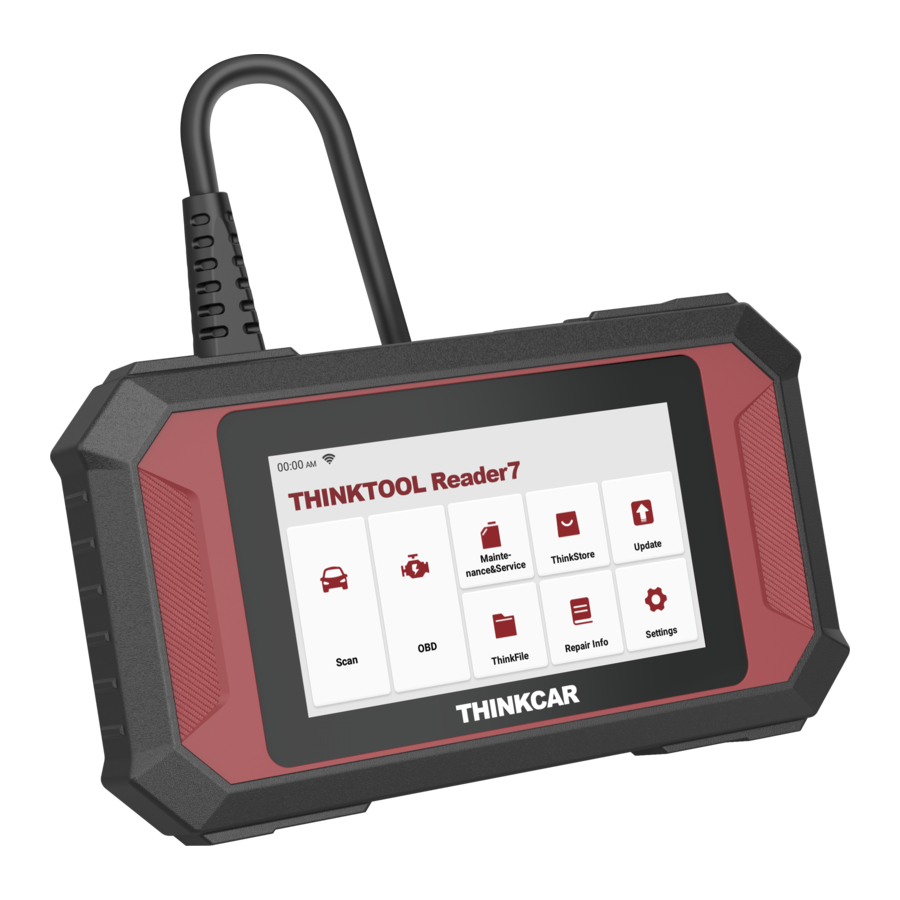
Functions Description

The THINKTOOL Reader main unit has the following 8 functions:
- Scan: This function serves to read & clear the DTC of the ECU memory of the tested system. Read and display real-time data and parameters of the car ECU. Autosearch: There is no need to manually select the brand model, it can automatically select the model and automatically detect
- OBD: Diagnosis of all problems related to the engine.codes, read data stream, read ECU information, etc.
- Maintenance & Service: Supports the most common multiple maintenance and reset functions.
- ThinkStore: Display related products, please contact the dealer if necessary.
- Update: This module allows you to update the diagnostic software & App and set frequently used software.
- ThinkFile: It is used to record and establish the files of the diagnosed vehicles. The files are created based on the vehicle VIN and check time, including all diagnostic-related data such as diagnostic reports, data stream records and screenshots.
- Repair Info: It includes 4 items, a fault code database, a list of vehicles able to be diagnosed, videos, a learning course. The maintenance technician can quickly refer to the explanation of the fault codes, and understand all the vehicles that can be diagnosed through the tool. The videos contain equipment usage, maintenance and diagnosis guides. The learning course demonstrates how tools are operated. These four functions help technicians quickly grasp the equipment use and improve diagnostic efficiently.
- Setting: Common system settings can be made here to modify and add information.
Settings

You can do some basic set up on this page. Include Wi-Fi, screen brightness, language, time zone, and so on.
- Feedback: You can feedback the diagnostic software/app bugs to us for analysis and improvements.
- Screenshots: Turn on this switch to take a screen capture.
- Screen floating window: Turn on this switch to record the screen operation video.
- Network: Set the connectable Wi-Fi network.
- Firmware fix: Used to update the firmware.
- Language: Select the tool language from the languages displayed on the interface.
- Time zone: Choose the time zone of the current location, then the system will automatically configure the time according to the time zone you chose.
FAQ
Here we list some common questions and answers related to this tool.
Q: Why does it have no responses when connected to a vehicle?
A: Check whether the connection with the vehicle diagnostic interface is normal, whether the ignition switch is on, and whether the tool supports the vehicle.
Q: Why does the system stop while reading the data stream?
A: This may be caused by loose diagnostic connection. Please unplug the connector and reconnect it firmly.
Q: Communication error with vehicle ECU?
A: Please confirm:
- Whether diagnostic connector is correctly connected.
- Whether ignition switch is ON.
- If all checks are normal, please send vehicle year, make, model and VIN number to us by Feedback function.
Q: Why does the screen flash when the engine ignition starts?
A: It is normal and caused by electromagnetic interference.
Q: How to upgrade the system software?
A:
- Start the tool and ensure a stable Internet connection.
- Go to "Settings" -> "App Update", click "OTA" and then click "check version" to enter the system upgrade interface.
- Complete the process by following the instructions on the screen step by step. It may take a few minutes. After successfully completing the upgrade, the tool will automatically restart and enter the main interface.
Warranty Terms
This warranty applies only to users and distributors who purchase THINKCAR TECH www.thinkcar.com THINKTOOL Reader products through normal procedures. Provide free warranty within one year. THINKCAR TECH warrants its electronic products for damages caused by defects in materials or workmanship. Damages to the equipment or components caused by abusing, unauthorized modification, using for non-designed purposes, operation in a manner not specified in the instructions, etc.are not covered by this warranty. The compensation for dashboard damage caused by the defect of this equipment is limited to repair or replacement. THINKCAR TECH does not bear any indirect and incidental losses. THINKCAR TECH will judge the nature of the equipment damage according to its prescribed inspection methods. No agents, employees or business representatives of THINKCAR TECH are authorized to make any confirmation, notice or promise related to THINKCAR TECH products.
Service Line: 0086-755-29838879
Customer Service Email: support@thinkcarus.com
Official Website: www.thinkcar.com
Products tutorial, videos, FAQ and coverage list are available on Thinkcar official website.
Follow us on
![]() @thinkcar.official
@thinkcar.official
![]() @ObdThinkcar
@ObdThinkcar

Documents / Resources
References
Download manual
Here you can download full pdf version of manual, it may contain additional safety instructions, warranty information, FCC rules, etc.
Advertisement


Need help?
Do you have a question about the THINKTOOL Reader and is the answer not in the manual?
Questions and answers