Advertisement
Quick Links
Advertisement

Related Manuals for Faber GV60TT/10


Summary of Contents for Faber GV60TT/10
- Page 1 User manual GV60TT/10 ENG 40011903-2018...
- Page 2 User manual GV60TT/10 1 < < < <...
- Page 3 User manual GV60TT/10 This user manual is intended for the following gas fires: Aspect Premium L RD/ST/C Relaxed Premium M Triple Premium M Aspect Premium XL RD/ST Relaxed Premium L Triple Premium L ...
- Page 4 User manual GV60TT/10 3 < < < <...
- Page 5 User manual GV60TT/10 DC 6V Reset connection 2.3.1 2.3.2 4 < < < <...
- Page 6 User manual GV60TT/10 5 < < < <...
- Page 7 User manual GV60TT/10 Dear user protection must always be placed around the fireplace. Congratulations on your purchase of a Faber fire! A As a fire is a source of heat, hot air quality product from which you will experience circulation is created.
- Page 8 User manual GV60TT/10 glass polish. This is a specially formulated cleaning Replacing empty batteries agent that can be ordered at authorised Faber Handset: dealers. Never use aggressive cleaning agents or If the indication BATT appears in abrasive products. the top left corner of the display screen, the batteries of the ...
-
Page 9: Additional Functions
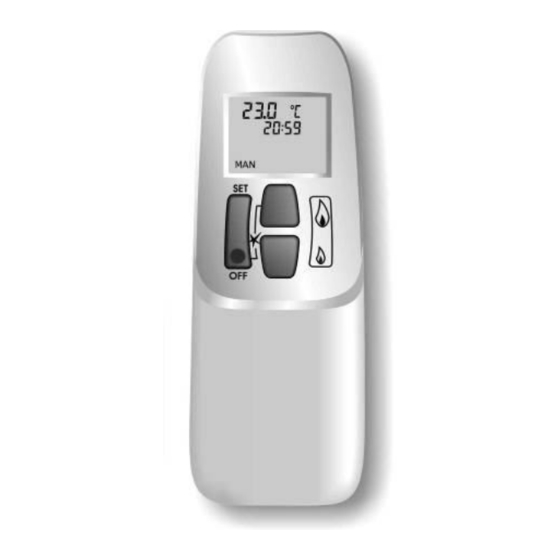
User manual GV60TT/10 Temperature/clock setting (standard Press the SET and the -key (large flame) °C/24hours) simultaneously and the flame picture will divide over the complete length of the The alteration of the temperature indication on the burner. (fig. 2.0) the AUX symbol appears display screen from °C/24hours to °F/12hours and... - Page 10 User manual GV60TT/10 Save the settings by pressing the OFF- manual operation. key (fig. 1.8) or wait for ten seconds. If the indication MAN is shown in the display screen, the fire can adjusted to a higher or lower ...
- Page 11 User manual GV60TT/10 reset button on the receiver the piezo-ignition E (fig.1.2 ) briefly a few (fig. 2.3.1), times, the pilot light will ignite now. 5. If the pilot light is burning, wait for for setting the transmitter code: approx.
Need help?
Do you have a question about the GV60TT/10 and is the answer not in the manual?
Questions and answers