Chapters
Table of Contents

Related Manuals for WLD-TEC SteriMax basic 4.101.000


Summary of Contents for WLD-TEC SteriMax basic 4.101.000
- Page 1 basic Bedienungsanleitung DE Instruction manual EN Mode d’emploi FR Mode d’emploi FR Impfösen - Sterilisator Inoculation Loop - Sterilizer Stérilisateur de fils à ensemencer...
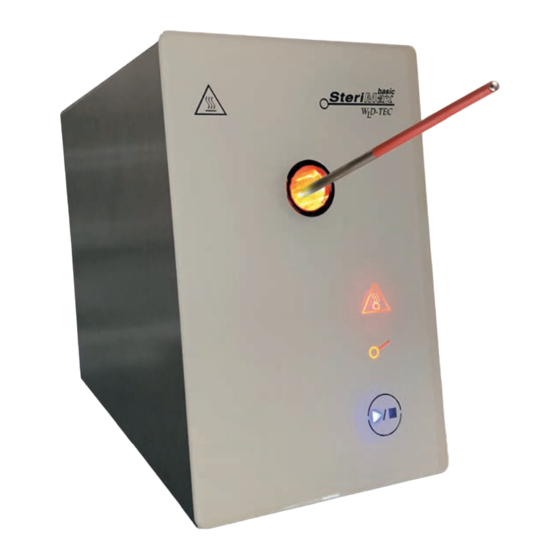
- Page 2 Die Bedienungsanleitung aufmerksam durchlesen, um sich mit dem Produkt vor dem Einsatz vertraut zu machen. Zur späteren Einsichtnahme die Gebrauchsanleitung bitte gut aufbewahren. Fig. A Fig. A 1a - Start-Symbol - Touchpanel 1b - Stop-Symbol - Touchpanel 4, 4a - Statusanzeige Sterilisationsverlauf - Restwärmeanzeige - Quarzglasausglührohr / Ausglührohr 4a - Sterilisationsöffnung...
-
Page 3: Table Of Contents
Inhaltsverzeichnis Lieferumfang Verwendung Warnhinweise 1. Inbetriebnahme 1.1 Quarzglasausglührohr 1.2 Netzanschluss 2. Bedienung 2.1 Gerät einschalten / ausschalten 2.2 Einschaltsterilisation 3. Sterilisation des Instruments 3.1 Starten der Sterilisation 3.2 Fußpedalanschluss und Bedienung (optional) 3.3 Sterilisationsvorgang 3.4 Abbruch der Sterilisation 3.5 Thermocontrol 4. -
Page 4: Lieferumfang
Lieferumfang SteriMax basic - Impfösen-Sterilisator: 230V / AC Art. Nr.: 4.101.000 120V / AC Art. Nr.: 4.102.000 100V / AC Art. Nr.: 4.103.000 • 1 Quarzglasausglührohr (im Gerät installiert) • 1 Impfösenhalter (R1) • 1 Impföse Ø 3 mm (R1a) •... - Page 5 • Stellen Sie sicher, dass das Gerät niemals mit Wasser oder anderen Flüssigkeiten in Berührung kommen kann, solange der Netzstecker in der Steckdose ist, insbesondere wenn Sie es im Labor in Nähe von Wasser oder Flüssigkeiten verwenden. • Achten Sie darauf, dass im Betrieb das Netzkabel (16) niemals nass oder feucht wird.
-
Page 6: Inbetriebnahme
1. Inbetriebnahme Die Inbetriebnahme ist, wie in den folgenden Punkten beschrieben, sorgfältig durchzuführen. 1.1 Quarzglasausglührohr Bei Auslieferung ist das Ausglührohr (4) schon in der Sterilisationsöffnung (4a) installiert. Vor erstmaliger Benutzung Schutzfolie und Hinweis-Aufkleber entfernen. Gerät niemals ohne eingesetztes Ausglührohr (4) betreiben! 1.2 Netzanschluss Das Netzanschlusskabel (16) mit dem Anschlussstück (14) in den Netzanschluss (12) auf der Rückseite des Gerätes stecken. -
Page 7: Starten Der Sterilisation
3.1 Starten der Sterilisation Das Instrument (z.B. Impföse mit Halter) in die Öffnung des Ausglührohrs (4, 4a) einführen. Das Start-Symbol (1a) auf dem Touchpanel durch leichtes berühren aktivieren um den Sterilisationsvorgang zu starten. 3.2 Fußpedalanschluss und Bedienung Alternativ kann der Sterilisationsvorgang auch mit einem optional erhältlichen Fußpedal gestartet werden. -
Page 8: Stand-By Funktion
4. Stand-by Funktion Die Stand-by Zeit beträgt 15 Minuten. Wird innerhalb der Stand-by Zeit keine Sterilisation gestartet, schaltet sich das Gerät nach 15 Minuten selbsttätig aus und verhindert so, z.B. bei Arbeitspausen, das ungewollte aktivieren einer Sterilisation. Der Lüfter (8) und die Restwärmeanzeige (3) sind im Stand-by Modus aktiv, bis die überschüssige Wärme abgebaut ist. -
Page 9: Reinigung Der Glasfront
Das Ausglührohr muss von innen und außen sauber und trocken sein bevor es wieder in die Sterilisationsöffnung (4a) eingesetzt wird. Das Ausglührohr ist ein Verschleißteil. Regelmäßig auf Beschädigungen überprüfen. Bei Eintrübungen, Rissen, Absplitterungen o.Ä. ersetzen. Ersatz-Quarzglasausglührohr: Art.-Nr.: 4.000.400 Gerät niemals ohne eingesetztes Ausglührohr (4) betreiben! 6.2 Reinigung der Glasfront Die Glasfront kann mit handelsüblichen Glasreinigern und einem weichen, fusselfreien Tuch gereinigt werden. -
Page 10: Fehleranzeige
8. Fehleranzeige Dieses Kapitel erläutert die Fehleranzeigen des Gerätes und gibt Hinweise zu deren Behebung. 8.1 Übertemperaturschutz Sollte das Gerät während des Sterilisationsvorgangs überhitzen, schaltet sich der IR-Halogenstrahler automatisch ab und das Stop-Symbol (1b) blinkt 1x. Der Lüfter ist aktiv, bis das Gerät abgekühlt ist (ca. 10 Minuten). Danach das Gerät über den Hauptschalter (13) ausschalten. -
Page 11: Einfache Fehlerbehebung
• Das Gerät wird zu heiß, und der IR-Halogenstrahler schaltet sich während der Sterilisation ab Der Thermoschutzschalter schaltet den IR-Halogenstrahler ab. (siehe Absatz 8.1) Lüfterfunktion überprüfen (siehe Absatz 7). Serviceadresse: WLD-TEC GmbH Telefon: 036081 68940 Produktion & Service Telefax: 036081 68942 Halle-Kasseler-Str.49 Email: sales@wld-tec.com D-37318 Arenshausen Internet: www.wld-tec.com... -
Page 12: Technische Daten
Technische Daten Touch-Bedienung: Start der Sterilisation (10 Sekunden) / Stop der Sterilisation Fußpedalbedienung*: Start der Sterilisation (10 Sekunden) / Stop der Sterilisation (*Fußpedal optional) Statusanzeige: optische Darstellung des Sterilisationsvorgangs Thermocontrol: dynamischer Sterilisationstimer, verkürzt die Einschaltdauer des IR-Strahlers in Abhängigkeit zur Restwärme Einschaltsterilisation: automatischer Sterilisationsvorgang nach Einschalten des Gerätes... -
Page 13: Konformitätserklärung
Schutz vor optischer Strahlung / Security of optical radiation (Risikofreie Gruppe) (Risk free group) 3.1 EN 62471:2008 Photobiologische Sicherheit von Lampen und Lampensystemen Photobiological safety of lamps and lamp systems WLD-TEC GmbH Halle-Kasseler-Str.49 D-37318 Arenshausen B. Wartewig (Geschäftsführer, CEO) Germany Arenshausen, 20.03.2018... -
Page 14: Optionales Zubehör
Optionales Zubehör Art.Nr.: 6.000.320 Tray, mobil: Art.Nr.: 4.000.341 Tray, rechts- oder linksseitig montierbar: Art.Nr.: 4.000.350 Instrumentenablage (magnetisch): Art.Nr.: 6.000.360 Impfösenhalter aus Edelstahl, Länge 245 mm: Art.Nr.: 6.000.365 Impfösenhalter aus Edelstahl, Länge 215 mm: Impfösen aus Spezial-Edelstahl, Draht Ø 0,6 mm Art.Nr.: 6.000.373 Ø... - Page 15 Notizen:...
- Page 16 Read these operating instructions carefully to familiarize yourself with the product before using. Keep the manual in a safe place for future reference. Fig. A Fig. A 1a - Start symbol - Touch panel 1b - Stop symbol - Touch panel - Status display: sterilization progress 4, 4a - Residual heat display...
- Page 17 Table of contents The range Safety Precautions 1. Initial operation 1.1 Quartz glass annealing tube 1.2 Power connection 2. Operation 2.1 Switching On / Off the device 2.2 Sterilization at start-up 3. Sterilizing the instrument 3.1 Starting the sterilization 3.2 Foot pedal connection and operation 3.3 Sterilization process 3.4 Cancellation of Sterilization 3.5 Thermocontrol...
-
Page 18: The Range
The range SteriMax basic - Inoculation Loop Sterilizer: 230V / AC Art. No.: 4.101.000 120V / AC Art. No.: 4.102.000 100V / AC Art. No.: 4.103.000 • 1 quartz glass annealing tube (installed in the device) • 1 inoculation loop holder (R1) •... - Page 19 • Make sure that the unit does not come in contact with water or other liquids as long as the plug is in the power socket, especially if you use it in the laboratory near water or liquids. • Using a two-pin AC adapter / connecting cable is NOT recommended.
-
Page 20: Initial Operation
1. Initial operation Please handle this sterilizer always with care as described in the following points of this manual. 1.1 Quartz glass annealing tube Upon delivery, the annealing tube (4) is already installed in the sterilization orifice (4a). Remove the protective foil and the adhesive warning label before first use. Never operate the device without the annealing tube (4) in place! 1.2 Power connection Plug the power cable (16) using the connector (14) into the power socket (12) on the... -
Page 21: Starting The Sterilization
3.1 Starting the sterilization Inserting an instrument (such as an inoculating loop with holder) into the orifice of the annealing tube (4, 4a). By briefly touching the start symbol (1a) at the touch panel, the user can start the sterilization. 3.2 Foot pedal connection and operation Alternatively, the sterilization process can also be started with an foot pedal, that is available optionally. -
Page 22: Stand-By Function
4. Stand-by function The stand-by time is 15 minutes. While the stand-by time, the device switches off automatically after 15 minutes without operation to prevent the unwanted activation of a sterilization. The fan (8) and the residual heat display (3) are active in standby mode until the excess heat has been dissipated. -
Page 23: Cleaning The Glass Front
The annealing tube must be clean and dry, inside and outside, before it is installed in the sterilization orifice (4a). The annealing tube is a consumable item. Check it regularly for damage. Replace it if opacity, cracks, chips or similar are observed. Quarz glass annealing tube: Art.-No.: 4.000.400 Never operate the device without the annealing tube (4) in place! -
Page 24: Error Display
All SteriMax basic are covered under our two-year manufacturer warranty against any manufacture defects in material and workmanship (including IR-halogen lamp). Except parts of wear and tear (quartz glass annealing tube). The WLD-TEC warranty guaran- tees all SteriMax basic under normal usage conditions and does not cover any dama- ges as a direct result of user misuse or / and abuse. -
Page 25: Troubleshooting Guide
• The unit gets hot, the red light turns off during sterilization The thermal circuit breaker is switching off the unit (see section 8.1). Check the functioning of the fan (see section 7). Service adress: WLD-TEC GmbH Phone: +49 36081 68940 Production & Service Fax: +49 36081 68942 Halle-Kasseler-Str.49... -
Page 26: Technical Data
Technical Data Touch-Operation: start of the sterilization (10 sec.) / stop of the sterilization Foot pedal-Operation*: start of the sterilization (10 sec.) / stop of the sterilization (*foot pedal is optional) Status display: optical display of the sterilization progress Thermocontrol: dynamic sterilization timer, reduces the activation of the IR-halogen lamp according to the residual heat Sterilization at start up:... -
Page 27: Declaration Of Conformity
Schutz vor optischer Strahlung / Security of optical radiation (Risikofreie Gruppe) (Risk free group) 3.1 EN 62471:2008 Photobiologische Sicherheit von Lampen und Lampensystemen Photobiological safety of lamps and lamp systems WLD-TEC GmbH Halle-Kasseler-Str.49 D-37318 Arenshausen B. Wartewig (Geschäftsführer, CEO) Germany Arenshausen, 20.03.2018... -
Page 28: Optional Accessories
Optional accessories Art.No.: 6.000.320 Tray, mobil: Art.No.: 4.000.341 Tray, for right or left side: Art.No.: 4.000.350 Instrument support (magnetic): Art.No.: 6.000.360 Inoculation loop holder, length 245 mm: Art.No.: 6.000.365 Inoculation loop holder, length 215 mm: Inoculation loops (special stainless steel), wire Ø 0.6 mm Art.No.: 6.000.373 Ø... - Page 29 Notes:...
- Page 30 Lire attentivement le mode d’emploi afin de se familiariser avec le produit avant de l’utiliser. Bien conserver le mode d’emploi pour pouvoir le consulter à tout moment. Fig. A 1a - Symbole start - écran tactile 1b - Symbole stop - écran tactile - Indicateur d’état du déroulement 4, 4a de la stérilisation...
- Page 31 Table de matières Contenu de la livraison Utilisation Avertissements 1. Mise en service 1.1 Tube de stérilisation en verre de quartz 1.2 Prise secteur 2. Utilisation 2.1 Mettre en marche / éteindre l’appareil 2.2 Stérilisation de mise en marche 3. Stérilisation de l’instrument 3.1 Lancement de la stérilisation 3.2 Raccordement et opération de la pédale de commande 3.3 Procédure de stérilisation...
-
Page 32: Contenu De La Livraison
Contenu de la livraison SteriMax basic - Stérilisateur de fils à ensemencer: 230V / AC Réf.: 4.101.000 120V / AC Réf.: 4.102.000 100V / AC Réf.: 4.103.000 • 1 tube de stérilisation en verre de quartz (placé dans l’appareil) • 1 support pour les fils à ensemencer (R1) •... - Page 33 • Assurez-vous que l’appareil ne soit jamais en contact avec de l’eau ou d’autres liquides, tant que la fiche de raccordement au secteur se trouve dans la prise, en particulier si vous l’utilisez dans le laboratoire à proximité d’eau ou de liquides. •...
-
Page 34: Mise En Service
1. Mise en service La mise en service doit être effectuée soigneusement comme décrit dans les points. 1.1 Tube de stérilisation en verre de quartz Au moment de la livraison, le tube de stérilisation (4) est déjà installé dans l’ouverture de stérilisation (4a). -
Page 35: Lancement De La Stérilisation
3.1 Lancement de la stérilisation Introduire l’instrument (ensemenceur avec support) dans l’ouverture de stérilisation (4, 4a). Activer le symbole Start (1a) sur l’écran tactile en l’effleurant pour démarrer le processus de stérilisation. 3.2 Raccordement et opération de la pédale de commande Alternativement le processus de stérilisation peut être démarré... -
Page 36: Temps De Veille
4. Temps de veille Le temps de veille est de 15 minutes. Si aucune stérilisation n’est démarrée pendant le temps de veille, l’appareil s’éteint de lui- même au bout de 15 minutes et évite ainsi l’activation non voulue d’une stérilisation, par exemple pendant les pauses de travail. -
Page 37: Nettoyage De La Façade En Verre
Le tube de stérilisation doit être propre et sec à l’intérieur et à l’extérieur avant qu’il ne soit à nouveau inséré dans l’ouverture de stérilisation (4a). Le tube de stérilisation est une pièce d’usure. Les dommages doivent être vérifiés régulièrement. Lors de l’apparition de tâches, de fissures, d’éclats ou 4.000.400). -
Page 38: Messages D'erreur
8. Messages d’erreur Ce chapitre explique les indications d’erreur de l’appareil et donne des indications au sujet de leur suppression. 8.1 Protection contre les températures excessives Si l’appareil venait à surchauffer pendant le processus de stérilisation, la lampe halogène IR s’arrête automatiquement et le symbole Stop (1b) clignote 1x. Le ventilateur est actif jusqu’à... -
Page 39: Dépannage Facile
• L’appareil devient trop chaud est la lampe halogène IR s’arrête pendant la stérilisation L’interrupteur thermique arrête la lampe halogène IR (voir 8.1) Vérifier le fonctionnement de ventilateur (voir paragraphe 7). Adresse du service après-vente: WLD-TEC GmbH Téléphon: +49 36081 68940 Production & Service Téléfax: +49 36081 68942 Halle-Kasseler-Str.49 Email: sales@wld-tec.com... -
Page 40: Données Techniques
Données techniques Commande tactile: Départ de la stérilisation (10 sec) / Arrêt de la stérilisation Commande à pédale*: Départ de la stérilisation (10 sec) / Arrêt de la stérilisation (*pédale optionnelle) Indicateur de statut: représentation visuelle du processus de stérilisation Thermocontrol: minuterie dynamique de stérilisation, réduit la durée d’utilisation de lampe IR en fonction de la chaleur... -
Page 41: Déclaration De Conformité
Schutz vor optischer Strahlung / Security of optical radiation (Risikofreie Gruppe) (Risk free group) 3.1 EN 62471:2008 Photobiologische Sicherheit von Lampen und Lampensystemen Photobiological safety of lamps and lamp systems WLD-TEC GmbH Halle-Kasseler-Str.49 D-37318 Arenshausen B. Wartewig (Geschäftsführer, CEO) Germany Arenshausen, 20.03.2018... -
Page 42: Accessoires En Option
Accessoires en option Réf.: 6.000.320 Plateau, mobile: Réf.: 4.000.341 Plateau se montant à droite ou à gauche: Réf.: 4.000.350 Stockage de l’instrument (magnétique): Fils à ensemencer en acier inoxydable: Réf.: 6.000.360 longueur 245 mm: Réf.: 6.000.365 longueur 215 mm: Fils à ensemencer en acier spécial Ø 0,6 mm Réf.: 6.000.373 Ø... - Page 43 Notation:...
- Page 44 D-37085 Göttingen D-37318 Arenshausen Telefon: +49 (0)551 / 793789 Telefon: +49 (0)36081 / 68940 Telefax: +49 (0)551 / 793707 Telefax: +49 (0)36081 / 68942 • Email: sales@wld-tec.com Internet: http://www.wld-tec.com Sales Department: Production & Service: Beethovenstr. 3 Halle-Kasseler-Straße 49 D-37085 Göttingen...
Need help?
Do you have a question about the SteriMax basic 4.101.000 and is the answer not in the manual?
Questions and answers