
Related Manuals for Grillo GH 9


Summary of Contents for Grillo GH 9
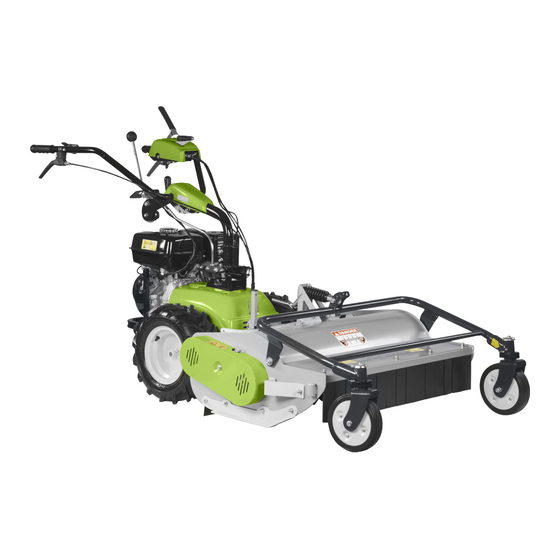
- Page 1 STANDARD CONFIGURATION WITH 85 cm ALL PURPOSE FLAIL MOWER GH 9 Hydrostatic Multi-tool OPERATOR’S MANUAL 02511.2022.12...
-
Page 2: Table Of Contents
GH 9 Hydrostatic Multi-tool / Translation of the original instructions TABLE OF CONTENTS Introduction ................3 15. Troubleshooting guide ............19 Description and intended use ..........3 16. Maintenance schedule ............20 17. Lubrication chart ..............20 Use and safety decals ............4 General safety rules ............... -
Page 3: Introduction
“PRE-DELIVERY INSPECTION”. Dear Customer, On this occasion the retailer will provide the customer with all the we thank you for the trust and preference you have placed in our Grillo information necessary to use the machine. GH 9 all purpose fl ail mower and we are confi dent that the use of your new machine will fully meet your requirements. -
Page 4: Use And Safety Decals
USE AND SAFETY DECALS Forward lever and PTO engagement Forward gear STOP position Reverse gear Serial number Parking brake Danger - disconnect the spark plug before doing any Consult the maintenance manual Fire hazard Danger - sharp parts Danger Danger of burns Danger of gas inhalation of bursting... -
Page 5: General Safety Rules
GENERAL SAFETY RULES Danger of gas inhalation ccident prevention rules On the machine and in this manual there are warnings and indications accompanied by this symbol: Exhaust fumes can cause serious damage to health or death. If it is necessary to start the engine in an enclosed space, use an extension piece to the exhaust pipe to blow out the smoke. - Page 6 ersonAl protection equipment Before using the machine the appropriate personal protection equipment must be worn: body protection, protective gloves, safety footwear, hearing protection, goggles.
-
Page 7: General Warnings To Keep In Mind
• Always use genuine Grillo spare parts and accessories; slopes (max 20°). The machine’s manoeuvrability is reduced on • Grillo machines are designed for the use of genuine Grillo slopes; accessories or accessories from authorised manufacturers. Do not • Be very careful when reversing, in case of danger let go of the install non-genuine accessories, accessories from unauthorised handlebar, the machine will stop immediately;... -
Page 8: Identification Of Machine Controls And Functions
IDENTIFICATION OF MACHINE CONTROLS AND FUNCTIONS 1. HANDLEBAR ROTATION LEVER 2. LEFT TURN LEVER 3. FORWARD LEVER 4. PTO LEVER 5. HANDLEBAR HEIGHT ADJUSTMENT LEVER 6. RIGHT TURN LEVER 7. THROTTLE 8. SPEED CONTROL LEVER 9. MACHINE BODY SUPPORT ROD 10. -
Page 9: Identification Of Machine Components
IDENTIFICATION OF MACHINE COMPONENTS 1. ENGINE AIR FILTER 2. CHOKE LEVER 3. FUEL TAP 4. PARKING BRAKE PEDAL 5. RECOIL KNOB 6. ENGINE GUARD 7. ENGINE FAN GRID 8. FUEL TANK CAP 9. LEFT-HAND ENGINE OIL LEVEL AND TOP-UP PLUG 10. -
Page 10: Technical Specifications
TECHNICAL SPECIFICATIONS Fig. 1 MODEL: GH 9 Multi-tool, standard configuration with 85 cm all purpose flail mower. ENGINE: Honda GX 270, 270 cm³, 6.3 kW (8.4 HP) at 3600 rpm, single- cylinder petrol engine. FUEL TANK CAPACITY: 5,3 litres STARTER: breakaway with recoil starter. TRANSMISSION: hydrostatic. -
Page 11: Operating Instructions - Standard Configuration With 85 Cm Flail Mower
OPERATING INSTRUCTIONS - STANDARD Fig. 4 Fig. 5 CONFIGURATION WITH 85 CM FLAIL MOWER SETTING UP THE MACHINE FOR USE • Check the integrity of the machine to ensure that it has not been damaged during transport; • Remove the machine from its packaging, taking care not to damage the levers and cables. -
Page 12: Work Conclusion
sudden jerks. Fig. 8 7. Practice forward and reverse travel only to familiarise yourself with the machine; 8. Then familiarise yourself with steering manoeuvres to the right or left by operating the levers on the handlebars. As you move forward, pressing the right turn lever (fi g. 10/6) will disengage the right wheel and the machine will tend to turn right;... -
Page 13: Useful Rules For Correct Use
USEFUL RULES FOR CORRECT USE SAFETY DEVICES The machine will work in optimum condition if certain precautions are followed. 10.1 ACTIVE COUPLING • Before starting work, check that the attachment is clean, free of grass and dirt; The machine is equipped with an active coupling system. •... -
Page 14: Ordinary Adjustments
ORDINARY ADJUSTMENTS 11.2 CUTTING HEIGHT ADJUSTMENT To set the cutting height of the fl ail mower, remove the catch (fi g. 15/13) and turn the crank (fi g. 15/12) clockwise/counterclockwise to set the 11.1 HANDLEBAR SETTING desired height, then reposition the catch. The height ranges from a minimum of 3 cm to a maximum of 9 cm. Before starting work, it is recommended to position the handlebar in the most comfortable position and with the greatest control over the machine. -
Page 15: Extraordinary Adjustments
g. 19/D) and slightly extend the require technical skills and expertise. It is advisable to contact an adjuster (unscrew it), then retighten the lock nut. authorised Grillo centre to carry them out. If, on the other hand, the fl ail rotor does start despite the PTO lever being Keeping the levers at the correct tension ensures proper operation of the released, it is necessary to loosen the lock nut and slightly shorten the machine controls. -
Page 16: Ordinary Maintenance
IMPORTANT: place the machine in a horizontal position to 11. Keep the levers (fi g. 24/L) lifted up; check fl uid levels. 12. Fill the axle with 1.8 L of oil Grillo code 53140 or gearbox oil 10W60; 13. Lower the levers (fi g. 24/L) until they click into place and tighten the oil plug (fi g. 24/I). Fig. 24 ngine Air filter Check and clean the air fi lter every 10 hours. -
Page 17: Maintenance Of The Flail Mower
ubricAting the trAnsmission Fig. 25 Remove the upper metal protection by unscrewing the 4 screws that secure it (fig. 28). Change the transmission oil every 50 working hours. Use IP MELLANA 220 gearbox oil, quantity: 0.2 litres. Fig. 28 Fig. 26 reAsing the rotor And front wheel beArings Grease the bearings of the flail mower rotor and the carriage front wheels every 20 operating hours using the grease nipples (fig. 29). The grease nipples on the wheels are identified by a dedicated decal. Fig. -
Page 18: Extraordinary Maintenance
2. Remove the belt guide bracket located above the small pulley (fig. cracks. It is advisable to contact an authorised Grillo centre to have 31); the belts replaced. 3. Replace the worn belts with a new pair of original Grillo belts; 4. Refit the belt guide; 14.1 REPLACING THE HYDROSTATIC AXLE BELT 5. Tighten all bolts and refit the plastic guards; 6. If necessary, adjust the belt tension using the belt tension adjuster To replace the hydrostatic axle belt, it is necessary to: (see chapter 12.3 Adjusting the PTO lever). -
Page 19: Troubleshooting Guide
TROUBLESHOOTING GUIDE GH 9 WITH FLAIL MOWER - TROUBLESHOOTING GUIDE PROBLEM CAUSE SOLUTION - Check that the fuel tap is open Out of fuel - Check the fuel level Throttle is set to zero - Move the throttle to position 1... -
Page 20: Maintenance Schedule
MAINTENANCE SCHEDULE GH 9 WITH FLAIL MOWER - MAINTENANCE SCHEDULE WHICHEVER OCCURS FIRST MAINTENANCE ITEM FIRST 20 HOURS AT EVERY USE EVERY 50 HOURS EVERY 100 HOURS OR WITHIN THE OR 6 MONTHS OR EVERY YEAR FIRST MONTH ● Check the level Engine oil ●... -
Page 21: Storage And Prolonged Inactivity
STORAGE AND PROLONGED INACTIVITY cm orientAble sweeper The sweeper is attached to the PTO of the machine. It is very useful Store the machine in a dry place and protected from the elements. for cleaning concrete surfaces, driveways, yards; it is also suitable for Clean the machine of dirt and grass residues and if possible cover it with clearing fresh snow up to a height of 10/12 cm. -
Page 22: Technical Assistance Service
For extraordinary maintenance, for all operations requiring technical ifting And trAnsport skills and expertise, please contact your authorised Grillo dealer. The GH 9 may not be driven on public roads. If the machine is loaded onto a transport vehicle, secure it properly with ropes and lower the 20.2 IDENTIFICATION DATA handlebar if necessary. When lifting, ensure that cranes, hoists and ropes have sufficient lifting capacity for the weight of the machine. -
Page 23: Declaration Of Conformity
GRILLO SPA – Via Cervese, 1701 – 47521 CESENA (FC) – ITALY declare that the following machinery: / dichiaro che la macchina di seguito indicata: / déclare que la machine suivante: / Hiermit erkläre ich, dass folgende Maschine: / declara que la siguiente máquina:... - Page 24 Tel: (+ 44) 01889569149 Website: www.grillospa.it Website: www.grilloagrigarden.co.uk E-mail: grillo@grillospa.it E-mail: info@grilloagrigarden.co.uk Grillo Australasia Pty Ltd Grillo Deutschland GmbH 14 REBECCA COURT - VIC 3943 SORRENTO - AUSTRALIA GUNTERSRIETHER STR.14 - 91224 HARTMANNSHOF - DEUTSCHLAND Tel: (+ 61) 0428206225 Tel: (+ 49) 09154949216 Website: www.grilloaustralia.com.au...
Need help?
Do you have a question about the GH 9 and is the answer not in the manual?
Questions and answers