
Subscribe to Our Youtube Channel
Related Manuals for StewMac MINI-T


Summary of Contents for StewMac MINI-T
- Page 1 M I N I -T G U I TA R K I T Have a little fun. Make a little noise. Build a REAL guitar in a weekend. • Easy to build, finish, and setup • Pre-wired electronics • All hardware included Sheet #i-12258 Updated 11/19...
-
Page 2: Tools And Supplies
Tools and supplies Cut-out radius gauge These are the tools and supplies we recommend for assem- bling this kit. Stewmac part numbers are included where Carefully cut out this radius gauge to check your saddle applicable. heights as shown on page 10. We’ve included two, so you have a backup. -
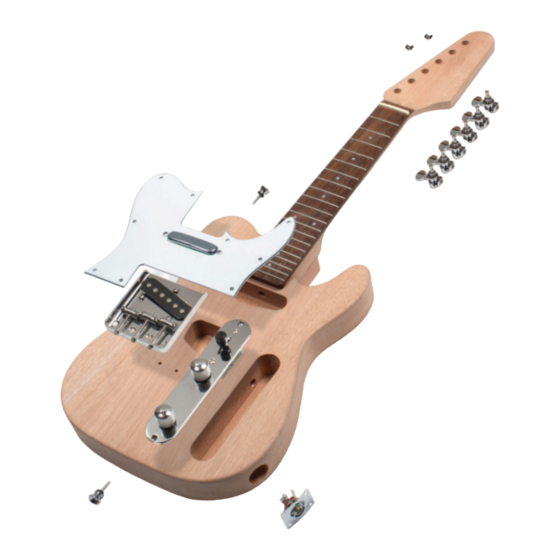
Page 3: Parts List
1.5mm hex wrench for adjusting bridge saddles Tuners with bushings, washers, and screws (set of 6) 4mm hex wrench for adjusting truss rod Bridge with mounting screws and pickup installed Strings Pickguard with mounting screws and neck pickup installed Prewired control plate with mounting screws stewmac.com... -
Page 4: Create Your Peghead Shape
When you’re happy with your peghead shape, sand it smooth using 150-grit sandpaper followed by 220-grit, then 320-grit. For info about using a template for peghead shaping, check out our Trade Secrets video #335 “How To Shape A Custom Peghead” at stewmac.com. stewmac.com search: ts335 stewmac.com... -
Page 5: Prep For Finishing
2-3 applications wood will do. are recommended to get a nice flat surface to build finish coats over. For more info on grain filling, see our article #i-0269 "Using ColorTone Grain Filler" at stewmac.com. stewmac.com search: i-0269 stewmac.com... - Page 6 Do not sand on your color coats. Apply 4-6 additional coats of clear over the top of the color or until you’ve reached your desired thickness. Allow 30 minutes to one hour between coats and allow the final coat to dry for 14 hours. stewmac.com...
-
Page 7: Assemble Your Guitar
Once positioned, mark out the mounting screw holes with a scribe or punch. Drill 3/8" deep pilot holes for the screws using a 1/16" drill bit. Install the screws in the pilot holes. stewmac.com... - Page 8 Mark out the 4 mounting screws with a scribe or punch using care to keep the edge of the jack plate square to the body. Drill the holes using a 1/16" drill bit. Do not install the jack plate yet. stewmac.com...
- Page 9 (usually yellow or white) to the round (tip). Once soldered, install the jack plate on the guitar. For more information on soldering check out our Trade Secrets video #186 “How to get a good clean solder joint” at stewmac.com stewmac.com search: ts186 stewmac.com...
-
Page 10: Final Setup
You can always go lower or higher depending on your play- ing style. After setting the two E strings, dial in the remaining strings to match the curve of the fretboard’s 16" radius using the cut-out gauge on page 2. stewmac.com... - Page 11 If the note reads sharp, the saddle needs to be adjusted back away from the nut, increasing the string length. You’re done! Congratulations! Your guitar is ready to play. We hope this will be the first of many that you have fun assembling and customizing. stewmac.com...
- Page 12 21 N. Shafer St • Athens, Ohio 45701 • USA USA & Canada call toll-free: 800-848-2273 9am-5pm weekdays Eastern time stewmac.com...
Need help?
Do you have a question about the MINI-T and is the answer not in the manual?
Questions and answers