
Related Manuals for StewMac UKULELE KIT


Summary of Contents for StewMac UKULELE KIT
- Page 1 StewMac Sheet #i-5371 Updated 11/18 PREMIUM SOLID-WOOD U K U L E L E K I T Assembly Instructions...
-
Page 2: Table Of Contents
Fit the nut and saddle . . . . . . . . . . . . . . . . . . . . . . . . . . . . . . . . . 29 Tools and supplies These are the tools and supplies we recommend for assem- bling this kit . StewMac item numbers are included where applicable . Tool you will need (required) -
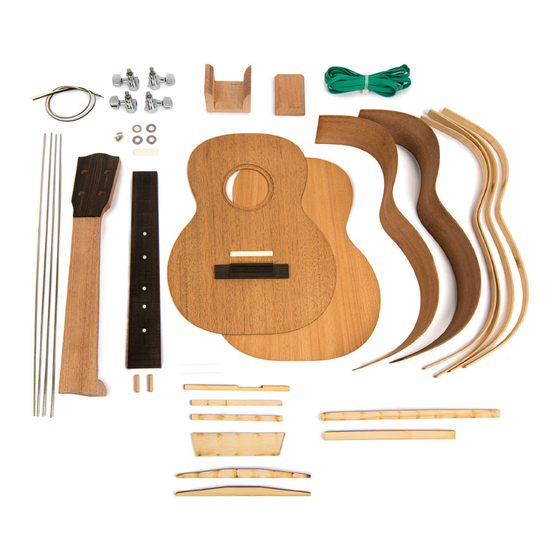
Page 3: Parts List
. This solid-wood ukulele kit will produce a professional quality instrument you will be proud of for decades When you’re done, you’ll have an excellent sounding to come . -
Page 4: Installing The Rosette
. with the top . Be sure to sand in a wide area so you don’t Now take your finger and guide the purflings back into the accidentally make the top thinner in this area . stewmac.com... -
Page 5: Brace The Top And Back
For this application we recommend using Titebond Original with scissors or a razor knife . Wood Glue or StewMac Fish Glue . Transfer the brace plan to the wood Apply a thin bead of glue to the brace and use your pinky... - Page 6 . So like you did when gluing the back braces, take a few minutes and do a dry run of your clamping setup Let them dry for 2 hours and then remove the clamps . before you apply glue . stewmac.com...
-
Page 7: Make The Body Mold
Tape or spray mount the plan drawing to the plywood, aligning it on the centerline . The bold black line on the plan drawing is the final shape of your uke . Attach blocks of wood to two of the corner braces, as shown stewmac.com... -
Page 8: Assemble The Body
When gluing in the neck block, place the “square” horizontal For these instructions, we are going to glue up the tail block extension toward the top of the ukulele and the “rounded” outside the mold, and the neck block inside the mold . stewmac.com... - Page 9 Fish Glue cleans up nicely after 10 - 15 minutes . It is still at these locations . wet enough to remove, but rubbery enough to make clean up less messy . stewmac.com...
- Page 10 If you have enough clamps you can glue up both halves of the rim at once . Allow them to dry for 1-2 hours before removing the clamps, then turn the sides over in the body mold and glue the linings to the other edge . stewmac.com...
- Page 11 . Make small pencil marks on the sides to fingers to round over the top of the brace . show where the braces touch . Extend these marks over the edge of the sides and linings . stewmac.com...
- Page 12 . Let the glue dry for 2 hours, then remove the body from the mold . Clean away any dripped glue, especially where it can be seen through the soundhole of the assembled body . stewmac.com...
- Page 13 A Dremel rotary tool with StewMac’s Precision Router Base and Edge Guide is ideal for trimming the overhang . Use a down-cut router bit to make a clean cut . Rout away most of the overhang, leaving it small enough to remove with sandpaper .
- Page 14 With a flat sanding block, follow the outer curves of the body overhang like you did on the back . to flush the edges with the sides . A curved sanding block or a stout wooden dowel makes a good sanding block for the inside curves at the waist . stewmac.com...
-
Page 15: Prepare The Neck
Adding medium viscosity superglue under the frets, such as Lay the end of the wire over the first fret slot, so it protrudes StewMac #20, keeps the frets seated . only very slightly over the edge of the board . Holding the... - Page 16 . (Optionally you can use a Fret Beveling file – #3760 – to get a perfectly uniform bevel on both sides of your fingerboard . ) stewmac.com...
- Page 17 . Now take a rule or straightedge and check to make sure the stewmac.com...
- Page 18 . Drill them 3/8" deep . (Mark your drill bit with a piece of mask- ing tape to keep from drilling the holes too deep . ) stewmac.com...
- Page 19 . fret . You want to drill this hole about half way between the It’s important that the fingerboard seats tightly on the neck . centerline and the edge of the fingerboard . stewmac.com...
- Page 20 . Trim the heel If the heel of your neck extends past the sides of the ukulele we will need to trim the neck so the heel transitions nicely from the back of the instrument . stewmac.com...
-
Page 21: Level The Frets
Leveling the frets leaves flat surfaces on the fret tops . Round off these flats using 400-grit sandpaper wrapped around your fingers . Run the sandpaper up and down the finger- board to smooth the frets . Follow this with 600-grit paper for a nice satin surface . stewmac.com... -
Page 22: Sand The Body And Neck
Knock off all sharp edges so they receive and hold a good coat of finish . Carefully examine your work using glancing light to find any scratches you missed . Continue with the process until all deep scratches are removed . stewmac.com... -
Page 23: Locate The Bridge
. If they’re off-center, the frame, consider whether your neck joint needs to be shift the neck until it’s centered . adjusted . Mark fretboard edge lines See if the neck is centered Fretboard taped stewmac.com... - Page 24 . If you’re not staining, the frame of tape around the neck joint is ready for gluing the neck . If the If the neck leans neck leans this way, this way, remove remove wood here wood here stewmac.com...
-
Page 25: Apply The Stain (Optional)
The carved heel and peghead have exposed endgrain, in- dicated by dark areas in the illustration below . The end of the peghead is endgrain also . These areas will absorb more stain than the straight grain, making them darker . stewmac.com... -
Page 26: Attach The Neck
Inside the body, the clamp foot will land on the top brace . To best protect the brace from damage, make a caul from a small piece of scrap wood . This caul elevates the clamping surface above the brace allowing the clamp to be applied without interference . stewmac.com... -
Page 27: Apply The Finish
. This gives you a handle while adding the last stroke of finish . You can also clamp this peg to your table when leaving the uke to dry . stewmac.com... -
Page 28: Glue The Bridge
. Instead place the camp just to the right or left of the fan brace . Glue and clamp up Apply the glue and clamp the bridge . Clean away squeeze- out, and allow it to dry for 45 minutes . stewmac.com... -
Page 29: Fit The Nut And Saddle
Thread the string through the back of the bridge . Tie it as again to create a knot . This is quicker than slowly wrapping shown in the three-step drawing below . Draw it tight . many times to get a good grip on the post . stewmac.com... - Page 30 . Use a Q-tip to do the same for the bridge . Install the nut Put a small drop of glue under the nut, and place it in posi- tion . The strings will hold it securely . stewmac.com...
- Page 31 stewmac.com...
- Page 32 21 N . Shafer St • Athens, Ohio 45701 • USA USA & Canada call toll-free: 800-848-2273 9am-6pm weekdays Eastern time stewmac.com...
Need help?
Do you have a question about the UKULELE KIT and is the answer not in the manual?
Questions and answers