Table of Contents
Advertisement
Quick Links
Advertisement
Table of Contents

Related Manuals for Citizen IF1-ET01


Summary of Contents for Citizen IF1-ET01
- Page 1 Ethernet Interface Board MODEL : IF1-ET01 User’s Manual Ver.2.12...
-
Page 2: Table Of Contents
Safety Instructions ......................4 1. Introduction ......................6 1-1. Specifications ......................... 7 1-2. Part Names and Functions ....................8 2. Preparing the IF1-ET01 ................... 9 2-1. Using the Panel Button ......................9 2-2. LED Functions ........................10 2-3. Printing the Ethernet Interface Board Configuration ............. 12 2-4. -
Page 3: Read Before Using
Read before using Be sure to read this manual carefully before using the product. After you read it, store it in a safe place so that you can reread it when necessary. Contents of this manual may be changed without notice. ... -
Page 4: Safety Instructions
Safety Instructions Before handling the product (removing from packaging, etc.), discharge static electricity by touching metal, etc. Do not spill liquid onto the device. Do not place the device in a humid place. Do not step on, or subject the network cable connected to the device to rough treatment. - Page 5 Safety Instructions Important FCC Radiation Exposure Statement The radiation exposure from this equipment is within the FCC RF radiation exposure limits for an uncontrolled environment. It is recommended that you install and operate this equipment with a minimum of 20 cm between the radiator and your body. CE Mark Warning This equipment is classified as a Class B product and may cause radio interference in a home environment.
-
Page 6: Introduction
1. Introduction Thank you for purchasing the Citizen IF1-ET01 Ethernet interface board. The IF1-ET01 Ethernet Interface Board is compatible with, for example, the Line Thermal Printer CT-S801 series and the CT-S601 series. Connecting the IF1-ET01 to a printer enables you to relay data between a network of multiple computers and the printer. In... -
Page 7: Specifications
Configuration changes from the Ethernet interface board setting screen Interactive communication Yes (only when CITIZEN TCP/IP port driver is used) Firmware upgrade Yes (using the Ethernet interface board setting screen) External dimensions 80 mm (W) x 70 mm (D) x 25 mm (H) (including connector... -
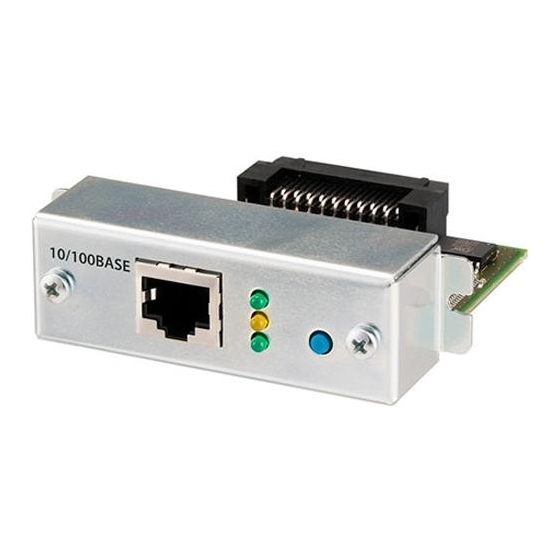
Page 8: Part Names And Functions
Shows network transmission speed with steady/blinking light. (Green) ③ Network status indicator Shows network connection status (disconnected, receiving data, etc.). (Yellow) ④ Board status indicator Shows operational status of the IF1-ET01 with combinations of steady and blinking lights. (Red/green) ⑤ Panel button Used to operate the IF1-ET01. -
Page 9: Preparing The If1-Et01
2. Preparing the IF1-ET01 2-1. Using the Panel Button The panel button on the operation panel is used to operate the IF1-ET01. You can use it to print settings information and restore factory default settings. Panel button ■ Starting the Ethernet Interface Board Switch on the printer. -
Page 10: Led Functions
2. Preparing the IF1-ET01 2-2. LED Functions The following charts show what each LED indicator indicates. ① ② ③ ④ ① Network transmission speed Transmission speed LED (green) 100 Mbps 10 Mbps / disconnected ② Link status with network Link status... - Page 11 2. Preparing the IF1-ET01 ③&④ Errors Display content LED (green) LED (red) Description Resource error Alternating blinking (0.5 second The IF1-ET01 is malfunctioning cycle) System error Alternating blinking (0.1 second The IF1-ET01 is malfunctioning cycle)
-
Page 12: Printing The Ethernet Interface Board Configuration
2. Preparing the IF1-ET01 2-3. Printing the Ethernet Interface Board Configuration Press the panel button to print out the IF1-ET01 configuration. ■ Configuration items that are printed I/F Board ① Title of the printout. ① Information ② Firmware version of the IF1-ET01. Same... -
Page 13: Returning The Ethernet Interface Board Configuration To Factory Default Settings
Settings 1) Press and hold the panel button to switch to setting mode. 2) After the IF1-ET01 has switched to setting mode, press and hold the panel button again within 3 seconds. The following message is printed, and the IF1-ET01 returns to factory default settings. -
Page 14: Using The Ethernet Interface Board Setting Screen
Using a Web browser, you can go to the Ethernet interface board setting screen to check or change the settings of the IF1-ET01 or to check the operational status of the printer. ■ Accessing the Ethernet Interface Board Setting Screen 1) Launch your browser and go to the URL of the Ethernet interface board setting screen. -
Page 15: Checking Or Changing Ethernet Interface Board Configuration
3. Using the Ethernet Interface Board Setting Screen 3-2. Checking or Changing Ethernet Interface Board Configuration You can check or change the settings of the IF1-ET01 from “Print server configuration” page of the Ethernet interface board setting screen. ■ Checking the Ethernet Interface Board Configuration On the menu page of the Ethernet interface board setting screen, click “Print server... - Page 16 Printer Manufacturer Obtains information from the printer about information the manufacturer of the printer to which the IF1-ET01 is connected Model Obtains information from the printer about the model of the printer to which the IF1- ET01 is connected Network...
- Page 17 3) After changing the settings, click “Register.” The “Please wait” page appears, and the changes are saved. Warning When the operation is complete, the IF1-ET01 restarts automatically. When the IF1-ET01 is set to automatically obtain the IP address from the DHCP server, the IP address assigned may be different from the previous one.
-
Page 18: Checking The Operational Status Of Printer
■ “Printer status” display items Item Description Manufacturer Information about the manufacturer of the printer to which the IF1-ET01 is connected. Model Information about the model of the printer to which the IF1-ET01 is connected. Printer status Operational status of the printer. -
Page 19: Checking The Ethernet Interface Board Version Information
3. Using the Ethernet Interface Board Setting Screen 3-4. Checking the Ethernet Interface Board Version Information The IF1-ET01 host name, serial number, and firmware version can be checked on the “LAN I/F information” page of the Ethernet interface board setting screen. -
Page 20: Setting The Ip Address
After the printer is switched on, the IF1-ET01 automatically obtains the IP address from the DHCP server within 60 seconds. If an IP address cannot be obtained automatically, the static IP address (169.254.1.10) that had been set in the IF1-ET01 before it left the factory is applied. -
Page 21: Network Seeker
5. Network Seeker By using “CITIZEN Network Seeker”, utility software that runs on Windows, you can check and change the Ethernet interface board settings. 5-1. Starting Network Seeker After obtaining the program “NetSeeker.exe” from the CD-ROM or our website, double click the program. - Page 22 5. Network Seeker ① “Seek” button Start a search for Ethernet interface boards on the network. The search function waits for a response for the duration set for ⑦. ② “Edit config” button Change the settings of the selected board. ③...
-
Page 23: Changing Settings
Warning ・ Malfunctions may occur if the IF1-ET01 is removed or re-inserted. ・ To install the IF1-ET01, please contact your dealer or service person. ・ If you work on your own, consider static electricity and other factors carefully, and then... - Page 24 AC power cord (For DC power type) 2) If another interface board is installed in the printer, remove it. Insert the IF1-ET01 into the interface slot of the Interface printer. slot 4) Connect the interface connector of the IF1-ET01 to the interface connector inside the printer.
- Page 25 Set the IP address for the printer in order to connect it to the network. Switch on the printer. After the printer is switched on, the IF1-ET01 automatically obtains an IP address from the DHCP server within 60 seconds. If an IP address cannot be...
Need help?
Do you have a question about the IF1-ET01 and is the answer not in the manual?
Questions and answers