Polar Refrigeration T316 Instruction Manual
Hide thumbs
Also See for T316:
- Instruction manual (64 pages) ,
- Instruction manual (56 pages) ,
- Instruction manual (41 pages)
Table of Contents
Advertisement
Available languages
Available languages
IJsblokjesmachine
NL
Handleiding
Machine à glaçons
FR
Mode d'emploi
Eismaschine
DE
Bedienungsanleitung
Model • Modèle • Modell • Modello • Modelo • Malli:
T316_GL192_ML_A5_v3_180102.indb 1
Ice Maker
Instruction manual
Fabbricatore di ghiaccio
8
IT
Manuale di istruzioni
Máquina de Hielo
14
ES
Manual de instrucciones
Máquina de fazer gelo
20
PT
Manual de instruções
T316 / GL192
26
32
38
2018/1/2 17:16
Advertisement
Table of Contents

Subscribe to Our Youtube Channel
Related Manuals for Polar Refrigeration T316


Summary of Contents for Polar Refrigeration T316
- Page 1 Manuale di istruzioni Machine à glaçons Máquina de Hielo Mode d'emploi Manual de instrucciones Eismaschine Máquina de fazer gelo Bedienungsanleitung Manual de instruções Model • Modèle • Modell • Modello • Modelo • Malli: T316 / GL192 T316_GL192_ML_A5_v3_180102.indb 1 2018/1/2 17:16...
-
Page 2: Safety Tips
Safety Tips • Position on a flat, stable surface. • A service agent/qualified technician should carry out installation and any repairs if required. Do not remove any components or service panels on this product. • Consult Local and National Standards to comply with the following: - Health and Safety at Work Legislation - BS EN Codes of Practice... -
Page 3: Pack Contents
• If the power cord is damaged, it must be replaced by a POLAR agent or a recommended qualified technician in order to avoid a hazard. • Polar recommend that this appliance is PAT tested on an annual basis to ensure the product remains safe. Caution Risk of Fire •... -
Page 4: Installation
1. Remove the appliance from the packaging and remove the protective film from all surfaces. 2. Remove the Scoop, Inlet/Outlet hoses and Model: T316 Sealing Washers from the ice bin. 3. When positioning the ice maker, maintain a distance of 20cm (7 inches) between the... -
Page 5: Cleaning, Care And Maintenance
Cleaning, Care & 2. Unscrew the drainage valve cap at the right lower part at the rear. Let the water drain from Maintenance the water reservoir thoroughly. Afterwards, re-locate the drainage cap and screw tight. • Always switch off and disconnect the power supply before cleaning. -
Page 6: Troubleshooting
Note: After auto-cleaning, use the first 3 ice making cycles to flush out the system. Discard the water and ice created from these initial cycles. Troubleshooting Fault Probable Cause Solution The appliance is not The unit is not switched on Check the unit is plugged in correctly and working switched on... -
Page 7: Technical Specifications
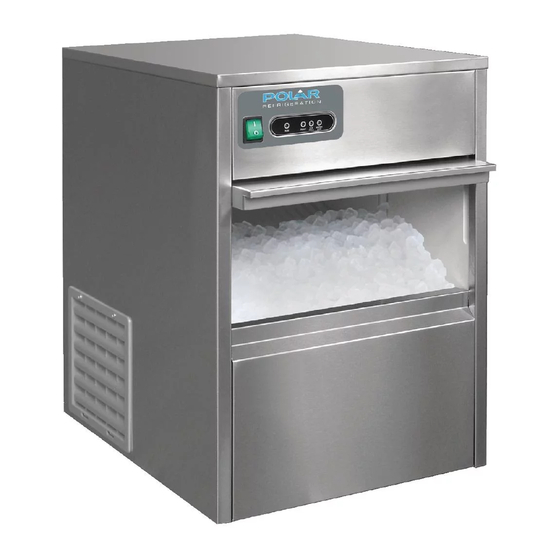
Technical Specifications Max Ice Making Dimensions Model Voltage Power Current Refrigerant Weight storage Capacity H x W x D mm T316 220-240V 50Hz 145W 1.1A 20kg/24 hours R600a 36g 590 x 380 x 480 28kg GL192 220-240V 50Hz 260W 1.8A... - Page 8 Veiligheidstips • Plaatsen op een vlakke en stabiele ondergrond. • De installatie en eventuele reparaties zijn door een servicetechnicus/vaktechnicus uit te voeren. Verwijder geen componenten of servicepanelen van dit product. • Raadpleeg en volg de plaatselijke en nationale regelgeving op m.b.t.
- Page 9 • Indien de stroomkabel beschadigd raakt, dient men deze door een POLAR technicus of een aanbevolen vaktechnicus te laten vervangen om gevaarlijke situaties te verhinderen. • Polar beveelt aan dat dit apparaat jaarlijks PAT getest wordt om ervoor te zorgen het product veilig blijft. Voorzichtig Risico van Fire •...
- Page 10 Bij twijfel dient men het Wateruitlaat product in een rechtopstaande positie te plaatsen. 1. Haal het apparaat uit de verpakking en Model: T316 verwijder de beschermingsfolie van alle oppervlakken. 2. Haal de ijsschep, toevoer-/afvoerslangen en Opmerking: voor een efficiënte afdrichtringen uit de ijsbak.
-
Page 11: Reiniging, Zorg & Onderhoud
Reiniging, zorg & 2. Draai de dop van de afvoerklep achteraan, rechts onderaan, los. Laat het water grondig onderhoud afvloeien uit het waterreservoir. Plaats de dop van de afvoer nadien terug en schroef het vast. • Alvorens het apparaat te reinigen dient men altijd de stroomvoorziening uit te schakelen. -
Page 12: Oplossen Van Problemen
Opmerking: Gebruik, na de auto-reiniging, de eerste ijsmaak-cycli om het systeem te spoelen. Gooi het water en het ijs, gemaakt tijdens deze initiële cycli, weg. Oplossen van problemen Probleem Mogelijke oorzaak Handeling Het apparaat werkt Het apparaat staat uit Controleer of de stroomkabel van het apparaat is niet aangesloten en of het apparaat is ingeschakeld Steker en kabel zijn... -
Page 13: Technische Specificaties
Technische specificaties Inhoud Productie vermogen Afmetingen Model Voltage Vermogen Stroom Koelmiddel Gewicht ijsblokjes (h x b x d mm) T316 220-240V 50Hz 145W 1,1A 20kg/24 uur R600a 36g 590 x 380 x 480 28 kg GL192 220-240V 50Hz 260W 1,8A... -
Page 14: Conseils De Sécurité
Conseils de sécurité • Placez l’appareil sur une surface plane, stable. • L’installation et les éventuelles réparations doivent être confiées à un dépanneur / technicien qualifié. Ne retirez aucun composant ou cache de ce produit. • Consultez les normes locales et nationales pour vous conformer aux : - lois sur l’hygiène et la sécurité... -
Page 15: Contenu De L'emballage
• Un cordon d’alimentation endommagé doit être remplacé par un agent POLAR ou un technicien qualifié recommandé, pour éviter tout danger. • Polar recommande que cet appareil soit testé chaque année pour s’assurer que le produit demeure sécuritaire. Attention Risque d’ incendie •... - Page 16 1. Sortez l’appareil de l’emballage et décollez la pellicule de protection de toutes ses surfaces. Modèle : T316 2. Retirez la pelle, les flexibles d’entrée/de sortie et les rondelles d’étanchéité du bac à glaçons. Remarque : pour une vidange 3.
-
Page 17: Nettoyage, Entretien Et Maintenance
Nettoyage, entretien et 2. Dévisser le bouchon de la vanne d’évacuation au niveau de la partie inférieure à l’arrière. Laisser maintenance l’eau couler du réservoir. Ensuite, replacer le bouchon de vidange et visser correctement. • N’oubliez jamais d’éteindre et de débrancher l’appareil avant de procéder à... -
Page 18: Dépannage
Remarque : Après l’auto nettoyage, utiliser les 3 premiers cycles de fabrication de glaçons pour rincer le système. Jeter l’eau et les glaçons issus de ces cycles initiaux. Dépannage Dysfonctionnement Cause probable Intervention L’appareil ne fonctionne L'appareil n'est pas allumé Vérifier que l'appareil est bien branché et allumé La prise et le cordon sont Appeler un agent POLAR ou un technicien endommagés... -
Page 19: Spécifications Techniques
Spécifications techniques Cap. production Dimensions Modèle Voltage Puissance Courant Contenance Réfrigérant Poids de glaçons (h x l x p mm) T316 220-240V 50Hz 145W 1,1A 20kg/24 heures R600a 36g 590 x 380 x 480 28 kg GL192 220-240V 50Hz 260W 1,8A... - Page 20 Sicherheitshinweise • Auf eine flache, stabile Fläche stellen. • Alle erforderlichen Montage- und Reparaturarbeiten sollten von Wartungspersonal oder einem qualifizierten Techniker durchgeführt werden. Keine Bauteile oder Bedienflächen von diesem Produkt entfernen. • Für folgende Normen und Vorschriften sind die lokalen und nationalen Normen heranzuziehen: - Arbeitsschutzvorschriften - BS EN Verhaltenspraktiken...
Need help?
Do you have a question about the T316 and is the answer not in the manual?
Questions and answers