Table of Contents
Advertisement
Quick Links
Advertisement
Table of Contents

Subscribe to Our Youtube Channel
Related Manuals for GGMgastro WKM335SN

Summary of Contents for GGMgastro WKM335SN
- Page 1 USERS GUIDE WKM335SN...
-
Page 2: Table Of Contents
Users manual - Wall cooling shelf Table of Contents 1. Product characteristics ......................2 1.1 Purpose............................2 1.2 Device description ........................2 1.3 Technical data .........................3 1.4 Surface of the device ......................3 1.5 Requirements for electrical connection ...................4 2. Operation of the device......................5 2.1 Setting and installing .......................5 2.2 Connection of the sewing machine ..................6 2.3 Storage of products in the device ....................6... -
Page 3: Product Characteristics
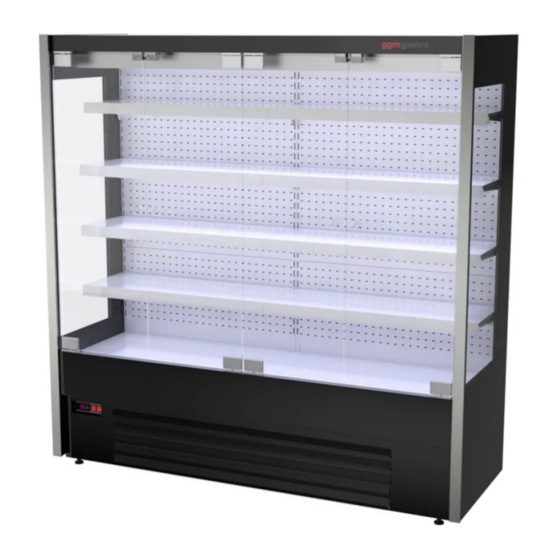
Users manual - Wall cooling shelf 1. PRODUCT CHARACTERISTICS 1.1 PURPOSE The cooling rack is a universal device designed for storing and presenting previously cooled food products at a reduced temperature. 1.2 DEVICE DESCRIPTION The cooling shelves’ body is made of electrolytically galvanized sheet steel, powder coated and is placed on a base of a steel section. -
Page 4: Technical Data
Users manual - Wall cooling shelf 1.3 TECHNICAL DATA TEMPERATURE DIMENSIONS MODEL DISPLAY AREA [m2] RANGE [°C] (LENGTH x DEPTH x HEIGHT) [mm] WKM335SN +1 do +10 °C 1960 x 700 x 1985 mm 3,35 1.4 SURFACE OF THE DEVICE... -
Page 5: Requirements For Electrical Connection
Users manual - Wall cooling shelf 1.5 REQUIREMENTS FOR ELECTRICAL CONNECTION. The power supply of the cooling rack should be made of a separate low voltage circuit. The installation is made in a grounding protection system. Before starting the device it is necessary to check whether the electrical installation to which the device will be connected meets the conditions of fire protection effectiveness confirmed by the results of measurements carried out with the applicable regulations. -
Page 6: Operation Of The Device
Users manual - Wall cooling shelf 2. OPERATION OF THE DEVICE 2.1 SETTING AND INSTALLING Before installing the device, it must be delivered to the target place of work. Remove the protec- tive foil from the device’s components. After setting the device, it should be leveled. To do this, screw in or unscrew the feet of the device. -
Page 7: Connection Of The Sewing Machine
Users manual - Wall cooling shelf 2.2 CONNECTION OF THE SEWING MACHINE. During the cyclical defrosting process, the ice accumulated on the evaporator of the device melts. The water created as a result of the process must be removed from the device. The place of re- moving water is the siphon located under the device. -
Page 8: Starting The Device
Users manual - Wall cooling shelf 2.4 STARTING THE DEVICE. After correct installation and leveling (see points 1.5 and 2.1 of the manual), you can start the device. Electric switches and a digital thermostat at the top of the front of the rack are used to start and operate the device. - Page 9 Users manual - Wall cooling shelf 1. Display with the current temperature inside the device. 2. SET / MUTE button 3. UP / ON OFF button 4. DOWN / DEFROST button 5. Diode No. 5 - when it is lit, it informs about the work of the compressor. During the blinking cycle, two blinks indicate that the continuous operation mode has been activated.
-
Page 10: Maintenance Of The Appliance
Users manual - Wall cooling shelf 3. MAINTENANCE OF THE APPLIANCE 3.1 CLEANING THE DEVICE. Attention! Before carrying out any maintenance, turn off the cooling rack from the mains (disconnect the plug from the socket by holding the socket with the other hand). Attention ! Protect the device from water. - Page 11 Users manual - Wall cooling shelf The device condenser is located at the bottom of the device. When cleaning the condensers, be especially careful !! . Attention! Do not touch the condenser part directly. Failure to follow the instructions may cause injury.
-
Page 12: Comments
Users manual - Wall cooling shelf 4. COMMENTS 1. Making repairs by the user on their own and not following the rules contained in the instruction manual will void the manufacturer’s warranty. 2. The equipment is not intended for use by persons (including children) with limited physical, mental and sensory ability, as well as persons who do not have knowledge of the device, unless it is supervised or in accordance with the instruction manual of the equipment provided by persons responsible for their use security. -
Page 13: Electrical Diagram
Users manual - Wall cooling shelf 5. ELECTRICAL DIAGRAM PJEZC - Temperature controller WG - Main switch WS - Illumination switch LS - Lighting (LED option) SM - Compressor motor M1 - Generator fan motor WP - Evaporator (option) PP - Evaporator sensor KK - Chamber sensor WT - Fan... - Page 14 Users manual - Wall cooling shelf NOTES ......................................................................................................................................................................................................................................................................................................................................................................................................................................................................................................................................................................................................................................................................................................................................................................
- Page 15 Users manual - Wall cooling shelf NOTES ......................................................................................................................................................................................................................................................................................................................................................................................................................................................................................................................................................................................................................................................................................................................................................................
Need help?
Do you have a question about the WKM335SN and is the answer not in the manual?
Questions and answers