Table of Contents
Advertisement
Quick Links
Advertisement
Table of Contents

Subscribe to Our Youtube Channel
Related Manuals for dymax DVC-345


Summary of Contents for dymax DVC-345
- Page 1 DVC-345 Valve Controller User Guide...
- Page 2 Please note that most dispensing and curing system applications are unique. Dymax does not warrant the fitness of the product for the intended application. Any warranty applicable to the product, its application, and use is strictly limited to that contained in the Dymax standard Conditions of Sale.
-
Page 3: Table Of Contents
General Safety Considerations ........5 Specific Safety Considerations ........5 Personal Protective Equipment ........5 Product Overview ............6 Description of the DVC-345 ..........6 Assembly and Setup ............7 Unpacking and Inspecting Your Shipment....7 Parts Included ..............7 System Interconnect ............ -
Page 4: Introduction
Introduction This guide describes how to use the Dymax DVC-345 digital valve controller (T11146). Sections in this guide describe how to assemble, use, and maintain the valve controller safely and efficiently. Intended Audience Dymax prepared this user guide for experienced process engineers, maintenance technicians, and manufacturing personnel. -
Page 5: General Safety Considerations
To learn about the safe handling and use of dispensing fluids, obtain and read the SDS for each fluid before using it. Dymax includes an SDS with each adhesive sold. SDS for Dymax products can also be requested through the Dymax website. -
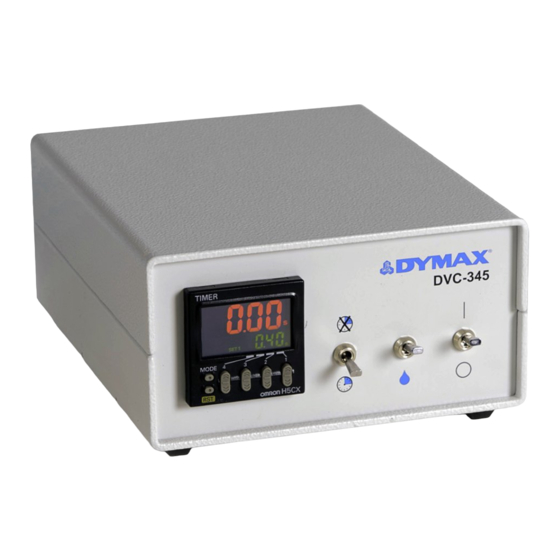
Page 6: Product Overview
Product Overview Description of the DVC-345 The DVC-345 digital valve controller provides a precise and settable time duration for controlling (opening and closing) a variety of dispense valves. This dispense controller features electronically controlled dispense time as well as DC operation. This ensures precise and repeatable shots with adjustable shot time durations of as little as 0.001... -
Page 7: Assembly And Setup
Open each box and check for equipment damage. If parts are damaged, notify the shipper and submit a claim for the damaged parts. Contact Dymax so that new parts can be shipped to you immediately. -
Page 8: System Interconnect
Plug the Foot Switch into the External Trigger Receptacle on the back of the Controller. Attach the Material Reservoir to the Dispensing Valve and the appropriate air supply Consult Dymax if you are unsure of this step. pressure to the Material Reservoir. - Page 9 Table 1. Dispensing Valve Plumbing Configurations Valve Diagram Plumbing Instructions Model 300: Single-acting, normally closed diaphragm AIR IN valve. Plug Port No. 1 (normally open) on the back of the controller and plumb Port No. 2 (normally closed) to the Air-In Port on the dispensing valve. Model 455: Single-acting, normally closed pinch valve.
-
Page 10: Operating The Controller
Operating the Controller Setting the Dispense Time The digital timer on the front of the controller uses up and down arrows to set the required dispense time. The time range is from 0.001 seconds to 9.999 seconds with a settable resolution of .001 seconds. Figure 4. -
Page 11: Spare Parts And Accessories
Foot Switch T14999 Power Supply T11624 Specifications Property Specification Part Numbers T11146 DVC-345 Digital Valve Controller Switch-mode auto-ranging power supply; includes four power plug adapters Power Requirements Input: 100-240V~, 50-60 Hz Output: 24V 0.35A − − − Air Pressure 60 psi [0.413 MPa] minimum/100 psi [0.689 MPa]... - Page 12 Figure 5. Controller Dimensions U S E R G U I D E D V C - 3 4 5 V A L V E C O N T R O L L E R...
-
Page 13: Declaration Of Conformity
Declaration of Conformity U S E R G U I D E D V C - 3 4 5 V A L V E C O N T R O L L E R... - Page 14 . Unauthorized repair, modification, or improper use of equipment may void your warranty benefits. The use of aftermarket replacement parts not supplied or approved by Dymax Corporation, will void any effective warranties and may result in damage to the equipment.
-
Page 15: Index
Safety, 5 Assembly and Setup, 7 Personal Protection Equipment, 5 Using Safe Operating Pressures, 5 Dimensions, 12 Setting the Dispense Time, 10 Dymax Contact Information, 4 Spare Parts and Accessories, Fluid Connections, 8 Specifications, 11 Help, 4 System Components, 6... - Page 16 © 2012-2021 Dymax Corporation. All rights reserved. All trademarks in this guide, except where noted, are the property of, or used under license by Dymax Corporation, U.S.A. The data contained in this bulletin is of a general nature and is based on laboratory test conditions. Dymax Europe GmbH does not warrant the data contained in this bulletin. Any warranty applicable to products, its application and use is strictly limited to that contained in Dymax Europe GmbH’s General Terms and Conditions of Sale published on our website.
Need help?
Do you have a question about the DVC-345 and is the answer not in the manual?
Questions and answers