Table of Contents
Advertisement
Quick Links
SP6953 Ridgid 1620RV0_SP6542.qxd 1/16/15 10:00 AM Page 1
WARNING:
!
To reduce the risk of injury, the user must read and understand the owner's manual
before using this product.
SAVE THIS MANUAL FOR FUTURE REFERENCE
Part No. SP6953
OWNER'S MANUAL
16 U.S. GALLON/ 60 LITER
PROFESSIONAL WET/DRY
BLOWER VAC
1620RV0
99 Washington Street
Melrose, MA 02176
Phone 781-665-1400
Toll Free 1-800-517-8431
Visit us at www.TestEquipmentDepot.com
Advertisement
Table of Contents

Related Manuals for RIDGID 1620RV


Summary of Contents for RIDGID 1620RV
- Page 1 SP6953 Ridgid 1620RV0_SP6542.qxd 1/16/15 10:00 AM Page 1 OWNER’S MANUAL 16 U.S. GALLON/ 60 LITER PROFESSIONAL WET/DRY BLOWER VAC 1620RV0 WARNING: To reduce the risk of injury, the user must read and understand the owner’s manual before using this product.
-
Page 2: Table Of Contents
SP6953 Ridgid 1620RV0_SP6542.qxd 1/16/15 10:00 AM Page 2 Table of Contents Section Page Section Page Introduction ..... . 4 Vacuuming Liquids ....10 Unpacking and Checking Emptying the Drum . - Page 3 SP6953 Ridgid 1620RV0_SP6542.qxd 1/16/15 10:00 AM Page 3 • To reduce the risk of injury from - Do not set down in liquid; electric accidental starting, unplug power cord shock could occur. before changing or cleaning filter. - Do not direct air at bystanders.
-
Page 4: Introduction
SP6953 Ridgid 1620RV0_SP6542.qxd 1/16/15 10:00 AM Page 4 Introduction This Wet/Dry Vac with Detachable Blower Read this owner’s manual to familiarize is intended for household use. It may be yourself with the product features and to used for vacuuming wet or dry media and understand the specific usage of your may be used as a blower. -
Page 5: Drum/Caster Foot Assembly
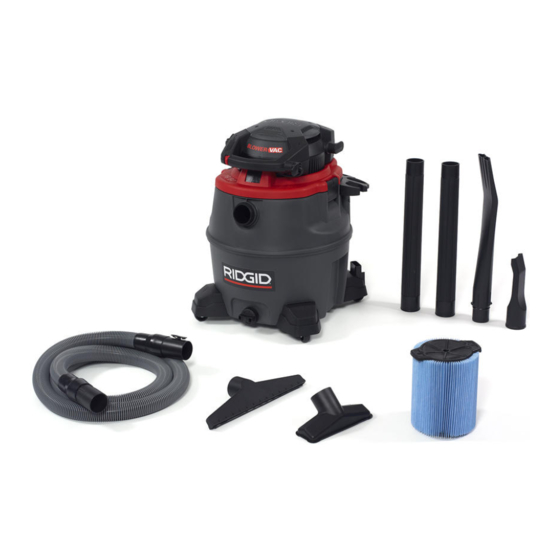
SP6953 Ridgid 1620RV0_SP6542.qxd 1/16/15 10:00 AM Page 5 Drum/Caster Foot Assembly If any parts are missing or damaged contact Customer Service. Rear Do not assemble until you have all the Drum Caster parts. Foot 1. Insert the front and rear caster feet into Front the bottom of drum as shown. -
Page 6: Accessory Storage Holder
SP6953 Ridgid 1620RV0_SP6542.qxd 1/16/15 10:00 AM Page 6 Accessory Storage Holder Installing Accessory Storage Removing Accessory Storage Holder Holder 1. Position rods of accessory storage Push in both accessory storage holder holder directly over accessory rod clips and then pull straight up on rods of receptacles in dust drum. -
Page 7: Wet/Dry Vac Assembly
SP6953 Ridgid 1620RV0_SP6542.qxd 1/16/15 10:00 AM Page 7 Accessory Storage (continued) Cord Wrap Detachable When vacuuming is complete, unplug the Blower cord and wrap it around the detachable blower as shown. Cord Wrap Power Cord Cord Swivel Wet/Dry Vac Assembly 1. -
Page 8: Positioning Detachable Blower (Power Head Assembly)
SP6953 Ridgid 1620RV0_SP6542.qxd 1/16/15 10:00 AM Page 8 Positioning Detachable Blower (Power Head Assembly) 1. To remove the detachable blower from 3. Lightly press down on the carry handle the lid assembly, press down on the of the detachable blower until you detachable blower latch under the hear the “snap”... -
Page 9: Operation
SP6953 Ridgid 1620RV0_SP6542.qxd 1/16/15 10:00 AM Page 9 Operation WARNING: To reduce the risk of fire, explosion, or damage to Vac: • Do not leave Vac running while unattended - you may fail to notice important signs indicating abnormal operation such as loss of suction, debris/liquid exiting the exhaust, or abnormal motor noises. -
Page 10: Vacuuming Dry Materials
SP6953 Ridgid 1620RV0_SP6542.qxd 1/16/15 10:00 AM Page 10 Operation (continued) Vacuuming Dry Materials Emptying the Drum 1. The filter must always be in correct WARNING: To reduce the risk of position at all times to avoid leaks and injury from accidental starting, possible damage to Vac. -
Page 11: Moving The Wet/Dry Vac
SP6953 Ridgid 1620RV0_SP6542.qxd 1/16/15 10:00 AM Page 11 Operation (continued) Moving the Wet/Dry Vac 1. Familiarize yourself with the detachable blower portion of your Wet/Dry Vac. Should it become necessary to pick the Vac up to move it, the handles on the 2. -
Page 12: Using The Detachable Blower
SP6953 Ridgid 1620RV0_SP6542.qxd 1/16/15 10:00 AM Page 12 Operation (continued) Using the Detachable Blower - OR - for “Blowing” 2. The Wet/Dry Vac may also be used for blowing using the seven-foot hose Two suggested methods of using the supplied with the Wet/Dry Vac. Install... -
Page 13: Detachable Blower Intake
SP6953 Ridgid 1620RV0_SP6542.qxd 1/16/15 10:00 AM Page 13 Maintenance Detachable Blower Intake WARNING: To reduce the risk of injury from accidental starting, unplug power cord before changing or cleaning filter or foam pad. After using the detachable blower of your... -
Page 14: Maintenance
SP6953 Ridgid 1620RV0_SP6542.qxd 1/16/15 10:00 AM Page 14 Maintenance (continued) Filter Filter Installation: 1. Carefully slide the Qwik Lock™ filter over the filter cage and press down on WARNING: To reduce the risk of injury from accidental starting, the outside edge of the filter until the... - Page 15 SP6953 Ridgid 1620RV0_SP6542.qxd 1/16/15 10:00 AM Page 15 Maintenance (continued) Cleaning A Dry Filter 1. Pour 1 gallon of water and 1 teaspoon chlorine bleach into the drum. 1. Light cleaning of some dry debris can 2. Let solution stand for 20 minutes,...
- Page 16 SP6953 Ridgid 1620RV0_SP6542.qxd 1/16/15 10:00 AM Page 16 Maintenance (continued) Storage Casters Before storing your Vac, the drum should If your casters are noisy, you may put a be emptied and cleaned. The cord and drop of oil on the roller shaft to make hose should be stored as described in them quieter.
- Page 17 SP6953 Ridgid 1620RV0_SP6542.qxd 1/16/15 10:01 AM Page 18 Repair Parts 16 Gallon Professional Wet/Dry Blower Vac Model Number 1620RV0 WARNING SERVICING OF DOUBLE-INSULATED WET/DRY VAC In a double-insulated Wet/Dry Vac, two systems of insulation are provided instead of grounding. No grounding means is provided on a double-insulated appliance, nor should a means for grounding be added.
-
Page 18: Repair Parts
SP6953 Ridgid 1620RV0_SP6542.qxd 1/16/15 10:01 AM Page 19 Repair Parts (continued) 16 Gallon Professional Wet/Dry Blower Vac Model Number 1620RV0...
Need help?
Do you have a question about the 1620RV and is the answer not in the manual?
Questions and answers