Table of Contents
Advertisement
Available languages
Available languages
Quick Links
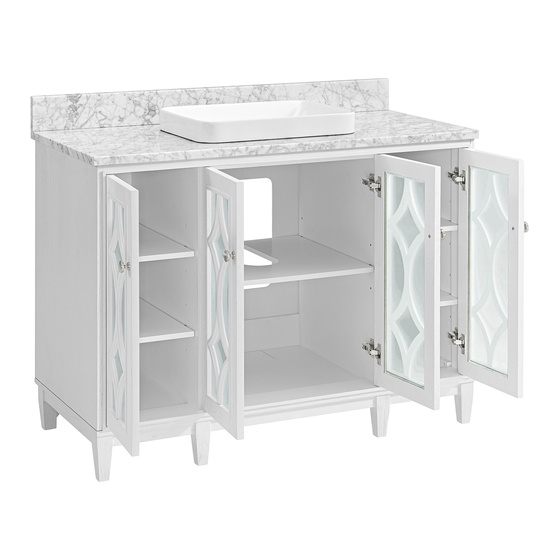
48-IN VANITY WITH TOP
MODEL #
1591VA-48-241-900-SR; 1591VA-48-241-900-UM; 1591VA-48-241-907-SR;
1591VA-48-241-907-UM; 1591VA-48-241-926-SR; 1591VA-48-241-926-UM;
1591VA-48-247-900-SR; 1591VA-48-247-900-UM; 1591VA-48-247-907-SR;
1591VA-48-247-907-UM; 1591VA-48-247-926-SR; 1591VA-48-247-926-UM
OPTION 1
(Semi-Recessed Sink)
MODEL NUMBER
1591VA-48-241-900-SR
1591VA-48-241-900-UM
1591VA-48-241-907-SR
1591VA-48-241-907-UM
1591VA-48-241-926-SR
1591VA-48-241-926-UM
1591VA-48-247-900-SR
1591VA-48-247-900-UM
1591VA-48-247-907-SR
1591VA-48-247-907-UM
1591VA-48-247-926-SR
1591VA-48-247-926-UM
ATTACH YOUR RECEIPT HERE
Serial Number__________________ Purchase Date__________________
Questions, problems, missing parts? Before returning to your retailer, call our customer service
department at 1-855-571-1044, 9 a.m. - 5 p.m., EST, Monday - Friday.
DESCRIPTION
Kathy Ireland Collection 1591 48 in Vanity White Painted Oak Veneer/Semi-recessed Carrara Marble Top
Kathy Ireland Collection 1591 48 in Vanity White Painted Oak Veneer/Carrara Marble Top
Kathy Ireland Collection 1591 48 in Vanity White Painted Oak Veneer/Semi-recessed Pure White Top
Kathy Ireland Collection 1591 48 in Vanity White Painted Oak Veneer/Pure White Top
Kathy Ireland Collection 1591 48 in Vanity White Painted Oak Veneer/Semi-recessed Engineered Calacatta Top
Kathy Ireland Collection 1591 48 in Vanity White Painted Oak Veneer/Engineered Calacatta Top
Kathy Ireland Collection 1591 48 in Vanity Cashmere Oak Veneer/Semi-recessed Carrara Marble Top
Kathy Ireland Collection 1591 48 in Vanity Cashmere Oak Veneer/Carrara Marble Top
Kathy Ireland Collection 1591 48 in Vanity Cashmere Oak Veneer/Semi-recessed Pure White Top
Kathy Ireland Collection 1591 48 in Vanity Cashmere Oak Veneer/Pure White Top
Kathy Ireland Collection 1591 48 in Vanity Cashmere Oak Veneer/Semi-recessed Engineered Calacatta Top
Kathy Ireland Collection 1591 48 in Vanity Cashmere Oak Veneer/Engineered Calacatta Top
OPTION 2
(Undermount Sink)
OR
1
Español p. 25
Advertisement
Chapters
Table of Contents

Related Manuals for Kathy Ireland 1591VA-48-241-900-SR


Summary of Contents for Kathy Ireland 1591VA-48-241-900-SR
- Page 1 (Undermount Sink) MODEL NUMBER DESCRIPTION 1591VA-48-241-900-SR Kathy Ireland Collection 1591 48 in Vanity White Painted Oak Veneer/Semi-recessed Carrara Marble Top 1591VA-48-241-900-UM Kathy Ireland Collection 1591 48 in Vanity White Painted Oak Veneer/Carrara Marble Top 1591VA-48-241-907-SR Kathy Ireland Collection 1591 48 in Vanity White Painted Oak Veneer/Semi-recessed Pure White Top...
-
Page 2: Table Of Contents
TABLE OF CONTENTS FOR OPTION 1 (Semi-Recessed Sink) Package Contents...........................3 Hardware Contents..........................3 Safety Instructions...........................3 Preparation............................4 Assembly or Installation Instructions....................4 Change Door Panels (Optional)....................10 Care and Maintenance........................11 Warranty............................11 Replacement Parts List.........................12 TABLE OF CONTENTS FOR OPTION 2 (Undermount Sink) Package Contents.........................14 Hardware Contents........................14 Safety Instructions.........................14 Preparation............................15... -
Page 3: Package Contents
PACKAGE CONTENTS (Semi-Recessed Sink) PART DESCRIPTION QUANTITY CARTON Vanity Box 2 of 3 Backsplash Box 1 of 3 Sink Template Sink Box 3 of 3 Left Door (preassembled to vanity (A)) Right Door (preassembled to vanity (A)) Center Shelf Box 2 of 3 Left Shelf Right Shelf Floor Plumbing Cutout Lid... -
Page 4: Preparation
PREPARATION Before beginning assembly of product, make sure all parts are present. Compare parts with package contents list and hardware contents list. If any part is missing or damaged, do not attempt to assemble the product. Estimated Installation Time: 45 minutes (24 hours for silicone caulk to dry). Tools Required for Installation (not included): Phillips screwdriver, utility knife or scissors, silicone caulk, power drill with drill bit, measuring tape, level INSTALLATION INSTRUCTIONS (Semi-Recessed Sink) - Page 5 INSTALLATION INSTRUCTIONS (Semi-Recessed Sink) 2. Take out the top (B) and backsplash (C) according to the steps indicated by the drawings on the right, and place them face up onto a scratch free surface such as a Foam sheet foam sheet that came in the packaging. Remove the top foam sheet Remove the backsplash and place it on a scratch free surface...
- Page 6 INSTALLATION INSTRUCTIONS (Semi-Recessed Sink) 4. Put the sink template (E) on the top (B). The hole in the cardboard needs to be aligned with the hole in the stone top. Make sure the sink template and stone top are flush along the back edge. 5.
- Page 7 INSTALLATION INSTRUCTIONS (Semi-Recessed Sink) 6. With the help of another adult, Gently lower the sink onto the stone top using even pressure to set the sink properly. Make sure the sink over-flow hole is at the front of wood cabinet. If some silicone caulk has over-flowed please clean it up at that time with water.
- Page 8 INSTALLATION INSTRUCTIONS (Semi-Recessed Sink) 8. The back of the vanity is open for accessibility for drain(s) and water line(s) hookup. If your plumbing comes out of the back wall, insert the floor plumbing cutout lid (K), as shown in Illustration 8. This will close the hole and increase your storage space.
- Page 9 INSTALLATION INSTRUCTIONS (Semi-Recessed Sink) 10. If you need to adjust the doors, do so in the following manner. To adjust door up or down, loosen screws (a) on both hinges, adjust door, and retighten screws. To adjust door left or right, turn screws (b) on both hinges, in and out. To adjust door in or out, loosen screws (c) on both hinges, adjust door, and retighten screws.
-
Page 10: Change Door Panels (Optional)
CHANGE DOOR PANELS (OPTIONAL) (SEMI-RECESSED SINK) The pre-installed glass door panels can be switched out with the included wood door panels (L). 1. Remove the silicone trim along the outer edges of the glass panel on the inside of the door. Start at a corner and pull to remove the four pieces. -
Page 11: Care And Maintenance
CARE AND MAINTENANCE • Dust the vanity regularly with a soft, non-lint producing cloth or household dusting product. • You can clean the vanity with a gentle, non-abrasive household cleaner. • Make sure to dry the wood immediately with a soft cloth or towel. •... -
Page 12: Replacement Parts List
REPLACEMENT PARTS LIST FOR 1591VA-48-241-SR (Semi-Recessed Sink) For replacement parts, call our customer service department at 1-855-571-1044, 9 a.m. - 5 p.m., EST, Monday - Friday. PART DESCRIPTION PART# Complete Set 48" Carrara Marble Top 3500VT-48-900 Complete Set 48" Pure White Top 3500VT-48-907 Complete Set 48"... - Page 13 REPLACEMENT PARTS LIST FOR 1591VA-48-247-SR (Semi-Recessed Sink) For replacement parts, call our customer service department at 1-855-571-1044, 9 a.m. - 5 p.m., EST, Monday - Friday. PART DESCRIPTION PART# Complete Set 48" Carrara Marble Top 3500VT-48-900 Complete Set 48" Pure White Top 3500VT-48-907 Complete Set 48"...
-
Page 14: Package Contents
PACKAGE CONTENTS (Undermount Sink) PART DESCRIPTION QUANTITY CARTON Vanity Box 2 of 3 Box 1 of 3 Backsplash Sink Box 3 of 3 Left Door (preassembled to vanity (A)) Right Door (preassembled to vanity (A)) Center Shelf Box 2 of 3 Left Shelf Right Shelf Floor Plumbing Cutout Lid... -
Page 15: Preparation
PREPARATION Before beginning assembly of product, make sure all parts are present. Compare parts with package contents list and hardware contents list. If any part is missing or damaged, do not attempt to assemble the product. Estimated Installation Time: 45 minutes (24 hours for silicone caulk to dry). Tools Required for Installation (not included): Phillips screwdriver, utility knife or scissors, silicone caulk, power drill with drill bit, measuring tape, level INSTALLATION INSTRUCTIONS (Undermount Sink) - Page 16 INSTALLATION INSTRUCTIONS (Undermount Sink) 2. Take out the top (B) and backsplash (C) according to the steps indicated by the drawings on the right, and place them face down onto a scratch free surface such as a Foam sheet foam sheet that came in the packaging. Remove the top foam sheet Remove the backsplash and place it on a scratch free surface...
- Page 17 INSTALLATION INSTRUCTIONS (Undermount Sink) 4. Screw bolts (HH) into the threaded holes of stone top (B). Hardware Used Bolt 5. Lower the sink brackets (II) over the bolts (HH) and allow to rest on the sink lip. Adjust location of bracket to firmly grasp sink lip. Lower lock washers (KK) over bolts (HH) and secure with nuts (JJ).
- Page 18 INSTALLATION INSTRUCTIONS (Undermount Sink) Helpful tip: it may be easier to install your choice of faucet (not included) before securing the vanity top (B) to vanity base (A). 6. To install the Top (B) to the vanity (A). Apply silicone caulk to the top edge of the wood cabinet.
- Page 19 INSTALLATION INSTRUCTIONS (Undermount Sink) 8. The back of the vanity is open for accessibility for drain(s) and water line(s) hookup. If your plumbing comes out of the back wall, insert the floor plumbing cutout lid (K), as shown in Illustration 8. This will close the hole and increase your storage space.
- Page 20 INSTALLATION INSTRUCTIONS (Undermount Sink) 10. If you need to adjust the doors, do so in the following manner. To adjust door up or down, loosen screws (a) on both hinges, adjust door, and retighten screws. To adjust door left or right, turn screws (b) on both hinges, in and out. To adjust door in or out, loosen screws (c) on both hinges, adjust door, and retighten screws.
-
Page 21: Change Door Panels (Optional)
CHANGE DOOR PANELS (OPTIONAL) (Undermount Sink) The pre-installed glass door panels can be switched out with the included wood door panels (L). 1. Remove the silicone trim along the outer edges of the glass panel on the inside of the door. Start at a corner and pull to remove the four pieces. -
Page 22: Care And Maintenance
CARE AND MAINTENANCE • Dust the vanity regularly with a soft, non-lint producing cloth or household dusting product. • You can clean the vanity with a gentle, non-abrasive household cleaner. • Make sure to dry the wood immediately with a soft cloth or towel. •... -
Page 23: Replacement Parts List
REPLACEMENT PARTS LIST FOR 1591VA-48-241-UM (Undermount Sink) For replacement parts, call our customer service department at 1-855-571-1044, 9 a.m. - 5 p.m., EST, Monday - Friday. PART DESCRIPTION PART# Complete Set 48" Carrara Marble Top 2500VT-48-900 Complete Set 48" Pure White Top 2500VT-48-907 Complete Set 48"... - Page 24 REPLACEMENT PARTS LIST FOR 1591VA-48-247-UM (Undermount Sink) For replacement parts, call our customer service department at 1-855-571-1044, 9 a.m. - 5 p.m., EST, Monday - Friday. PART DESCRIPTION PART# Complete Set 48" Carrara Marble Top 2500VT-48-900 Complete Set 48" Pure White Top 2500VT-48-907 Complete Set 48"...
- Page 25 (LAVABO SEMIEMPOTRABLE) (LAVABO EMPOTRABLE) NÚMERO DE MODELO DESCRIPCIÓN Kathy Ireland Collection 1591 – Tocador de 48 pulg. chapado de roble pintado en blanco/superficie de mármol de Carrara 1591VA-48-241-900-SR semiempotrada 1591VA-48-241-900-UM Kathy Ireland Collection 1591 – Tocador de 48 pulg. chapado de roble pintado en blanco/superficie de mármol de Carrara Kathy Ireland Collection 1591 –...
- Page 26 TABLA DE CONTENIDOS PARA LA OPCIÓN 1 (LAVABO SEMIEMPOTRABLE) Contenido del paquete........................27 Aditamentos.........................27 Información de seguridad......................27 Preparación..........................28 Instrucciones de ensamblaje o instalación..................28 Cambio de los paneles de puertas (opcional)................34 Cuidado y mantenimiento......................35 Garantía............................35 Lista de piezas de repuesto......................36 TABLA DE CONTENIDOS PARA LA OPCIÓN 2 (LAVABO EMPOTRABLE) Contenido del paquete........................38 Aditamentos.........................38 Información de seguridad......................38...
-
Page 27: Contenido Del Paquete
CONTENIDO DEL PAQUETE (LAVABO SEMIEMPOTRABLE) PIEZA DESCRIPCIÓN CANTIDAD CARTÓN Tocador Caja 2 de 3 Cubierta Protector contra salpicaduras Caja 1 de 3 Plantilla de lavamanos Lavabo Caja 3 de 3 Puerta izquierda (preensamblada al tocador (A)) Puerta derecha (preensamblada al tocador (A)) Estante central Caja 2 de 3 Estante izquierdo... -
Page 28: Preparación
PREPARACIÓN Antes de comenzar a ensamblar el producto, asegúrese de tener todas las piezas. Compare las piezas con la lista del contenido del paquete y la lista de aditamentos. No intente ensamblar el producto si falta alguna pieza o si estas están dañadas. Temps d’installation approximatif : 45 minutes (24 heures pour le séchage du calfeutrant à... - Page 29 INSTRUCCIONES DE INSTALACIÓN (LAVABO SEMIEMPOTRABLE) 2. Quite la parte superior (B) y el protector de pared (C) de acuerdo con los pasos indicados en los diagramas de la derecha, y colóquelos boca arriba sobre una superficie lisa, como la Lámina de espuma lámina de espuma incluida en el paquete.
- Page 30 INSTRUCCIONES DE INSTALACIÓN (LAVABO SEMIEMPOTRABLE) 4. Coloque la plantilla del lavamanos (E) en la parte superior (B). El orificio en el cartón debe estar alineado con el orificio en la cubierta de piedra. Asegúrese de que la plantilla del lavamanos y la cubierta de piedra estén alineadas a lo largo del borde posterior.
- Page 31 INSTRUCCIONES DE INSTALACIÓN (LAVABO SEMIEMPOTRABLE) 6. Con la ayuda de otro adulto, baje suavemente el lavamanos sobre la cubierta de piedra aplicando una presión uniforme para colocarlo de forma correcta. Asegúrese de que el orificio de desborde del lavamanos esté en la parte delantera del gabinete de madera.
- Page 32 INSTRUCCIONES DE INSTALACIÓN (LAVABO SEMIEMPOTRABLE) 8. La parte posterior del tocador está abierta para contar con accesibilidad a las conexiones de drenajes y líneas de agua. Si la plomería sale de la pared posterior, inserte la tapa de corte de plomería del piso (K), como se muestra en la Ilustración 8.
- Page 33 INSTRUCCIONES DE INSTALACIÓN (LAVABO SEMIEMPOTRABLE) 10. Si necesita ajustar las puertas, hágalo de la siguiente manera. Para ajustar las puertas hacia arriba o abajo, afloje los tornillos (a) en ambas bisagras, ajuste la puerta y vuelva a apretar los tornillos. Para ajustar las puertas hacia la derecha o la izquierda, gire los tornillos en ambas bisagras (b) hacia adentro y afuera.
-
Page 34: Cambio De Los Paneles De Puertas (Opcional)
CAMBIO DE LOS PANELES DE PUERTAS (OPCIONAL) (LAVABO SEMIEMPOTRABLE) Los paneles de puerta de vidrio preinstalados se pueden cambiar con los paneles de puerta de madera (L) incluidos. 1. Retire la moldura de silicona de los bordes exteriores del panel de vidrio en el interior de la puerta. -
Page 35: Cuidado Y Mantenimiento
CUIDADO Y MANTENIMIENTO • Limpie el tocador regularmente con un paño suave que no deje pelusas o con un producto de limpieza doméstico. • Puede limpiar el tocador con un limpiador doméstico suave no abrasivo. • Asegúrese de secar la madera inmediatamente con un paño o una toalla suave. •... -
Page 36: Lista De Piezas De Repuesto
LISTA DE PIEZAS DE REPUESTO PARA 1591VA-48-241-SR (LAVABO SEMIEMPOTRABLE) Para obtener piezas de repuesto, llame a nuestro Departamento de Servicio al Cliente all 1-855-571-1044, de lunes a viernes de 9:00 a.m. a 5:00 p.m., hora del Este. PIEZA DESCRIPCIÓN PIEZA # Juego completo de cubierta de mármol de Carrara de 48"... - Page 37 LISTA DE PIEZAS DE REPUESTO PARA 1591VA-48-247-SR (LAVABO SEMIEMPOTRABLE) Para obtener piezas de repuesto, llame a nuestro Departamento de Servicio al Cliente all 1-855-571-1044, de lunes a viernes de 9:00 a.m. a 5:00 p.m., hora del Este. PIEZA DESCRIPCIÓN PIEZA # Juego completo de cubierta de mármol de Carrara de 48"...
-
Page 38: Contenido Del Paquete
CONTENIDO DEL PAQUETE (LAVABO EMPOTRABLE) PIEZA DESCRIPCIÓN CANTIDAD CARTÓN Tocador Caja 2 de 3 Cubierta Caja 1 de 3 Protector contra salpicaduras Lavabo Caja 3 de 3 Puerta izquierda (preensamblada al tocador (A)) Puerta derecha (preensamblada al tocador (A)) Estante central Caja 2 de 3 Estante izquierdo Estante derecho... -
Page 39: Preparación
PREPARACIÓN Antes de comenzar a ensamblar el producto, asegúrese de tener todas las piezas. Compare las piezas con la lista del contenido del paquete y la lista de aditamentos. No intente ensamblar el producto si falta alguna pieza o si estas están dañadas. Temps d’installation approximatif : 45 minutes (24 heures pour le séchage du calfeutrant à... - Page 40 INSTRUCCIONES DE INSTALACIÓN (LAVABO EMPOTRABLE) 2. Quite la parte superior (B) y el protector de pared (C) de acuerdo con los pasos indicados por los diagramas de la derecha, y colóquelos boca abajo sobre una superficie lisa, como la Lámina de espuma lámina de espuma incluida en el paquete.
- Page 41 INSTRUCCIONES DE INSTALACIÓN (LAVABO EMPOTRABLE) 4. Atornille los pernos (HH) en los orificios roscados de la cubierta de piedra (B). Aditamentos utilizados Perno 5. Coloque los soportes para fregadero (II) sobre los pernos (HH) y déjelos reposar sobre el borde del fregadero.
- Page 42 INSTRUCCIONES DE INSTALACIÓN (LAVABO EMPOTRABLE) Consejo útil: puede que sea más fácil que instale el grifo que ha elegido (no incluido) antes de asegurar la encimera (B) al armario de lavabo (A). 6. Para instalar la encimera (B) al armario de lavabo (A).
- Page 43 INSTRUCCIONES DE INSTALACIÓN (LAVABO EMPOTRABLE) 8. La parte posterior del tocador está abierta para contar con accesibilidad a las conexiones de drenajes y líneas de agua. Si la plomería sale de la pared posterior, inserte la tapa de corte de plomería del piso (K), como se muestra en la Ilustración 8.
- Page 44 INSTRUCCIONES DE INSTALACIÓN (LAVABO EMPOTRABLE) 10. Si necesita ajustar las puertas, hágalo de la siguiente manera. Para ajustar las puertas hacia arriba o abajo, afloje los tornillos (a) en ambas bisagras, ajuste la puerta y vuelva a apretar los tornillos. Para ajustar las puertas hacia la derecha o la izquierda, gire los tornillos en ambas bisagras (b) hacia adentro y afuera.
-
Page 45: Cambio De Los Paneles De Puertas (Opcional)
CAMBIO DE LOS PANELES DE PUERTAS (OPCIONAL) (LAVABO EMPOTRABLE) Los paneles de puerta de vidrio preinstalados se pueden cambiar con los paneles de puerta de madera (L) incluidos. 1. Retire la moldura de silicona de los bordes exteriores del panel de vidrio en el interior de la puerta. -
Page 46: Cuidado Y Mantenimiento
CUIDADO Y MANTENIMIENTO • Limpie el tocador regularmente con un paño suave que no deje pelusas o con un producto de limpieza doméstico. • Puede limpiar el tocador con un limpiador doméstico suave no abrasivo. • Asegúrese de secar la madera inmediatamente con un paño o una toalla suave. •... -
Page 47: Lista De Piezas De Repuesto
LISTA DE PIEZAS DE REPUESTO PARA 1591VA-48-241-UM (LAVABO EMPOTRABLE) Para obtener piezas de repuesto, llame a nuestro Departamento de Servicio al Cliente all 1-855-571-1044, de lunes a viernes de 9:00 a.m. a 5:00 p.m., hora del Este. PIEZA DESCRIPCIÓN PIEZA # Juego completo de cubierta de mármol de Carrara de 48"... - Page 48 LISTA DE PIEZAS DE REPUESTO PARA 1591VA-48-247-UM (LAVABO EMPOTRABLE) Para obtener piezas de repuesto, llame a nuestro Departamento de Servicio al Cliente all 1-855-571-1044, de lunes a viernes de 9:00 a.m. a 5:00 p.m., hora del Este. PIEZA DESCRIPCIÓN PIEZA # Juego completo de cubierta de mármol de Carrara de 48"...
Need help?
Do you have a question about the 1591VA-48-241-900-SR and is the answer not in the manual?
Questions and answers