
Related Manuals for ETNA KIF780 Series


Summary of Contents for ETNA KIF780 Series
- Page 1 GEBRUIKSAANWIJZING INSTRUCTIONS FOR USE INDUCTIEKOOKPLAAT INDUCTION HOB KIF780 -- KIF790 --...
- Page 2 Handleiding NL 3 - NL 22 Manual EN 3 - EN 22 Gebruikte pictogrammen - Pictograms used Belangrijk om te weten - Important information NL 4...
-
Page 3: Table Of Contents
INHOUDSOPGAVE Uw inductiekookplaat Inleiding Beschrijving Bedieningspaneel Meldingen op het display Veiligheid Temperatuurbeveiliging Kookduurbegrenzer Voor het eerste gebruik Gebruik van de aanraaktoetsen en de schuifregelaar Inductiegeluiden Geschikte pannen Pandetectie Vermogen instellen Kookinstellingen Bediening Inschakelen en vermogen instellen Functie ‘Low range’ Boostfunctie Klaar met koken Pandetectiesymbool Bridge-inductiekookzones koppelen... -
Page 4: Uw Inductiekookplaat
UW INDUCTIEKOOKPLAAT Inleiding Gefeliciteerd met uw keuze voor dit toestel. In het ontwerp van dit product heeft eenvoudige bediening en optimale gebruiksvriendelijkheid centraal gestaan. In deze handleiding leest u hoe u dit toestel het best kunt gebruiken. Naast informatie over de bediening, vindt u hier ook achtergrondinformatie die u tijdens het gebruik van het toestel van pas kan komen. -
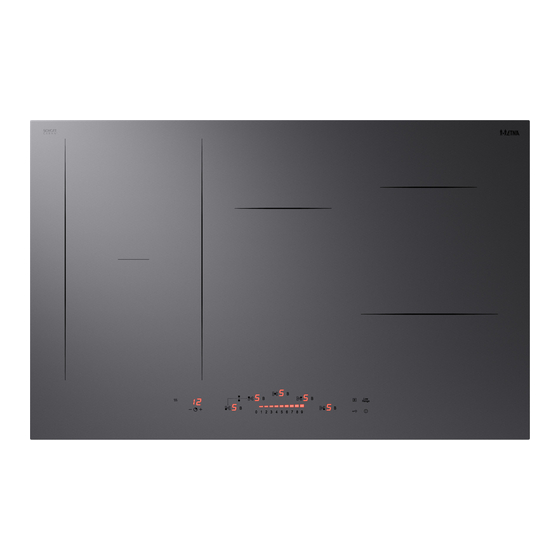
Page 5: Beschrijving
UW INDUCTIEKOOKPLAAT Beschrijving KIF780 KIF780DS KIF790 1. Bridge-inductiekookzone 210x180 mm / 2,2 kW - 3,6 kW (boost) 2. Kookzone ø 145 mm / 1,2 kW - 1,8 kW (boost) 3. Kookzone ø 210 mm / 2,2 kW - 3,6 kW (boost) 4. -
Page 6: Bedieningspaneel
UW INDUCTIEKOOKPLAAT Bedieningspaneel 5 6 7 5 6 7 5 6 7 1. Warmhoudtoets 2. Timerdisplay met indicatielampjes 3. Mintoets ‘-’ timer 4. Plustoets ‘+’ timer 5. Selectietoets kookzone 6. Kookzonedisplay 7. Boosttoets 8. Indicatielampje bridge-inductiekookzone 9. Schuifregelaar 10. Pauzetoets 11. -
Page 7: Meldingen Op Het Display
UW INDUCTIEKOOKPLAAT Meldingen op het display Display Beschrijving Vermogensniveau ‘0’ voor een kookzone. Ingesteld vermogensniveau van een kookzone: 1 = laag, 9 = hoog. Ingesteld vermogensniveau in ‘Low range’ van een kookzone: L1 = laag, L9 = gemiddeld. Boostfunctie actief. Geen (geschikte) pan op de kookzone (pandetectiesymbool). -
Page 8: Veiligheid
VEILIGHEID Lees eerst de afzonderlijke veiligheidsinstructies voordat u het apparaat in gebruik neemt! Als de kookplaat voor de eerste keer op het elektriciteitsnet wordt aangesloten of na een stroomstoring is de vergrendelfunctie actief. Raak eerst de vergrendeltoets aan totdat het indicatielampje uit gaat. Nu kunt u de kookplaat inschakelen. Temperatuurbeveiliging Een sensor controleert continu de temperatuur van bepaalde onderdelen van de kookplaat. -
Page 9: Voor Het Eerste Gebruik
VOOR HET EERSTE GEBRUIK Gebruik van de aanraaktoetsen en de schuifregelaar Plaats uw vingertop plat op een toets of op de schuifregelaar voor het beste resultaat. U hoeft geen druk uit te voeren. De aanraaktoetsen reageren alleen op lichte druk van een vingertop. Bedien de toetsen niet met andere objecten. -
Page 10: Pandetectie
VOOR HET EERSTE GEBRUIK Minimale pandiameter • De minimale diameter van de panbodem: 90 mm voor een kookzone ø 145 mm ▷ ▷ 110 mm voor een kookzone ø 210 mm 110 mm voor een kookzone 210x180 mm ▷ 210 mm voor gekoppelde kookzones 210 x 380 mm ▷... -
Page 11: Kookinstellingen
VOOR HET EERSTE GEBRUIK verlaagd. In het display van de kookzone die in vermogen wordt verlaagd wordt 3 seconden afwisselend het vermogen en ‘r’ getoond en er klinkt een geluidssignaal; het vermogen wordt dan automatisch verlaagd naar het hoogste beschikbare vermogen. De zones links voor/links achter en de zones op dezelfde fase beïnvloeden elkaar. -
Page 12: Bediening
BEDIENING Lees het hoofdstuk ‘Voor het eerste gebruik’ zorgvuldig door voordat u begint met koken. Dit voorkomt onjuist gebruik van de kookplaat. Inschakelen en vermogen instellen Zorg ervoor dat de onderzijde van de pan en het oppervlak van de kookzone schoon en droog zijn. -
Page 13: Boostfunctie
BEDIENING 5. Gebruik de schuifregelaar om de gewenste stand in te stellen. De kookzone start automatisch op het ingestelde niveau. ▷ Alle displays worden weer fel verlicht. ▷ 6. Stel een hoger of lager vermogen in door de kookzone te selecteren met de selectietoets en de schuifregelaar te gebruiken. -
Page 14: Bridge-Inductiekookzones Koppelen
BEDIENING Bridge-inductiekookzones koppelen De Bridge inductie zones kunnen aan elkaar gekoppeld worden. Hierdoor ontstaat één grote zone die bijvoorbeeld kan worden gebruikt voor de grillplaat of een grote vispan op hetzelfde vermogen. De pan moet groot genoeg zijn om het midden van de voorste en achterste kookzones te bedekken. -
Page 15: Vergrendelfunctie
BEDIENING Raak de kookzonetoets aan om de ingestelde tijd te bekijken voor deze kookzone. Het indicatielampje bij de timer van de betreffende kookzone en de ingestelde tijd knipperen. Gebruik de mintoets ‘-’ of plustoets ‘+’ van de timer om de ingestelde tijd te wijzigen. Raak de kookzonetoets aan en raak dan tegelijk de mintoets ‘-’... -
Page 16: De Warmhoudfunctie Inschakelen
BEDIENING De warmhoudfunctie inschakelen Gebruik deze functie om voedsel na het koken warm te houden (op ongeveer 72 °C). Het is ook mogelijk om met deze functie eten op te warmen (tot ongeveer 72 °C). • Zo wordt voorkomen dat vloeistoffen overstromen en aan de bodem van de pan branden. •... -
Page 17: Pauzefunctie
BEDIENING 1. Schakel de kookplaat in en selecteer de gewenste kookzone. 2. Raak de schuifregelaar ten minste 3 seconden op het gewenste niveau aan (van 1 t/m 8). In het display verschijnt een ‘A’ afgewisseld met het geselecteerde vermogensniveau. ▷ ▷... -
Page 18: Vermogensbegrenzer
VERMOGENSBEGRENZER Vermogensbegrenzer Het instellen van de vermogensbegrenzer mag alleen worden uitgevoerd door een erkende en gekwalificeerde installateur. Lees de veiligheidsvoorschriften en de installatie-instructies zorgvuldig door. De kookplaat is voorzien van een vermogensbegrenzer. Als het totale vermogen van de actieve kookzones het maximaal beschikbare vermogen overschrijdt, wordt het vermogen automatisch verlaagd. -
Page 19: Onderhoud
ONDERHOUD Reiniging Dagelijkse reiniging • Hoewel overgekookt voedsel niet kan inbranden in het glas, verdient het aanbeveling de kookplaat direct na gebruik schoon te maken. • Voor de dagelijkse reiniging kunt u het best een vochtige doek met een mild reinigingsmiddel gebruiken. -
Page 20: Problemen Oplossen
PROBLEMEN OPLOSSEN Algemeen Schakel de kookplaat onmiddellijk uit als u een barst in het glas ziet (hoe klein ook). Haal de stekker uit het stopcontact of zet de (automatische) zekering(en) in de meterkast uit. Bij een permanente aansluiting zet u de stroomtoevoer op nul. Neem contact op met de serviceafdeling. Probleemoplossingstabel Als het toestel niet naar behoren werkt, betekent dit niet altijd dat het defect is. - Page 21 PROBLEMEN OPLOSSEN Symptoom Mogelijke oorzaak Oplossing Bij het inschakelen van Foutieve elektrische Laat de elektrische de kookplaat slaat er een aansluiting. aansluiting controleren. stop door. In het display van de De vergrendelfunctie is actief. Deactiveer de timer wordt symbool Lo vergrendelfunctie.
- Page 22 PROBLEMEN OPLOSSEN Foutcodes interne generator Code Beschrijving Oorzaak Oplossing Eén zijde krijgt Aansluitfout. Controleer de aansluiting. geen voedings- spanning. Voedingspanning te Aansluitfout. Controleer de aansluiting. hoog. Generator Interne fout. Reset het toestel (maak het toestel temperatuursensor even spanningsloos). Indien dit geen heeft kortsluiting.
-
Page 23: Technische Specificaties
TECHNISCHE SPECIFICATIES Informatie volgens verordening (EU) 66/2014 Metingen volgens EN60350-2 Modelaanduiding KIF780 -- / KIF790 -- Type kookplaat Inductiekookplaat Aantal elektrische kookzones en/of kookgebieden Kookzones/gebieden op basis Verwarmingstechnologie van inductie Voor niet-ronde kookzones of kookgebieden: de lengte en breedte van het bruikbare oppervlak per elektrisch verwarmde 210x180 mm (2x) kookzone of elektrisch verwarmd kookgebied Energieverbruik per kookzone of kookgebied berekend per kg... -
Page 24: Milieuaspecten
MILIEUASPECTEN Verpakking en apparaat afdanken Bij de productie van dit apparaat is gebruik gemaakt van duurzame materialen. Dit apparaat moet aan het einde van zijn levenscyclus op verantwoorde wijze worden afgedankt. De overheid kan u hierover informatie verstrekken. De verpakking van het apparaat is recyclebaar. Mogelijk zijn de volgende materialen gebruikt: •... - Page 25 CONTENTS Your induction hob Introduction Description Control panel Indications in the display Safety Temperature safety Cooking-time limiter Before first use Use of the touch keys and slide control Induction noises Appropriate pans Pan detection Power level setting Cooking settings Operation Switching on and power setting ‘Low range’...
-
Page 26: Your Induction Hob
YOUR INDUCTION HOB Introduction Congratulations on your choice of this appliance. This product was designed with simple operation and optimum comfort in mind. This manual describes the best way to use this appliance. In addition to information on operation, you will also find background information that may come in handy when using the appliance. -
Page 27: Description
YOUR INDUCTION HOB Description KIF780 KIF780DS KIF790 1. Bridge induction cooking zone 210x180 mm / 2.2 kW - 3.6 kW (boost) 2. Cooking zone ø 145 mm / 1.2 kW - 1.8 kW (boost) 3. Cooking zone ø 210 mm / 2.2 kW - 3.6 kW (boost) 4. -
Page 28: Control Panel
YOUR INDUCTION HOB Control panel 5 6 7 5 6 7 5 6 7 1. Keep warm key 2. Timer display with indicator lights 3. Minus ‘-’ key timer 4. Plus ‘+’ key timer 5. Cooking zone selection key 6. Cooking zone display 7. -
Page 29: Indications In The Display
YOUR INDUCTION HOB Indications in the display Display Description Power level ‘0’ for a cooking zone. Power level that is set for a cooking zone; 1 = low / 9 = high. Power level in ‘Low range’ that is set for a cooking zone; L1 = low / L9 = medium. -
Page 30: Safety
SAFETY Before use, read the separate safety instructions first! When the hob is connected to the mains for the first time or after a power failure, the lock function is active. First touch and hold the lock key until the indicator light goes off. Now you can switch on the hob. -
Page 31: Before First Use
BEFORE FIRST USE Use of the touch keys and slide control Place the tip of your finger flat on a key or the slide control to achieve the best results. You do not have to apply any pressure. The touch keys only react to the light pressure of a fingertip. Do not operate the controls with any other objects. -
Page 32: Pan Detection
BEFORE FIRST USE Minimum pan diameter • The diameter of the bottom of the pan must be at least: 90 mm for a cooking zone ø 145 mm ▷ ▷ 110 mm for a cooking zone ø 210 mm 110 mm for a cooking zone 210x180 mm ▷... -
Page 33: Cooking Settings
BEFORE FIRST USE the cooking zone that is being reduced in power, the power and ‘r’ are shown alternately for 3 seconds and you will hear an audio signal; the level is then automatically reduced to the highest available power. The front left/rear left zones and the zones on the same phase influence each other. -
Page 34: Operation
OPERATION Please read the chapter ‘Before first use’ very carefully before you start cooking. This prevents incorrect use of the hob. Switching on and power setting Make sure the bottom of the pan and the surface of the cooking zone are clean and dry. 1. -
Page 35: Boost Function
OPERATION 5. Use the slide control to set the desired setting. The cooking zone starts automatically at the level that has been set. ▷ All displays are brightly lit again. ▷ 6. Set a higher or lower power by selecting the cooking zone with the selection key and using the slide control. -
Page 36: Connecting Bridge Induction Cooking Zones
OPERATION Connecting bridge induction cooking zones The Bridge induction zones can be connected to each other. This creates one large zone that can be used, for example, a grill plate or a large fish pan on the same power. The pan has to be large enough to cover the centres of the front and rear cooking zone. -
Page 37: Lock Function
OPERATION Touch the cooking zone key to view the time that has been set for this cooking zone. The indicator light on the timer of the relevant cooking zone and the set time flash. Use the minus ‘-’ key or plus ‘+’ key of the timer to change the the time that has been set. Touch the cooking zone key and then simultaneously touch the minus ‘-’... -
Page 38: Switching On The Keep Warm Function
OPERATION Switching on the keep warm function Use this function to keep food warm directly after cooking (at approximately 72 °C). It is also possible to heat up food (up to about 72 °C) with this function. • This will avoid liquids overflowing and burning on the bottom of the pan. •... -
Page 39: Pause Function
OPERATION 1. Switch on the hob and select the desired cooking zone. 2. Touch and hold the slide control for at least 3 seconds at the desired level (from 1 to 8). An ‘A’ appears in the display alternating with the selected power level. ▷... -
Page 40: Power Limiter
POWER LIMITER Power limiter Setting the power limiter should only be carried out by a registered and qualified installer. Please read the safety regulations and the installation instructions carefully. The hob is equipped with a power limiter. If the total power of operating cooking zones exceeds the maximum available amount of power, the power is automatically reduced. -
Page 41: Maintenance
MAINTENANCE Cleaning Daily cleaning • Although food spills cannot burn into the glass, we nevertheless recommend you to clean the hob immediately after use. • Best for daily cleaning is a damp cloth with a mild cleaning agent. • Dry with kitchen paper or a dry towel. Stubborn stains •... -
Page 42: Troubleshooting
TROUBLESHOOTING General If you notice a crack in the glass top (however small), switch the hob off immediately, unplug the hob or turn off the (automatic) fuse switch(es) in the meter cupboard or. In the event of a permanent connection, set the switch in the power supply lead to zero. Contact the service department. - Page 43 TROUBLESHOOTING Symptom Possible cause Solution Symbol Lo appears in the Lock function is activated. Deactivate the lock function. displays. The indicator light above the Lock function is activated. Deactivate the lock function. lock key comes on when I want to switch on the hob. Error codes appliance Code Description...
- Page 44 TROUBLESHOOTING Error codes internal generator Code Description Cause Solution Mains voltage zero Connection error. Check the connection. crossing is not detected. Mains voltage is Connection error. Check the connection.. too high. Generator Internal error. Reset the appliance (disconnect the temperature sensor appliance from the power supply for is in short-circuit.
-
Page 45: Technical Specifications
TECHNICAL SPECIFICATIONS Information according regulation (EU) 66/2014 Measurements according EN60350-2 Model identification KIF780 -- / KIF790 -- Type of hob Induction hob Number of electric cooking zones and/or areas Induction cooking zones and Heating technology cooking areas For non-circular cooking zones or areas: lenght and width of 210x180 mm (2x) useful surface area per electric heated cooking zone or area Energy consumption per cooking zone or area calculated... -
Page 46: Environmental Aspects
ENVIRONMENTAL ASPECTS Disposal of packaging and appliance In the manufacturing of this appliance durable materials were used. Make sure to dispose of this equipment responsibly at the end of its lifecycle. Ask the authorities for more information regarding this. The appliance packaging is recyclable. The following may have been used: •... - Page 47 EN 25...
- Page 48 When contacting the service department, have the complete type number to hand. Adressen en telefoonnummers van de serviceorganisatie vindt u op de garantiekaart. You will find the addresses and phone numbers of the service organisation on the guarantee card. www.etna.nl www.etna.be 896061...
Need help?
Do you have a question about the KIF780 Series and is the answer not in the manual?
Questions and answers