ETNA KIF880DS Instructions For Use Manual
Hide thumbs
Also See for KIF880DS:
- Instructions for use manual (120 pages) ,
- Installation instructions (2 pages)

Related Manuals for ETNA KIF880DS


Summary of Contents for ETNA KIF880DS
- Page 1 GEBRUIKSAANWIJZING INSTRUCTIONS FOR USE INDUCTIEKOOKPLAAT INDUCTION HOB KIF880DS KIF880ZT KIF890ZT...
- Page 2 Gebruiksaanwijzing NL 3 - NL 30 Instructions for use EN 3 - EN 30 Gebruikte pictogrammen – Pictograms used Gevaar! Risico op letsel – Danger! Risk of injury Let op! Risico op schade aan het apparaat Caution! Risk of damaging the appliance Let op! –...
-
Page 3: Table Of Contents
INHOUD Uw kookplaat Inleiding Inductiekookplaat Bedieningspaneel Veiligheid Temperatuurbeveiliging Kookduurbegrenzer Gezond koken Gebruik Geluiden bij inductie Pannen Vermogen instellen Warmhoudfunctie Automatisch opwarmen Overige functies Meldingen op het display Gebruik van de timer Kookinstellingen Bediening Bereiding starten Klaar met koken De automatische opwarmfunctie inschakelen De warmhoudfunctie inschakelen De Bridge-inductiekookzones koppelen Timerbediening... -
Page 4: Uw Kookplaat
UW KOOKPLAAT Inleiding Deze kookplaat is ontworpen voor de echte kookliefhebber. Koken op een inductiekookplaat heeft een aantal voordelen. Het is makkelijk, omdat de kookplaat snel reageert en ook op een zeer laag vermogen is in te stellen. Bovendien kunt u dankzij het hoge vermogen gerechten zeer snel aan de kook brengen. -
Page 5: Inductiekookplaat
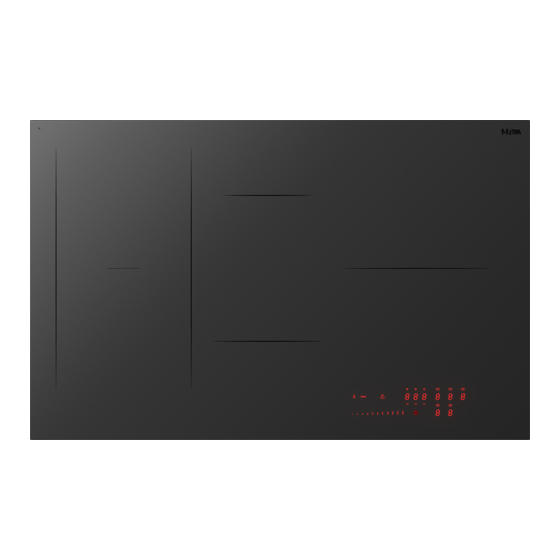
UW KOOKPLAAT Inductiekookplaat 1. Kookzone ø 27,5 cm / 2,3 kW - 3,0 kW (boost) 2. Kookzone ø 14,5 cm / 1,4 kW - 1,85 kW (boost) 3. Bridge-inductiekookzone 19,5 x 20,5 cm / 2,1 kW - 3,0 kW (boost) 4. -
Page 6: Bedieningspaneel
UW KOOKPLAAT Bedieningspaneel 1. Aan-/uittoets 2. Schuifregelaar (van stand 0 t/m stand 9) voor: ▷ het instellen van een waarde 3. Boost-toets 4. Warmhoudtoets 5. Grillfunctie 6. Pauzefunctie 7. Min-/plus-toets timer 8. Timerdisplay 9. Kookzonetoets en kookzonedisplay 10. Timerfunctie voor elke kookzone NL 6... -
Page 7: Veiligheid
VEILIGHEID Lees eerst de afzonderlijke veiligheidsinstructies voordat u het toestel gaat gebruiken! Bij de eerste keer dat de kookplaat wordt aangezet, knippert de warmhoudtoets. De kookplaat staat in de instelmodus. Laat de vermogensbegrenzer instellen door een installateur (zie hoofdstuk ‘Installatie’) of wacht 2 minuten. Na 2 minuten is de kookplaat klaar voor gebruik. -
Page 8: Gebruik
GEBRUIK Geluiden bij inductie Tikkend geluid • Dit wordt veroorzaakt door de vermogensbegrenzer op de linker- en rechterzone. Ook bij lagere instellingen kunt u een tikkend geluid horen. Pannen maken geluid • Pannen kunnen tijdens het koken geluid maken. Dit wordt veroorzaakt door de energie die van de kookplaat naar de pan stroomt. -
Page 9: Vermogen Instellen
GEBRUIK • Gebruik nooit een pan met een vervormde bodem. Een holle of bolle bodem kan de werking van de oververhittingsbeveiliging belemmeren, waardoor het toestel te warm wordt. Hierdoor kan de glasplaat barsten en de panbodem smelten. • Schade als gevolg van het gebruik van ongeschikte pannen of van droogkoken, valt buiten de garantie. -
Page 10: Warmhoudfunctie
GEBRUIK Vermogensbegrenzer De kookplaat is voorzien van een vermogensbegrenzer. Als het totale vermogen van de actieve kookzones het maximaal beschikbare vermogen overschrijdt, wordt het vermogen automatisch verlaagd. Het display van de kookzone die in vermogen wordt verlaagd knippert eerst; het niveau wordt dan automatisch verlaagd naar het hoogste beschikbare vermogen. -
Page 11: Meldingen Op Het Display
GEBRUIK Meldingen op het display Op display Status Vermogensniveau ‘0’ voor een kookzone Ingesteld vermogensniveau van een kookzone: 1 = laag, 9 = hoog Boostfunctie actief Geen (geschikte) pan op de kookzone (pandetectiesymbool) De Bridge-kookzones zijn gekoppeld (afhankelijk van het model beschikbaar) Automatisch opwarmen is geactiveerd Grillfunctie is geactiveerd Warmhoudfunctie is geactiveerd;... -
Page 12: Kookinstellingen
GEBRUIK Kookinstellingen Aangezien de standen afhankelijk zijn van de hoeveelheid en samenstelling van het gerecht in de pan, geldt de onderstaande tabel alleen als richtlijn. Gebruik de boost-stand voor: • snel aan de kook brengen van voedsel of vloeistoffen; • slinken van groenten;... -
Page 13: Bediening
BEDIENING Bereiding starten Gebruik van de aanraaktoetsen en de schuifregelaar Plaats uw vingertop plat op een toets of op de schuifregelaar voor het beste resultaat. U hoeft geen druk uit te voeren. De aanraaktoetsen reageren alleen op lichte druk van een vingertop. Bedien de toetsen niet met andere objecten. - Page 14 BEDIENING 4. Stel binnen 10 seconden het vermogen in door de schuifregelaar of de boost-toets aan te raken. ▷ De kookzone start automatisch op het ingestelde niveau. Stel een hoger of lager vermogensniveau in met de schuifregelaar. ▷ Na 10 seconden wordt de schuifregelaar uitgeschakeld en de kookduur teller wordt ▷...
-
Page 15: Klaar Met Koken
BEDIENING Klaar met koken 1. Zet het vermogensniveau op ‘0’ om de kookzone uit te schakelen. 2. Schakel de inductiekookplaat uit door de aan/uit-toets aan te raken. Het symbool H wordt weergegeven op het display van de kookzone, als die te heet is om te worden aangeraakt. -
Page 16: De Bridge-Inductiekookzones Koppelen
BEDIENING Na 10 seconden wordt de schuifregelaar uitgeschakeld en de kookduur teller wordt ▷ verborgen. 4. Zet het vermogensniveau op ‘0’ of raak de warmhoudtoets aan om de warmhoudfunctie uit te schakelen. De Bridge-inductiekookzones koppelen Twee Bridge-inductiezones kunnen aan elkaar worden gekoppeld. Hierdoor ontstaat één grote zone die kan worden gebruikt voor bijvoorbeeld een grillplaat of een grote vispan op hetzelfde vermogen. -
Page 17: Timerbediening
BEDIENING Ontkoppeling van Bridge-inductiekookzones 1. Raak de kookzonetoetsen van de verbonden kookzones tegelijk aan. ▷ Het verbindingssymbool verdwijnt op het display van de achterste kookzone. Timerbediening De eierwekker gebruiken (tijd is aflopend) De kookplaat is ingeschakeld en er is geen kookzone geselecteerd. 1. - Page 18 BEDIENING De kookwekker gebruiken 1. Selecteer de gewenste kookzone en gebruik de schuifregelaar om het gewenste vermogensniveau in te stellen. 2. Raak het timersymbool boven de betreffende kookzone aan. Op het display van de timer verschijnt ‘000’ en het geselecteerde timersymbool knippert. ▷...
- Page 19 BEDIENING De resterende kookduur controleren 1. Druk op de kookzonetoets om de zone te selecteren waarvan u de resterende tijd wilt bekijken. Een aan de kookwekker gekoppelde zone is te herkennen aan het helder verlichte ▷ timersymbool boven het kookzonedisplay. ▷...
-
Page 20: Koken Pauzeren
BEDIENING Koken pauzeren Deze functie stopt de kookactiviteit tijdelijk (max. 10 minuten); timers en tellers worden ook gepauzeerd. 1. Raak de pauzetoets aan en houd deze 2 seconden vast. ▷ Het pauzesymbool wordt weergegeven. 2. Raak opnieuw de pauzetoets aan en houd deze 2 seconden vast tot er een geluidssignaal klinkt. -
Page 21: Grillfunctie
BEDIENING Grillfunctie 1. Schakel de kookplaat in en plaats een grillplaat op twee bridge-inductiekookzones. 2. Raak de kookzonetoets van de zone linksvoor aan. 3. Raak vervolgens de grilltoets aan. Het verbindingssymbool verschijnt op het achterste kookzonedisplay en het grillsymbool ▷ op het voorste kookzonedisplay. -
Page 22: Herstelfunctie
BEDIENING Herstelfunctie Als de kookplaat met de aan/uit-toets per ongeluk werd uitgeschakeld, kunnen met behulp van de herstelfunctie alle instellingen worden teruggezet. 1. Raak binnen 6 seconden de aan/uit-toets aan en houd deze 2 seconden vast. ▷ Het pauzesymbool knippert. 2. -
Page 23: Instellingen
INSTELLINGEN De gebruikersinstellingen wijzigen 1. Raak de aan/uit-toets aan om de kookplaat aan te zetten. Raak binnen 3 seconden de aan/ uit-toets opnieuw aan. De kookplaat gaat in standby. ▷ ▷ De pauzetoets knippert (maximaal 60 seconden). 2. Raak de pauzetoets aan en houd deze vast. 3. -
Page 24: Installatie
INSTALLATIE Vermogensbegrenzer Het instellen van de vermogensbegrenzer mag alleen worden uitgevoerd door een erkende en gekwalificeerde installateur. Lees de veiligheidsvoorschriften en de installatie-instructies zorgvuldig door. De kookplaat is voorzien van een vermogensbegrenzer. Als het totale vermogen van de actieve kookzones het maximaal beschikbare vermogen overschrijdt, wordt het vermogen automatisch verlaagd. - Page 25 INSTALLATIE Een dubbel geluidssignaal geeft een fout in de operatie aan. Herhaal in dat geval de ▷ procedure vanaf stap 3. ▷ "C" knippert afwisselend met “0” op het display van de kookzone linksachter. De configuratiewaarde verschijnt op het display van de kookzone linksvoor. ▷...
-
Page 26: Onderhoud
ONDERHOUD Reinigen Activeer het kinderslot voordat u begint met het reinigen van de kookplaat. Wij raden u aan het apparaat na elk gebruik te reinigen. Zo voorkomt u dat overgekookt eten de glasplaat kan beschadigen. Dagelijkse reiniging 1. Gebruik een vochtige doek en een mild reinigingsmiddel (afwasmiddel) om het apparaat te reinigen. -
Page 27: Technische Specificaties
TECHNISCHE SPECIFICATIES Informatie over EU-verordening 66/2014 Metingen volgens EN 60350-2 Modelaanduiding KIF880DS / KIF880ZT Type kookplaat Inductiekookplaat Aantal elektrische kookzones en/of -gebieden Verwarmingstechnologie Inductiekookzones Voor ronde elektrische kookzones: de diameter van het bruikbare 14,5 17,5 oppervlak per elektrisch verwarmde kookzone in cm... -
Page 28: Problemen Oplossen
PROBLEMEN OPLOSSEN Algemeen Wanneer u een barst in het glas ziet (hoe klein ook), schakelt u de kookplaat onmiddellijk uit, haalt u de stekker uit het stopcontact en zet u de (automatische) zekering(en) in de meterkast uit. Bij een permanente aansluiting zet u de stroomtoevoer op nul. Neem contact op met de servicedienst. - Page 29 PROBLEMEN OPLOSSEN Probleem Mogelijk oorzaak Oplossing Het apparaat is te heet. Laat het apparaat afkoelen. Foutcode E2 of EH Stroomuitval/ Laat de stroomaansluiting Foutcode E5 of E6 voedingsspanning verkeerd. controleren door een installateur. De luchtinlaat is geblokkeerd. Controleer de luchtinlaat. Foutcode E8 Ander defect.
-
Page 30: Milieuaspecten
MILIEUASPECTEN Verpakking en toestel afdanken Bij de vervaardiging van dit toestel is gebruik gemaakt van duurzame materialen. Dit toestel moet aan het eind van zijn levenscyclus op verantwoorde wijze worden afgevoerd. De overheid kan u hierover informatie verschaffen. De verpakking van het toestel is recyclebaar. Gebruikt kunnen zijn: •... - Page 31 CONTENTS Your hob Introduction Induction hob Control panel Safety Temperature safety Cooking-time limiter Healthy cooking Induction noises Pans Power level setting Keep warm function Automatic heat-up Other functions Indications in the display Timer use Cooking settings Operation Starting cooking Finishing cooking Switching on the automatic heat-up function Switching on the keep warm function Connecting the bridge induction cooking zones...
-
Page 32: Your Hob
YOUR HOB Introduction This hob has been designed for the real lover of cooking. Cooking on an induction hob has a number of advantages. It is easy, because the hob reacts quickly and can also be set to a very low power level. -
Page 33: Induction Hob
YOUR HOB Induction hob 1. Cooking zone ø 27.5 cm / 2.3 kW - 3.0 kW (boost) 2. Cooking zone ø 14.5 cm / 1.4 kW - 1.85 kW (boost) 3. Bridge induction cooking zone 19.5 x 20.5 cm / 2.1 kW - 3.0 kW (boost) 4. -
Page 34: Control Panel
YOUR HOB Control panel 1. On/off key 2. Slide control (from position 0 to position 9) for: ▷ setting a value 3. Boost key 4. Keep warm key 5. Grill function 6. Pause function 7. Minus/plus key for timer 8. Timer display 9. -
Page 35: Safety
SAFETY Before use, read the separate safety instructions first! At first power on the hob the keep warm key will flash. The hob is in the settings mode. Let the power limiter set by an installer (see chapter ‘Installation’) or wait 2 minutes. -
Page 36: Use
Induction noises A ticking sound • This is caused by the capacity limiter on the left and right zones. Ticking can also occur at lower settings. Pans are making noise • Pans can make some noise during cooking. This is caused by the energy flowing from the hob to the pan. -
Page 37: Power Level Setting
• Never use pans with a misshapen base. A hollow or rounded base can interfere with the operation of the overheating protection, so that the appliance becomes too hot. This may lead to the glass top cracking and the pan base melting. •... -
Page 38: Keep Warm Function
Power limiter The hob is equipped with a power limiter. If the total power of operating cooking zones exceeds the maximum available amount of power, the power is automatically reduced. The display of the cooking zone who is being reduced in its power is first flashing; the level is then automatically reduced to the highest available power. -
Page 39: Indications In The Display
Indications in the display In display Status Power level ‘0’ for a cooking zone Power level that is set for a cooking zone; 1 = low / 9 = high Boost function active No (suitable) pan on cooking zone (pan detection symbol) Bridge cooking zones are connected (present depending on model). -
Page 40: Cooking Settings
Cooking settings Because the settings depend on the quantity and composition of the contents of the pan, the table below is intended as a guideline only. Use setting ‘boost’ • bring the food or liquid to the boil quickly; • ‘shrink’... -
Page 41: Operation
OPERATION Starting cooking Use of the touch keys and slide control Place the tip of your finger flat on a key or the slide control to achieve the best results. You do not have to apply any pressure. The touch keys only react to the light pressure of a fingertip. Do not operate the controls with any other objects. - Page 42 OPERATION 4. Within 10 seconds, set the power level by touching the slide control or the boost key. The cooking zone starts automatically at the level that has been set. ▷ Set a higher or lower power level with the slide control. ▷...
-
Page 43: Finishing Cooking
OPERATION Finishing cooking 1. Set the power level to ‘0’ to turn off the cooking zone. 2. Turn the induction hob off by touching the On/off key. The ‘H’ symbol will appear in the display of the cooking zone which is too hot to touch. The symbol disappears when the surface has cooled down to a safe temperature. -
Page 44: Connecting The Bridge Induction Cooking Zones
OPERATION After 10 seconds the slide control will switch off and the cooking time counter is hidden. ▷ 4. Set the power level to ‘0’ or touch the keep warm key to switch off the keep warm function. Connecting the bridge induction cooking zones Two bridge induction zones can be connected to each other. -
Page 45: Timer Control
OPERATION Disconnecting bridge induction cooking zones 1. Simultaneously touch the cooking zone keys of the connected cooking zones. ▷ The connection symbol will disappear on the rear cooking zone display. Timer control Using the minute minder (count-down timer) The hob is switched on and no cooking zone is selected. 1. - Page 46 OPERATION Using the cooking timer 1. Select the desired cooking zone and use the slide control to set the desired power level. 2. Touch the timer symbol above the corresponding cooking zone. The timer display shows ‘000’ and the selected timer symbol flashes. ▷...
- Page 47 OPERATION Checking remaining cooking time 1. Touch the cooking zone key to select the zone for which you want to see the remaining time. A zone connected to the cooking timer can be identified by the brightly lit timer symbol ▷...
-
Page 48: Pause Cooking
OPERATION Pause cooking This function temporarily stops the cooking activity (max. 10 minutes); timers and counters are also paused. 1. Touch and hold the pause key for 2 seconds. ▷ The pause symbol is shown. 2. Touch and hold the pause key for 2 seconds again until a beep sounds. The pause key flashes. -
Page 49: Grill Function
OPERATION Grill function 1. Switch on the hob and put a grill plate on two bridge induction cooking zones. 2. Touch the cooking zone key for the front-left zone. 3. Then touch the grill key. The connection symbol appears on the rear cooking zone display and the grill symbol on ▷... -
Page 50: Recall Function
OPERATION Recall function If the hob was switched off accidentally with the On/off key, all settings can be restored using the recall function. 1. Touch the On/off key within 6 seconds and hold it for 2 seconds. ▷ The pause symbol flashes. 2. -
Page 51: Settings
SETTINGS Changing user settings 1. Touch the On/Off key to switch on the hob. Touch the On/off key again within 3 seconds. The hob goes into standby. ▷ The pause key flashes (maximum 60 seconds). ▷ 2. Touch and hold the pause key. 3. -
Page 52: Installation
INSTALLATION Power limiter Setting the power limiter should only be carried out by a registered and qualified installer. Please read the safety regulations and the installation instructions carefully. The hob is equipped with a power limiter. If the total power of operating cooking zones exceeds the maximum available amount of power, the power is automatically reduced. - Page 53 INSTALLATION A double beep indicates an error in the operation. If this happens, repeat the procedure ▷ from step 3. ▷ ‘C’ and ‘0’ flash alternately on the display for the left-rear cooking zone. The configuration value appears in the left-front cooking zone display. ▷...
-
Page 54: Maintenance
MAINTENANCE Cleaning Set the child lock before you start cleaning the hob. We recommend that you clean the appliance after each use. This prevents that over cooked food can damage the glass surface. Daily cleaning 1. Use a damp cloth and a mild cleaning agent (washing-up liquid) to clean the appliance. 2. -
Page 55: Technical Specifications
TECHNICAL SPECIFICATIONS Information according regulation (EU) 66/2014 Measurements according EN60350-2 Model identification KIF880DS / KIF880ZT Type of hob Induction hob Number of electric cooking zones and/or areas Heating technology Induction cooking zones For circular electric cooking zones: diameter of useful surface 14.5... -
Page 56: Troubleshooting
TROUBLESHOOTING General If you notice a crack in the glass top (however small), switch the hob off immediately, unplug the hob, turn off the (automatic) fuse switch(es) in the meter cupboard or, in the event of a permanent connection, set the switch in the power supply lead to zero.) Contact the service department. Troubleshooting table If the appliance does not work properly, this does not always mean that it is defective. - Page 57 TROUBLESHOOTING Symptom Possible cause Solution Appliance is too hot. Let the appliance cool down. Error code E2 or EH Power supply failure/Power Let the power connection Error code E5 or E6 voltage wrong. checked by an installer. The air inlet is obstructed. Check air inlet.
-
Page 58: Environmental Aspects
ENVIRONMENTAL ASPECTS Disposal of packaging and appliance In the manufacturing of this appliance durable materials were used. Make sure to dispose of this equipment responsibly at the end of its lifecycle. Ask the authorities for more information regarding this. The appliance packaging is recyclable. The following may have been used: •... - Page 59 EN 31...
- Page 60 Het toestel-identificatieplaatje bevindt zich aan de onderkant van het toestel. The appliance identification card is located on the bottom of the appliance. Plak hier het toestel-identificatieplaatje. Stick the appliance identification card here. Houd, wanneer u contact opneemt met de serviceafdeling, het complete typenummer bij de hand.
Need help?
Do you have a question about the KIF880DS and is the answer not in the manual?
Questions and answers