Magellan RoadMate 760 Reference Manual
Magellan roadmate 760: reference manual
Hide thumbs
Also See for RoadMate 760:
- User manual (131 pages) ,
- Manual (130 pages) ,
- Reference manual (130 pages)

Related Manuals for Magellan RoadMate 760


Summary of Contents for Magellan RoadMate 760
- Page 1 Magellan RoadMate ® ™ Reference Manual Instructions for Operating the Magellan RoadMate 760...
-
Page 2: Important Safety Warnings
The Magellan RoadMate 760 is a vehicle-navigation aid designed to assist you in arriving at your selected destinations. When using the Magellan RoadMate, these safety rules must be followed to prevent accidents that can result in injury or death to yourself or others: •... -
Page 3: Table Of Contents
Application ... 14 Adding A Single POI ... 14 Adding Multiple POIs ... 16 Basic Operation ... 19 Turning the Magellan RoadMate On ... 19 Adjusting the Volume ... 20 Repeating the Last Command ... 20 Inputting Text Characters ... 20 Additional Characters ... - Page 4 Selecting Destinations ... 31 Choosing the Routing Method ... 32 Changing the Routing Method ... 33 Cancelling a Planned Route ... 34 Selecting a Destination Using Select Address ... 35 Search by Town ... 35 Search by Postcode ... 37 Search by County ...
- Page 5 Typical GPS STATUS Screen Display ... 118 Appendix C ... 119 POI Categories ... 119 Appendix D ... 120 Specifications ... 120 THALES CONSUMER PRODUCTS GPS RECEIVER END USER SOFTWARE LICENSE ... 1 THALES NAVIGATION MAGELLAN PRODUCTS LIMITED WARRANTY ... 1 Table of Contents...
-
Page 6: Information
On average, a satellite-navigation receiver is accurate to within 15 meters. Thales Navigation employs several technologies to increase the accuracy of their professional and Magellan®-branded receivers. An accuracy of 3 meters or better is achieved using correction signals from satellite navigation-augmentation systems. In the U.S., an accuracy of 3 meters is achieved... -
Page 7: A Word On The Safe Usage Of Gps Maps
From Source to Destination Thales Navigation, maker of Magellan GPS products, is not a cartography company. We do not create the maps that are used on our GPS devices. We seek to acquire map data from the best public and private sources available at the time of publication. -
Page 8: Gps Maps And Your Safety
For instance, the Magellan GPS receiver should be operated only by vehicle passengers or by the driver when the vehicle has come to a complete stop. -
Page 9: Magellan Roadmate
Magellan RoadMate Magellan RoadMate Front View Press to turn the Magellan RoadMate on or off. Adjust to set the volume of the speaker. Press to repeat the last spoken prompt. While viewing the map, press to zoom in on the center of the display. -
Page 10: Rear View
Press to repeat the last spoken prompt. Adjust to set the volume of the speaker. Rotate up when in use to receive signals from the GPS satellite network. Compartment to store the compact flash memory card. Connection for power and data for the Magellan RoadMate. -
Page 11: Cradle Front View
USB Connection Power Connection Magellan RoadMate Cradle Front View Connection for power and data for the Magellan RoadMate. Press to remove the Magellan RoadMate from the cradle. Cradle Side View Connect to your PC to upload Custom POIs or software updates. -
Page 12: Installation
Take care when mounting the Magellan RoadMate in your vehicle, whether using the windshield mount, vent mount or other mount, that it does not obstruct the driver’s view of the road. Make sure that the placement of the Magellan RoadMate and cable does not interfere with the operation of vehicle safety devices, such as air bags. - Page 13 Installation Plug the power cable into the cradle. Plug the cigarette lighter connector into an appropriate 12V receptacle in your car. Rotate the antenna upward. Installation is complete, and you are ready to turn the Magellan RoadMate on and go.
-
Page 14: Poi Manager
The Magellan RoadMate 760 comes with Magellan RoadMate POI Manager Software. This allows you to add custom POIs to your Magellan RoadMate. You can add things such as friends’ houses and other favorite places that are not in the installed database. -
Page 15: Longitude
POI Manager Longitude Conversely, longitude lines can be expressed by dividing Earth into vertical segments totalling 360 degrees. Starting at the Prime Meridian (which is The Royal Observatory in Greenwich, England), or zero degrees Longitude, lines are drawn in 10- degree increments 180 degrees to the West and 180 degrees to the East. -
Page 16: Altitude
Altitude Each location also must have an Altitude. Altitude is expressed by how far the point is above or below the level of the ocean, or Sea Level. For example, Los Angeles, California is about 92 meters above sea level. Death Valley, California is about 82 meters below sea level. -
Page 17: Installation
POI Manager Installation Insert the POI Manager CD into your PC’s CD drive. The setup application will begin automatically. If it does not, browse your computer’s CD drive and double-click on the setup.exe file. Select a default language for the Application. The Welcome screen will appear to begin the installation process. - Page 18 POI Manager Next, choose a Program Folder to place the application icons. THe Magellan RoadMate POI Manager software will be installed. When it has finished, to can have the installer launch the application automatically, or deselect to exit without launching...
-
Page 19: Connecting Your Magellan Roadmate
Connect the small end of the External Power cable to the power port on the cradle and plug the other end of the cable into a standard, 110 VAC wall outlet. See “Cradle Side View” on page 6. Depending on the location and surrounding obstructions, the Magellan RoadMate may or may not be able to receive GPS satellite information. - Page 20 You are given the option of saving the POIs either to your computer (for later transfer) or directly to your Magellan RoadMate. Select the Save to My Magellan RoadMate button. Give your POI file a name and click on Save.
-
Page 21: Adding Multiple Pois
POI Manager The POIs are uploaded to your Magellan RoadMate. To access the new POIs on your Magellan RoadMate, refer to page 86. Adding Multiple POIs The POI Manager software supports ASCII file format (.ASC,.CSV,.TXT); GPS Exchange file format (.GPS,.XML); Magellan Waypoint file format (.WPT,.RTE);... - Page 22 Assign a title to each field. You must have a latitude, a longitude, and a name. Click Finish. If there are any errors in the data you can view them. Otherwise, click No. The POI file has been imported and is ready to upload to your Magellan RoadMate.
- Page 23 Magellan RoadMate. Select the Save to My Magellan RoadMate button. Give your POI file a name and click on Save. The POIs are uploaded to your Magellan RoadMate. To access the new POIs on your Magellan RoadMate, refer to page 86.
-
Page 24: Basic Operation
Either the Select Destination screen or the Resume Route screen will be displayed automatically. Select Destination Resume Guidance Resume Route is displayed if you were navigating toward a destination when the Magellan RoadMate was turned off. Press the Power button and the Magellan RoadMate will turn off. -
Page 25: Adjusting The Volume
Basic Operation Adjusting the Volume The volume control is located at the top of the Magellan RoadMate. Use the thumbwheel to set the volume of the speaker to a desired level. See “Rear View” on page 5. Repeating the Last Command If you missed the last verbal command, you can repeat it by pressing the Repeat button. -
Page 26: Numerical Characters
QuickSpell eliminates the possibility of a misspelled word or looking for a city or street that is not in the loaded database. As you begin entering characters, the QuickSpell feature of the Magellan RoadMate dims out those characters that are not available, thereby speeding up the process of entering data. -
Page 27: Flexaddress
Basic Operation Select “F”. When the list of passible town names is narrowed down enough, the Magellan RoadMate will automatically display a list of all the towns with words beginning with the characters you entered (see FlexAddress below). At this point you can continue, or if the list is too long, press the Cancel button and continue entering characters to narrow down the list further. -
Page 28: Traveling
The Magellan RoadMate has three screens you can use to assist you in travelling to your destination: the Map screen, the Maneuver List screen and the TrueView 3D/ Split TrueView screen. Map: When a new destination is selected and calculated, the Map screen is displayed. This screen displays a map of your surrounding area, along with the planned route (if calculated) and information about the route. -
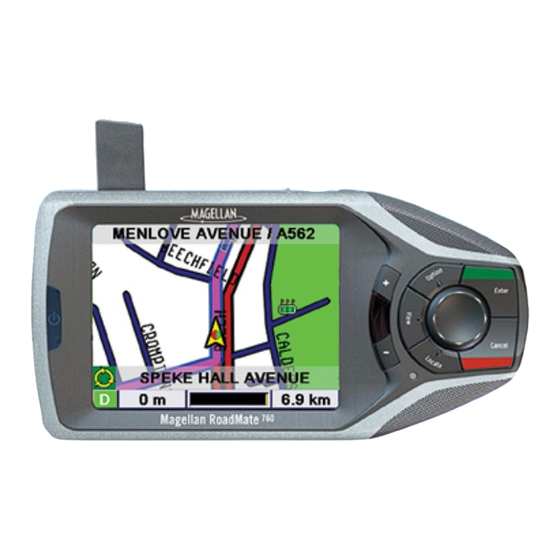
Page 29: Map Screen
The Map screen is the most commonly used screen in the Magellan RoadMate and provides you with detailed information about where you are and where you are going. POI Icon † Planned Route (pink) Next Maneuver Direction of Travel and GPS Signal Strength ††... -
Page 30: Maneuver List Screen
Maneuver The Magellan RoadMate uses TrueView 3D technology to display a three-dimensional picture of the next maneuver. The TrueView 3D screen can be viewed only after a route has been calculated. From the Map screen, press the View button twice to view the TrueView 3D screen. -
Page 31: Detouring From The Planned Route
While travelling or setting up your destination you may find it necessary to exclude one of the maneuvers in the Maneuver List. This could be due to an accident or street maintenance you want to avoid. The Magellan RoadMate provides you tools to select a specific maneuver, exclude it from the planned route and reroute the trip. -
Page 32: Displaying Information About Your Present Location
Traveling The details for the maneuver are displayed. Select Exclude. The trip will be recalculated excluding the selected maneuver. This calculation is done using the same Route Method that was chosen originally. After the route is recalculated, the Map screen is displayed. Displaying Information About Your Present Location Anytime that you want to view information about your present location you can press the Locate button. -
Page 33: Saving Your Current Location To Your Address Book
Finding POIs Along Your Route While driving along a route, if you need to find a gas station, ATM, or other POI, the Magellan RoadMate can find the nearest POI and route to it. Then, when you have completed the side route, resume guidance to your original destination. -
Page 34: Finding A Detour Along Your Route
A list of the nearest POIs is displayed. Use the Navigation key to scroll the list up or down (if necessary) and select the desired POI. The Magellan RoadMate will calculate a new route to the selected POI from your current position. - Page 35 Traveling Or, you can enter a custom distance. Select Custom and select the custom distance. Enter the number of kilometers for your detour and then select OK. Select Route. The Magellan RoadMate will recalculate the alternate route to your destination.
-
Page 36: Selecting Destinations
Select Address Address Book Point of Interest Junction Selecting Destinations Selecting Destinations Previous Destinations Favorites List Addressed Create New Entry Trip Planner Spell Name Select Category Custom POIs Search by Town Search by Postcode Search by Area Previous Towns Search by Town Search by Postcode Search by Area... -
Page 37: Choosing The Routing Method
Every route is calculated based on the Routing Method criteria selected. Every time a new destination is selected, the Magellan RoadMate prompts you for the method that will be used to calculate the route. Shortest Time: This selection calculates a route that should take the least amount of time using speed limits and other information in the database. -
Page 38: Changing The Routing Method
Selecting Destinations Changing the Routing Method When you select a destination for the first time, a Routing Method is chosen (see “Choosing the Routing Method” on page 32). At any time during the trip you can change the Route Method. While viewing the Map screen, the Maneuver List screen, or the TrueView 3D screen, press the Cancel button. -
Page 39: Cancelling A Planned Route
Selecting Destinations Cancelling a Planned Route While viewing the Map screen, the Maneuver List screen, or the TrueView 3D screen, press the Cancel button. Select Yes to cancel the route and display the Select Destination screen. Selecting No returns the display to the last viewed screen. -
Page 40: Selecting A Destination Using Select Address
Selecting Destinations Selecting a Destination Using Select Address A destination can be created by entering the street address that you want to go to. This address is not automatically added your Address Book but is saved to your Previous Destination list. You have four options, Search By Town enables you to find an address if you know the town it is located in, Search By Postcode will find all addresses within a postcode area, Search by County searches a county area for the specified address, or Previous Towns gives you a list of towns that have been routed to. - Page 41 Enter the street address. The acceptable range of numbers is displayed at the top of the screen. Select Done. Select the desired Routing Method. The Magellan RoadMate will calculate the route. When the calculations are complete, the Map screen will be displayed.
-
Page 42: Search By Postcode
Selecting Destinations Search by Postcode Select the Globe icon. Use the Navigation key to scroll the list up or down (if necessary) and select the desired country to search from. From the Select Destination screen, select Select Address. Select Search by Postcode. Enter the first few characters of the postcode and select OK. - Page 43 Enter the street address. The acceptable range of numbers is displayed at the top of the screen. Select Done. Select the desired Routing Method. The Magellan RoadMate will calculate the route. When the calculations are complete, the Map screen will be displayed.
-
Page 44: Search By County
Selecting Destinations Search by County Select the Globe icon. Use the Navigation key to scroll the list up or down (if necessary) and select the desired country to search from. From the Select Destination screen, select Select Address. Select Search by County. Enter the first few characters for the name of the county and select OK. - Page 45 Enter the street address. The acceptable range of numbers is displayed at the top of the screen. Select Done. Select the desired Routing Method. The Magellan RoadMate will calculate the route. When the calculations are complete, the Map screen will be displayed.
-
Page 46: Selecting Destinations
Selecting Destinations Previous Towns Select the Globe icon. Use the Navigation key to scroll the list up or down (if necessary) and select the desired country to search from. From the Select Destination screen, select Select Address. Select Previous Town. Use the Navigation key to scroll the list up or down (if necessary) and select the desired town. - Page 47 Enter the street address. The acceptable range of numbers is displayed at the top of the screen. Select Done. Select the desired Routing Method. The Magellan RoadMate will calculate the route. When the calculations are complete, the Map screen will be displayed.
-
Page 48: Selecting A Destination Using The Address Book
Selecting Destinations Selecting a Destination Using the Address Book The Address Book can store up to 200 addresses for each of the three users you have available. When you select Address Book you are given five options: Previous Destinations lets you select from a list of the last 20 destinations you routed to; List Addresses displays a list of all the addresses you have stored in your Address Book;... -
Page 49: Saving A Previous Destination To The Address Book
Selecting Destinations Select Route. Select the desired Routing Method. The Magellan RoadMate will calculate the route. When the calculations are complete, the Map screen will be displayed. Saving a Previous Destination to the Address Book From the Select Destination screen, select Address Book. - Page 50 The address is saved to the Address Book. The Previous Destination screen is displayed to continue the routing to the previous destination. Select Route. Select the desired Routing Method. The Magellan RoadMate will calculate the route. When the calculations are complete, the Map screen will be displayed.
-
Page 51: Deleting A Previous Destination
Selecting Destinations Deleting A Previous Destination From the Select Destination screen, select Address Book. Select Previous Destinations. Use the Navigation key to scroll the list up or down (if necessary) and select the desired previous destination. Select Delete. A dialog box will appear to confirm your selection. Select Yes. The Previous Destination is deleted from the list. -
Page 52: Favourites
Use the Navigation key to scroll the list up or down (if necessary) and select the desired favourite. Select Route. Select the desired Routing Method. The Magellan RoadMate will calculate the route. When the calculations are complete, the Map screen will be displayed. -
Page 53: Editing A Favourite
Selecting Destinations Editing a Favourite From the Select Destination screen, select Address Book. Select Favourites. Use the Navigation key to scroll the list up or down (if necessary) and select the desired favourite. Select Edit. The top line (Name) and the bottom line (Information) can be edited. The address cannot be changed. -
Page 54: Deleting A Favourite
The address is saved to the Address Book. The Previous Destination screen is displayed to continue the routing to the previous destination. Select Route. Select the desired Routing Method. The Magellan RoadMate will calculate the route. When the calculations are complete, the Map screen will be displayed. Deleting A Favourite From the Select Destination screen, select Address Book. -
Page 55: List Addresses
Selecting Destinations Select Delete. A dialog box will appear to confirm your selection. Select Yes. The Previous Destination is deleted from the list and you are returned to the Address Book screen. List Addresses From the Select Destination screen, select Address Book. Select List Addresses. -
Page 56: Editing An Address
Selecting Destinations Select Route. Select the desired Routing Method. The Magellan RoadMate will calculate the route. When the calculations are complete, the Map screen will be displayed. Editing an Address From the Select Destination screen, select Address Book. Select List Addresses. - Page 57 The address is saved to the Address Book. The Address screen is displayed to continue the routing to the Address. Select Route. Select the desired Routing Method. The Magellan RoadMate will calculate the route. When the calculations are complete, the Map screen will be displayed.
-
Page 58: Deleting An Address
Selecting Destinations Deleting an Address From the Select Destination screen, select Address Book. Select List Addresses. Use the Navigation key to scroll the list up or down (if necessary) and select the desired previous destination. Select Delete. A dialog box will appear to confirm your selection. Select Yes. The Previous Destination is deleted from the list and you are returned to the Address Book screen. -
Page 59: Create New Entry - Search By Town
Selecting Destinations Create New Entry – Search by Town From the Select Destination screen, select Address Book. Select Create New Entry. Select Search By Town. Enter the first few characters in the town name and select OK. Use the Navigation key to scroll the list up or down (if necessary) and select the desired town. -
Page 60: Create New Entry - Search By Postcode
Selecting Destinations Use the Navigation key to scroll the list up or down (if necessary) and select the desired street. Enter the street address. The acceptable range of numbers is displayed at the top of the screen. Select Done. The top line (Name) and the bottom line (Information) can be edited. The address cannot be changed. - Page 61 Selecting Destinations Select Search By Postcode Use the keypad to enter the first few characters for the postcode and select OK. Use the Navigation key to scroll the list up or down (if necessary) and select the Postcode. Enter the first few characters for the street name and select OK. Use the Navigation key to scroll the list up or down (if necessary) and select the street.
-
Page 62: Create New Entry - Search By County
Selecting Destinations Enter the street address. The acceptable range of numbers is displayed at the top of the screen. Select Done. The top line (Name) and the bottom line (Information) can be edited. The address cannot be changed. Select the line you want to modify. Use the keypad to enter the desired text and select OK. - Page 63 Selecting Destinations Use the keypad to enter the first few characters for the county and select OK. Select the county. Enter the first few characters for the street name and select OK. Use the Navigation key to scroll the list up or down (if necessary) and select the desired street.
-
Page 64: Create New Entry - Previous Town
Selecting Destinations Create New Entry – Previous Town From the Select Destination screen, select Address Book. Select Create New Entry. Select Previous Town. Use the Navigation key to scroll the list up or down (if necessary) and select the desired town. -
Page 65: Trip Planner - New Trip
Selecting Destinations The top line (Name) and the bottom line (Information) can be edited. The address cannot be changed. Select the line you want to modify. Use the keypad to enter the desired text and select OK. Select the Favourites box if you wish to add the address to your Favourites list. When you have finished making changes, select Save and you are taken back to the Address Book screen. -
Page 66: Trip Planner - Optimizing A Trip
Selecting Destinations From the pop-up menu, select Add. From the Select Trip Planner Address screen, select the method for adding a destination to your trip: Map (Map button) will add a destination from a point on the map; Select Address will add a destination from a new address;... -
Page 67: Trip Planner - Guide Me
Selecting Destinations Select Optimize. The destinations are sorted from closest to farthest from your current location. Select Save. Trip Planner – Guide Me Once you have your destinations set and optimized, you can begin your trip. From the Trip Planner screen, select Guide Me. Select the trip you wish to begin. -
Page 68: Trip Planner - Edit
Selecting Destinations Select the desired Routing Method. The Magellan RoadMate will calculate the route. When the calculations are complete, the Map screen will be displayed. Trip Planner – Edit Destinations within a trip can be moved, deleted, or added to. -
Page 69: Trip Planner - Delete And Rename
Selecting Destinations When you have finished, select Save and you are returned to the Trip Planner screen. Trip Planner – Delete and Rename From the Trip Planner screen, select Delete, Rename. Select Delete. Select the trip you wish to delete. A dialog box will appear to confirm your selection. - Page 70 Selecting Destinations Select the Trip to rename. Use the backspace key to delete the old name; then, enter the new name for the trip. When you have finished, select OK. The trip has been renamed.
-
Page 71: Selecting A Point Of Interest As A Destination
Points of Interest (POIs), are commercial or recreational locations, landmarks, or services that are preloaded into the Magellan RoadMate database. There are over 750,000 POIs in the database, which range from restaurants, parks, petrol stations, and banks, to schools and police stations, and more. The purpose of the POI database (accessed through the Points of Interest menu) is to provide you with a list of popular destinations without having to add them to your Address Book manually. - Page 72 Selecting Destinations Select the desired Routing Method. The Magellan RoadMate will calculate the route. When the calculations are complete, the Map screen will be displayed. Selecting List by Town will list the POIs matching the name you entered within a selected city.
- Page 73 Selecting Destinations Select the desired Routing Method. The Magellan RoadMate will calculate the route. When the calculations are complete, the Map screen will be displayed. Selecting Select Category enables you to list all of the POIs in the selected category. Select Select Category.
-
Page 74: Select Category
Selecting Destinations The Magellan RoadMate will calculate the route. When the calculations are complete, the Map screen will be displayed. Select Category From the Select Destination screen, select Point of Interest. Select Select Category. Select the POI category. Selecting Nearest will list the POIs matching the name you entered from closest to farthest. - Page 75 Selecting Destinations Select the desired Routing Method. The Magellan RoadMate will calculate the route. When the calculations are complete, the Map screen will be displayed. Selecting List by Town will list the POIs matching the name you entered within a selected city.
-
Page 76: Selecting Destinations
Selecting Destinations Select the desired Routing Method. The Magellan RoadMate will calculate the route. When the calculations are complete, the Map screen will be displayed. Selecting Spell Name will list the POIs matching the name you entered. Select Spell Name. -
Page 77: Custom Pois
Selecting Destinations The Magellan RoadMate will calculate the route. When the calculations are complete, the Map screen will be displayed. Custom POIs Please refer to page 14 for information on creating and loading Custom POIs. From the Select Destination screen, select Point of Interest Select Custom POIs. - Page 78 Selecting Destinations Select the desired Routing Method. The Magellan RoadMate will calculate the route. When the calculations are complete, the Map screen will be displayed.
-
Page 79: Selecting An Junction As A Destination
Selecting Destinations Selecting an Junction as a Destination An junction of two streets can be used as a destination for your trip. The search for the junction can be done whether or not you know the city. If you know the city, you can start there; if you are unsure of the city, you can start with the state. Search by Town From the Select Destination screen, select Junction. -
Page 80: Search By Postcode
Use the Navigation key to scroll the list up or down (if necessary) and select the second street from the list. Select the desired Routing Method. The Magellan RoadMate will calculate the route. When the calculations are complete, the Map screen will be displayed. Search by Postcode... - Page 81 Selecting Destinations Select Search by Postcode. Enter the first few characters for the state and select OK. Use the Navigation key to scroll the list up or down (if necessary) and select the state from the list. Enter the first few characters for the first street and select OK. Use the Navigation key to scroll the list up or down (if necessary) and select the first street from the list.
-
Page 82: Search By County
Use the Navigation key to scroll the list up or down (if necessary) and select the second street from the list. Select the desired Routing Method. The Magellan RoadMate will calculate the route. When the calculations are complete, the Map screen will be displayed. Search by County From the Select Destination screen, select Junction. - Page 83 Selecting Destinations Use the Navigation key to scroll the list up or down (if necessary) and select the desired county. Enter the first few characters for the first street and select OK. Use the Navigation key to scroll the list up or down (if necessary) and select the first street from the list.
-
Page 84: Previous Towns
Selecting Destinations The Magellan RoadMate will calculate the route. When the calculations are complete, the Map screen will be displayed. Previous Towns From the Select Destination screen, select Junction. Select Previous Towns. Use the Navigation key to scroll the list up or down (if necessary) and select the desired city. - Page 85 Use the Navigation key to scroll the list up or down (if necessary) and select the second street from the list. Select the desired Routing Method. The Magellan RoadMate will calculate the route. When the calculations are complete, the Map screen will be displayed.
-
Page 86: Options
Configuration provides access to customize the look and operation of the Magellan RoadMate. It also contains diagnostic features to keep your Magellan RoadMate performing at its best. See “Configuration” on page 85. Tutorial provides instructions and verbal narration on how to use the most common features of the Magellan RoadMate. See “Tutorial” on page 112. -
Page 87: Trip Computer
Options Trip Computer The Trip Computer is a valuable tool for recording the mileage and time spent driving while on business or vacation. The information for the trip can be saved and viewed at any time, providing you easy access to information on your current trip, as well as previous trips. -
Page 88: Saving The Current Trip Report
Options While the Trip Computer is in a “Stopped” state, select Start to continue recording the current trip or select reset to begin a new trip. Saving the Current Trip Report When you have finished with your trip, you can save the information for later viewing. Select Save at any time. -
Page 89: Viewing A Saved Trip Report
Options Viewing a Saved Trip Report From the Trip Computer screen, select the Trip Report you wish to view. The saved Trip Report is displayed. Press the Cancel button when you are finished viewing the trip and return to the Trip Computer screen. Deleting a Trip Report Select the Trip Report to be deleted. -
Page 90: Configuration
Options Configuration The configuration options can be set differently for each user. From any screen, press the Option button and select Configuration. POI Selection From the POI Selection menu, you can choose which icons to display on the Map screen Select POI Selection. -
Page 91: Custom Pois
Options Custom POIs The Custom POI menu enables you to select POIs previously loaded into your Magellan RoadMate using the Magellan RoadMate POI Manager software (see “Application” on page 14). The instructions following instructions are assuming you have loaded one or more POIs into your Magellan RoadMate. - Page 92 Options When you have finished, press the Cancel button to return to the Custom POIs menu. You can also be alerted when you approach a custom POI. The Set Alarm function works for Custom POIs only and only if the POI has been selected to show on the Map screen. Select Set Alarms.
- Page 93 Options The Detection Angle is set to alert you when you are within so many degrees of the POI. Select Detection Angle. Use the numeric keypad to enter the number of degrees in which to set the alert. When you have finished, select OK.
- Page 94 Options The First Warning is set to alert you when you are within a certain number of feet from the POI. Select First Warning. Use the numeric keypad to enter the number of feet in which to alert you. When you have finished, select OK.
- Page 95 Options The Last Warning is set as a final alert when you are within a certain number of feet from the POI. Select Last Warning. Use the numeric keypad to enter the number of feet in which to alert you. When you have finished, select OK.
-
Page 96: Map Options
Options Map Options Map Options enable you to determine the behavior of the Map while you are driving. Select Map Options. With Map Smart selected, the Map screen will automatically switch to the Maneuver List and/or the TrueView 3D screen when applicable. That is, when the satellite signal is lost for more than 30 seconds, the Maneuver List will be displayed so that you can still be guided to your destination. -
Page 97: Select Map Colour
Select Map Colour Select Select Map Colour. With Automatic Night Mode enabled, the Magellan RoadMate will switch between a Day screen and a Night screen based on sunrise and sunset times for your current location. Select Day Screen to choose a color scheme for the map while you are driving during the day. -
Page 98: Route Preferences
When you have finished, select Save and you will be returned to the Configuration menu. Route Preferences Route preferences enable you to set parameters for the Magellan RoadMate to follow when calculating a route. Select Route Preferences. Avoid Toll Roads instructs Magellan RoadMate to avoid known toll roads when calculating a... -
Page 99: Detour Options
Detour Options The Magellan RoadMate comes equipped with SmartDetour. If you are driving on the motorway with SmartDetour enabled and your speed drops below 24 KPH, you may press the detour icon on the Map screen in order to caculate an alternate route around traffic. - Page 100 When you encounter traffic, and the set time has elapsed, the Detour icon will flash on the Map screen. Touch the icon on the screen to have the Magellan RoadMate calculate the detour. You can choose to ignore the Detour alert; after one minute it will stop flashing until the set time...
-
Page 101: Voice Options
From the Voice Options menu, you can select to have your voice prompts announced in either a male or a female voice in the language currently enabled (see Language for instructions on selecting a language). Additionally, you can also have the Magellan RoadMate speak the street name of the next maneuver. Select Voice Options. -
Page 102: Contrast
Options Select the desired color scheme. When you have finished, select Save. Contrast Contrast determines the level of difference between light and dark colors. Select Contrast. Select the left arrow to decrease the amount of contrast, or select the right arrow to increase the amount of contrast. -
Page 103: Display Options
If you wish to maintain your manual settings, do not enable Automatic Contrast or Automatic Brightness. Additional, you can set the Magellan RoadMate to shut off automatically if no movement is detected for 20 minutes. Select Display Options. -
Page 104: Tone Options
Options Tone Options As you approach a maneuver, an audible alert sounds to let you know to make the maneuver. Select Tone Options. Select either Bell, Chime, or Beep. When you have finished, select Save. Language You can select to have the menus displayed in one of 11 languages. Also, audible voice prompts will be spoken in the selected language. -
Page 105: Diagnostics
Diagnostics The Magellan RoadMate comes with built-in system tests and other features to aid in the performance of the unit. If you feel that your unit is not functioning properly, contact our Technical Support Representative before engaging any of the option in the Diagnostics menu. -
Page 106: Audio Test
Set GPS Position Set GPS Position enables you to manually set the location of the Current Position icon. If you have traveled a long distance with the unit off, it may take some time for the unit to reacquire a satellite signal. By manually setting the position of the unit, you are telling the unit where you are and will speed up the satellite signal acquisition. -
Page 107: Tmc Status
Enter the street address. The acceptable range of numbers is displayed at the top of the screen. If you do not know the exact address, just select Done and the Magellan RoadMate will use the lowest number in the range. Select Done to continue. You will be returned to the Diagnostics menu. -
Page 108: Simulator Mode
Options Simulator Mode In Simulator Mode, you can demonstrate the capabilities of the Magellan RoadMate without actually driving. In order for the simulation to work, you must set a route first. Select Simulator Mode. Set the speed variance of the simulation: x1 will “drive” at normal speed using known speed limits;... -
Page 109: Edit User Name
The Magellan RoadMate 760 comes preloaded with North American and European map data. If you are traveling to North AMerica, you can take your Magellan RoadMate with you and use it while you are driving abroad. To unlock the North America map, contact our Customer Service department and, for a fee, receive an unlock code. - Page 110 Options Select USA - Canada and then select Unlock. Select Code. Use the keypad to enter the unlock code. When you have finished, select OK. Select Unlock. The database is unlocked. Select OK. Select USA - Canada and then select Switch.
-
Page 111: Safety Lockout
Select Enable Safety Lockout and select Save. Password The Magellan RoadMate has the capability of enabling a password for each of the three users. This will keep other users from accessing and changing your preferences or altering your Address Book. -
Page 112: Automatic Volume
Select Activate to enable the password. When you have finished, select Save. Automatic Volume The Magellan RoadMate can be set to automatically increase the volume when the vehicle exceed 45 mph to compensate for road noise. Select Automatic Volume. Select the number increment by which to increase the volume. -
Page 113: Tmc Options
Options Select Enable. When you have finished, select Save. TMC Options The Traffic Message Channel (TMC) enables you to receive real-time traffic alerts along your calculated route and, if configured, bypass them. Select TMC Options. Select Incident Options. To enable the alerts, select TMC Active. - Page 114 Options With Use Alternative Route unchecked, you are given alerts only. Select Alert Options. Select Live Alert to be notified of incidents along your route. Select the distance at which you wish to be notified. You can select all the distances and be notified at each.
-
Page 115: Backup And Restore
Backup and Restore The Magellan RoadMate 760 has the capability to back up your information (Address Book, Previous Destinations, etc.) to a Compact Flash (CF) card (not included). When a CF card is inserted in the CF card slot (see “Rear View” on page 5), the information will automatically back up when you power down the unit. - Page 116 Options If you do not have a CF card inserted in the CF card slot (see “Rear View” on page 5), you will be prompted to turn the unit off and insert the CF card. Then, turn the unit back on and reselect Backup and Restore. A dialog box will appear, stating that your information is being restored, and the unit will shut off automatically.
-
Page 117: Tutorial
Tutorial The Magellan RoadMate has a built-in Tutorial that you can view or refer to anytime the Magellan RoadMate is turned on. Do not use the tutorial while you are driving. If you are operating the vehicle, please come to a complete stop before reviewing the tutorial topics. -
Page 118: Help
Options Help Select Help. Customer Support phone numbers for United States, Canada, and Europe are displayed. See page 114 for more information. -
Page 119: Contact Information
Contact Information Contact Information If you need support for your Magellan RoadMate and you wish to contact Thales, the following information is provided so that you can direct your questions/comments to the proper person. Technical Support For Magellan product support and warranty service information in English, French, German, Spanish, Portuguese, Dutch, Norwegian, Finnish and Danish please dial FREE PHONE: 00800MAGELLAN* (00800 62435526) from 9 AM to 6 PM GMT &... -
Page 120: Appendix A
Appendix A Adding Addresses from an IrDA-Equipped Device The Magellan RoadMate comes equipped with an IRDA receiver (see “Front View” on page 4). With this, you can “beam” addresses from your Palm or other equipped device. Do not attempt to transfer addresses while you are driving, at a stop, or in traffic. Address transfer should be done only while the vehicle is parked. -
Page 121: Appendix B
GPS STATUS Screen Structure-first page It is ordered by the channel number from 1 to 12. Where: Satellite PRN number, with “e” or “E” to the right means got ephemeris data, “v” or “V” to the right means got verified ephemeris data (double check). -
Page 122: Gps Status Screen Structure - Second Page
10km normal for postfit residuals for range 66 HUGE_DOPPLER_RESID 100m/s normal for postfit residuals for doppler Usually, Bad code is 20 and 23. If fix is good, it would be 0. GPS STATUS Screen Structure - second page Heading XXX (degree) Current Lat: DDD.DDDDD W/E Current Long: DDD.DDDDD N/S... -
Page 123: Typical Gps Status Screen Display
Typical GPS STATUS Screen Display First Page Second Page Heading 0Speeding 0.0 m/s Current Lat: 34.10939 N Current Long:117.82599 W Current altitude 255 TTFF 116s #Satellite (U/T) 11/12 PDOP VDOP TDOP HDOP 1.3 FOMS P/V/H UTC TIME 08/16/2004 22:56:53 Appendix B... -
Page 124: Appendix C
The Magellan RoadMate POI database has 25 different categories. The icons will appear on the Map screen (if enabled): Restaurant Hotel or Motel Petrol Station Vehicle Services Airport Entertainment Sports & Recreation Transportation Car Hire Casino Town Centre Public Buildings... -
Page 125: Appendix D
Display: 3.8” anti-glare TTF color touch screen, 2.25” x 3.0” Screen Resolution: 320 x 240 QVGA; 32,000 colors Storage: 20 GB Hard Drive Audio: Integrated Speaker GPS Antenna: Integrated, detachable for optional external antenna connection Appendix C Appendix D Specifications... - Page 126 Agreement. User Restrictions. The Software may only be used on a single computer and on a single Magellan GPS receiver owned or leased by you. You may not operate the Software in a time-sharing or service bureau operation, on a temporary or permanent basis, without the prior written consent of Licensor.
- Page 127 Licensor or its third-party supplies have been advised of the possibility of such claim or damages. The liability of Licensor and its third-party suppliers (and their third-party suppliers) for damages shall not exceed the actual amount paid for the GPS receiver product.
-
Page 128: Thales Navigation Magellan Products Limited Warranty
PRODUCT. 1. THALES NAVIGATION WARRANTY Thales Navigation warrants their GPS receivers and hardware accessories to be free of defects in material and workmanship and will conform to our published specifications for the product for a period of two years from the date of original purchase or such longer period as required by law. THIS WARRANTY APPLIES ONLY TO THE ORIGINAL PURCHASER OF THIS PRODUCT. - Page 129 GPS. (Note: Thales Navigation GPS receivers use GPS or GPS+GLONASS to obtain position, velocity and time information.
- Page 130 Some national, state, or local laws do not allow the exclusion or limitation of incidental or consequential damages, so the above limitation or exclusion may not apply to you. 7. COMPLETE AGREEMENT This written warranty is the complete, final and exclusive agreement between Thales Navigation and the purchaser with respect to the quality of performance of the goods and any and all warranties and representations.
Need help?
Do you have a question about the RoadMate 760 and is the answer not in the manual?
Questions and answers