Advertisement
Quick Links
Release date 04.02.2022
T2 Install & Operation
Manual
Safety
This appliance can be used by children aged from 8 years and above and persons
with reduced physical, sensory or mental capabilities or lack of experience and
knowledge if they have been given supervision or instruction concerning use of the
appliance in a safe way and understand the hazards involved. Children shall not
play with the appliance. Cleaning and user maintenance shall not be made by
children without supervision.
The unit should be isolated from the electricity supply before removal of any covers. Great care must be
employed when working with high pressure carbon dioxide, and in no cases should the maximum
operating pressure of 0.4MPa (4 bar) be exceeded.
The appliance is not suitable for installation in an area where a water jet could be used.
The appliance has to be placed in a horizontal position
WARNING: Keep ventilation openings in the appliance enclosure or in the built-in structure clear of
obstruction.
WARNING: When positioning the appliance, ensure the supply cord is not trapped or damaged.
WARNING: Do not locate multiple portable socket-outlets or portable power supplies at the rear of the
appliance.
This appliance is intended to be used in household and similar applications such as:-
Staff kitchen areas in shops, offices and other working environments
Farm houses and by clients in hotels, motels and other residential type environments
Bed and breakfast type environments
Catering and similar non-retail applications
A-weighted emission sound pressure level is below 70 dB(A)
Advertisement

Related Manuals for Borg & Overstrom T2


Summary of Contents for Borg & Overstrom T2
- Page 1 Release date 04.02.2022 T2 Install & Operation Manual Safety This appliance can be used by children aged from 8 years and above and persons with reduced physical, sensory or mental capabilities or lack of experience and knowledge if they have been given supervision or instruction concerning use of the appliance in a safe way and understand the hazards involved.
- Page 2 R290 is a refrigerant-grade propane used on a wide range of commercial refrigeration and air conditioning units. A highly pure propane, it has a low environmental impact and nominal global warming potential (GWP), meaning it possesses no qualities that can destroy the ozone layer. R290 also is the preferred hydrocarbon alternative of the Environmental Protection Agency (EPA), substituting more harmful fluorocarbon refrigerants like R22, R134a, R404a and R502.
- Page 3 The WEEE symbol indicates that this item contains electronic components which must be collected and disposed of separately. Never dispose of electrical waste in general municipal waste. Collect and dispose of such waste separately. Make use of the return and collection systems available to you, or your local recycling programme.
-
Page 4: Specification
Specification... - Page 5 COOLING SYSTEM Stainless steel direct chill coil encased in a solid-block system for instant response cool down action. Ultra efficiency compression system with capillary control. Environmentally friendly R290 refrigerant. COLD TEMPERATURE 2°C - 11°C. OUTPUT PER HOUR 50 litres Chilled 50 litres Sparkling (ProCore) OUTPUT PER HOUR 80 litres Chilled 80 litres Sparkling...
- Page 6 AMBIENT ROOM OPERATING TEMPERATURE CLIMATIC CLASS...
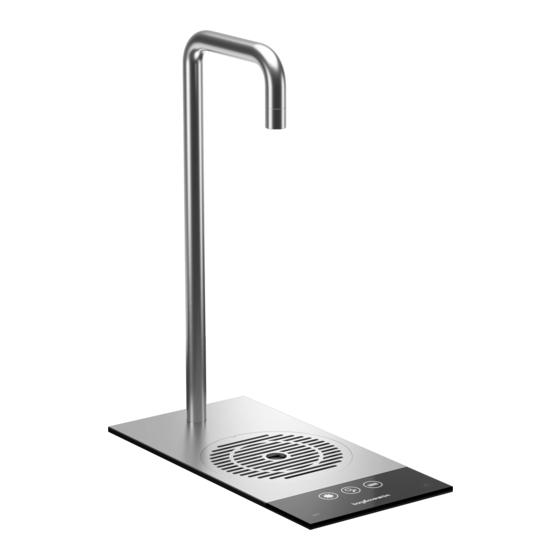
- Page 7 Model Overview Introduction The T2 & T2+ epitomises cutting-edge design and innovation with its contoured tap and compact ProCore unit. This is our most discreet range and will fit into any environment seamlessly. The ProCore dispenser is a cooler designed to provide chilled and carbonated water. All the materials and components are tested during the entire production process in order to satisfy all expectations.
- Page 8 Component/Feature Overview T2 Tap - Major Components Contents: 1 no Connector Cable 1 no T2 1 no Waste Drain Pipe 1 no Top Plate with Control Panel 1 no Fixings Set 1 no Drip Tray 1 no 1.0m x 6mm Insulated Water Pipe 1.
- Page 9 Contents: 1 no Co2 Regulator with Gauge & Connection tube* 1 no Undercounter Unit 1 no ProCore Simple-fit Ventilation Kit 1 no 2.0m Power Cord Set...
- Page 10 1. ProCore Simple-fit Chimney, 2. ProCore Simple-fit Base, 3. Front Panel, 4. Carry Handle, 5. Top Panel, 6. Water Outlet, 7. Water Inlet, 8. Tap Connection, 9. CO2 Inlet*, 10. On/Off Switch, 11. Power Connection, 12. Side Panel Please Note: Mains Installation Kit &...
-
Page 12: Service Requirements
Installation Installation Requirements Identify a suitable location for the ProCore unit. It should be positioned within 1.0m of the faucet, and within 2.0m of suitable services connections. Allow enough space to fit the ventilation ducting system. The ProCore unit must be installed in accordance with the relevant requirements of: The appropriate building regulations by application of either The Building Regulations (England and Wales), The Building Regulations (Scotland) or The Building Regulations (Northern Ireland). - Page 13 Using the M6 allthreads First, install the T2 tap to Insert the tap so the When planning and as provided locate them the top plate base. Line fixing screws line up providing for the into the base of the tap up the tap so it’s parallel...
-
Page 14: Operation
Operation Tap Control Panel 1. Chilled Dispense, 2. Sparkling Dispense, 3. Ambient Dispense, 4. ‘eco’ Mode Symbol 5. Warning Symbol. Basic Functions... -
Page 15: Warning Symbol
Dispensing from unit: Press and hold dispense icon and release to finish dispense • Chilled icon flashing – Unit is chilling down • Sparkling icon flashing – Tank is refilling ‘eco’ Mode: ‘eco’ mode symbol illuminates when unit is in ‘eco’ mode, to awaken unit press and hold any dispense icon. - Page 16 Situate the ProCore Simple-fit Insert 4 screws into the holes Using the template provided, ventilation base in place centrally located. Do not overtighten at this carefully mark and cut the over the aperture. Ensuring that stage. aperture to the edge of the there is a minimum of 30mm air cabinet.
- Page 17 NOTE: Any obstructions will adversely affect the airflow to the appliance causing potential for poor performance, over heating or fridge failure. ProCore Installation & Water Connection Connect the T2 tap to the water Locate the ProCore in a suitable Connect the T2 Tap USB to the outlet.
- Page 18 The carbonator should be purged Allow the machine to stand for 8 - Turn on the water supply to fill the of air by activating the sparkling 12 minutes for the initial chilling tank. water dispense for approximately process to complete. 10 seconds.
- Page 19 Stand the cylinder in a suitable We recommend between 3.5 - 4 place. bar (58 PSI) (max). Do not exceed 4 bar pressure. Sparkling Water Flow Rate - Sparkling Versions Only NOTE: Sparkling water flow rate factory setting = 2.4L per minute MAX. This may need adjusting depending on inlet pressure.
- Page 20 Maintenance & Cleaning Sanitisation Guide NOTE: All maintenance operations must be carried out with the dispenser switched off. This operation must only be carried out by trained staff. Every 6 months a sanitisation procedure is recommended as follows: Turn off incoming mains Briefly press chilled Remove the existing Use Sterizen Hand Gel...
- Page 21 For this we recommend Pay particular attention Attend to any cosmetic Leave the solution inside the use of Sterizen to the dispense faucet marks as needed. machine for sanitisation sanitising solution. and the push button to take effect (minimum controls. For this use 5 minutes) while Sterizen External thoroughly cleaning the...
- Page 22 Pre-flush the new filter to waste using the chilled button until the water appears clear and is free of air. Flush through a small amount of water to check all functions. Please note that this sanitisation fluid contains an Avoid skin active caustic/alkaline agent.
- Page 23 Turn off the water Press and hold the The tank is empty of Ensure to release the supply. Sparkling water sparkling water when Sparkling water button dispense button until all only CO2 is being and take care to avoid the water is expelled released.
- Page 24 Advanced Troubleshooting Fault Diagnostics...
- Page 25 Possible Problem/Report Suggested Action Cause No Water Water Check water flow through the regulator. Dispensing Pressure Replace if necessary. Regulator Check Tap Check fault codes. HMI Control No Sparkling No CO2 Check CO2 bottle, regulator and non-return valve. Supply pressure Water pressure should be 58 psi (4bar), replace as necessary.
-
Page 26: Fault Codes
Fault Codes Internal overheat activated Compressor timing out too often Water not filling carbonator tank... - Page 27 Technical Information T2/T2+ Chilled & Ambient Circuit Schematic T2/T2+ Chilled & Sparkling Circuit Schematic...
- Page 28 T2/T2+ Chilled, Ambient & Sparkling Circuit Schematic...
- Page 29 Water Pathway - Chilled & Ambient...
- Page 30 Water Pathway - Chilled & Sparkling...
- Page 31 Water Pathway - Chilled, Ambient & Sparkling...
- Page 33 Spares ProCore/ProCore+ Exploded Parts Diagram T2/T2+ Exploded Parts Diagram...
-
Page 35: Spares List
Spares List Part No. Description 720130 Main Control PCBA • • • 700721 Top Panel Asm • • • 720117 Right Panel Asm • • • 720113 Left Panel Asm • • • 720045 Front Panel Asm • • • 701537 Pump •... - Page 36 Part No. Description 701094 3/4'' BSP Inlet Solenoid • • • 462325 1/4'' Bulkhead Connector • • 462850 6mm Bulkhead Connector • • • 701076 8mm PRV - ProCore+ • • • 701515 6mm 2 Way Solenoid • • 701525 6mm 3 Way Solenoid •...
- Page 37 • • • 720193 Cup Stand Plated Black • • • 720152 Cup Stand Plated Metal • • • 720289 T2 CSA HMI Lens Asm • 720292 T2 CS HMI Lens Asm • 720295 T2 CA HMI Lens Asm •...
Need help?
Do you have a question about the T2 and is the answer not in the manual?
Questions and answers