Ninka Qanto Instructions For Use Manual
Hide thumbs
Also See for Qanto:
- Instructions for use manual (24 pages) ,
- Instructions for use manual (100 pages)
Table of Contents
Advertisement
Quick Links
Instructions for use
US
Instrucciones de uso
Mode d'emploi
English
2
Espanõl 34
Français 66
Qanto_Id_A5_ 0000.50.65062 - US
Reproduction, even in excerpts, is permitted only with the written permission of Ninkaplast GmbH.
Ninguna parte de este manual puede ser reproducida sin el consentimiento escrito de Ninkaplast GmbH.
Toute reproduction, même par extrait, n'est autorisée qu'avec le consentement écrit de Ninkaplast GmbH.
Advertisement
Chapters
Table of Contents

Related Manuals for Ninka Qanto


Summary of Contents for Ninka Qanto
- Page 1 Instructions for use Instrucciones de uso Mode d’emploi English Espanõl 34 Français 66 Qanto_Id_A5_ 0000.50.65062 - US Reproduction, even in excerpts, is permitted only with the written permission of Ninkaplast GmbH. Ninguna parte de este manual puede ser reproducida sin el consentimiento escrito de Ninkaplast GmbH. Toute reproduction, même par extrait, n’est autorisée qu’avec le consentement écrit de Ninkaplast GmbH.
-
Page 2: Table Of Contents
3.3 Versions (installation on left/right) ......8 4. Technical data ..............9 5. Assembly of Qanto.............10 5.1 General assembly instructions ........10 5.2 Delivery ..............11 6. Operation of Qanto ............12 6.1 Electrical system ............12 6.2 Control element ............12 6.3 Safety cut-off .............14 6.4 Lighting ..............15 6.5 Height adjustment of the middle tray ......16... - Page 3 7. Maintenance and care ............24 8. Warranty and guarantee ............24 8.1 Guarantee ..............24 8.2 Spare parts ..............25 8.3 Repair ................26 9. Disassembly/assembly ............26 9.1 Exchange of the LED lighting ........27 10. Recycling/disposal..............29 11. Troubleshooting ..............33 Qanto_Id_A5_ 0000.50.65062-US...
-
Page 4: Explanation Of Symbols
1. Explanation of symbols DANGER DANGER indicates a hazardous situation which, if not avoided, will result in death or serious injury. WARNING WARNING indicates a hazardous situation which, if not avoided, could result in death or serious injury. CAUTION CAUTION indicates a hazardous situation which, if not avoided, could result in minor or moderate injury. -
Page 5: Safety Instructions
• Do not use the drive to lift people. During operation, do not put your weight on or lean against the system. • Careful monitoring is required if Qanto is used by or in the vicinity of children or disabled persons. - Page 6 • Qanto may be used by children 8 years of age and older, people with limited physical, sensory or mental aptitude or lack of experience and/or knowledge only if they are supervised or have been instructed in the safe use of Qanto and understand the resulting risks.
- Page 7 • Do not use Qanto outdoors. • Never drop or insert any object into any opening. • Operate the lifting system only with the trays in place.
-
Page 8: General Information
3.1 Designation of the device The kitchen cabinet is called Qanto. 3.2 Intended use Qanto is an enclosed cabinet in which trays can be lifted and lowered using a lifting system. 3.3 Versions Qanto is suitable for “left” and/or “right” installation. -
Page 9: Technical Data
4.Technical data Mains connection 120 V / 60 Hz / 15 A CAUTION Lifting 19,69“ (500 mm) Top tray: max. load of 22 lbs. (10 kg) Middle tray: max. load of 22 lbs. (10 kg) Bottom tray: max. load of 33 lbs. (15 kg) Inner dimensions of tray 18,66“... -
Page 10: Assembly Of Qanto
5.1 General assembly instructions WARNING Anyone who performs connection or assembly work on Qanto or uses Qanto must have access to these instructions for use. Fol- low these instructions. Non-observance of the above mentioned instructions can lead to accidents resulting in severe personal injury. -
Page 11: Delivery
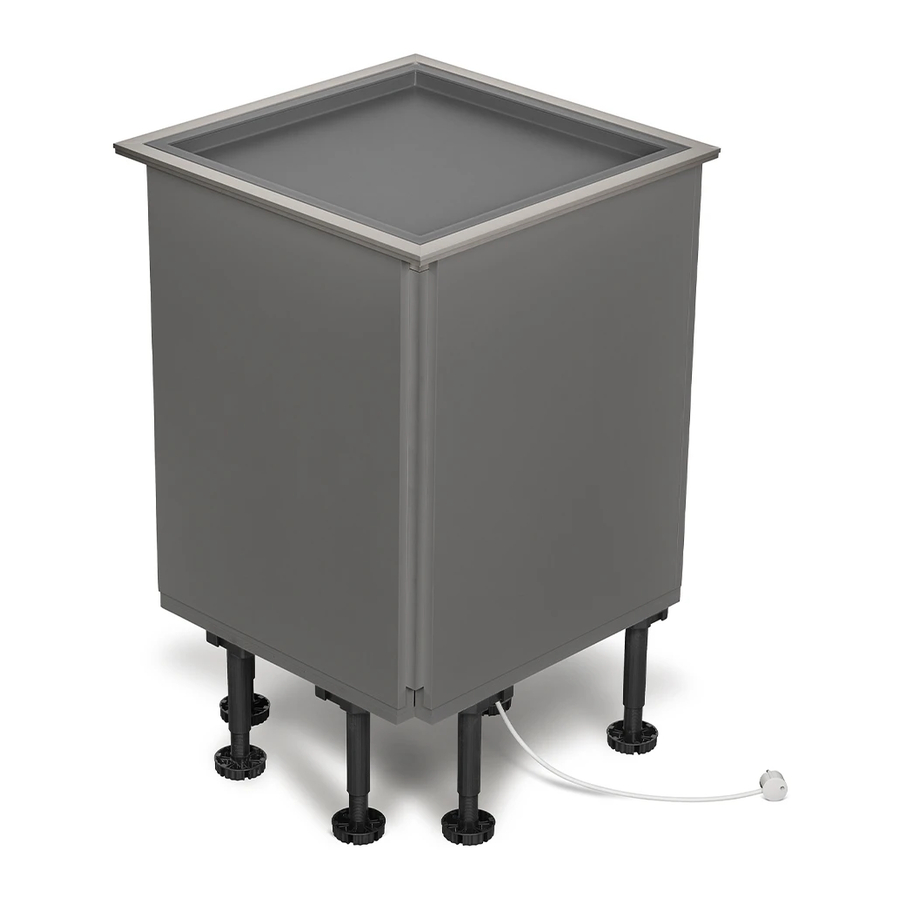
5.2 Scope of supply Cabinet with lifting system Adjustable feet Top tray 1x (2x) Bottom tray (middle tray: optional) Spacer bars: optional Qanto_Id_A5_ 0000.50.65062-US... -
Page 12: Operation Of Qanto
Before connecting the electrical drives to the in-house power mains, compare the voltage of the power mains with the input missible input voltage must be identical. If not, Qanto must not be connected. Please contact your specialist dealer. 6.2 Control element... - Page 13 PRESSING and HOLDING the button moves the drive up. PRESSING and HOLDING the button moves the drive down. RELEASING the button switches the STOP drive to STOP. Qanto_Id_A5_ 0000.50.65062-US...
-
Page 14: Safety Cut-Off
STOP PRESSING and HOLDING the button moves the drive up and switches to STOP in the end position. PRESSING and HOLDING the button STOP moves the drive down and switches STOP in the end position. Downward movement is possible only if the upper trays are in place. -
Page 15: Lighting
6.4 LED lighting optional NOT FOR US-VERSION The cabinet can be delivered with maintenance-free LED lighting. When the trays are raised, the LED lighting switches “ON” auto- matically. When the trays are lowered, the LED lighting switches “OFF” automatically If a fault occurs, please contact your specialist dealer or customer service. -
Page 16: Height Adjustment Of The Middle Tray
6.5 Height adjustment of the middle tray Step 1: Move the trays completely to the top by pressing the “+” button on the control element. Tray Step 2: Leverage under the middle tray and remove it from the tray carrier. Qanto_Id_A5_ 0000.50.65062-US... - Page 17 1x 360° Step 3: Loosen the 4 screws with a socket head screwdriver 7/64” (3 mm) by a 360° turn. Tray carrier Step 4: You can now move in the middle tray by about ± 1.96” (± 50 mm). Step 5: Retighten the 4 screws with a socket head screwdriver 7/64”...
- Page 18 Tray Tray carrier Step 6: Place the tray on the middle tray carrier. Step 7: Move the trays completely to the bottom by pressing the “–” button on the control element. Qanto_Id_A5_ 0000.50.65062-US...
-
Page 19: Height Adjustment Of Trays
6.6 Height adjustment of trays H = H Tray Step 1: Masking frame Check the height of the tray in relation to the height of the masking frame. Tray Tray support Step 2: Leverage the tray from the tray carrier. Step 3: Raise or lower the tray supports by turning them. - Page 20 H = H Step 4: Lay the tray on the tray carrier and check the height of the tray in relation to the height of the mask- ing frame once again. If the height still is not correct, repeat Steps 2 and 3.
-
Page 21: Gap Adjustment Of Trays
6.7 Gap adjustment of trays Masking frame Tray Step 1: Check the gap between the tray and the masking frame. Tray Step 2: Lift the tray from the tray carrier. Qanto_Id_A5_ 0000.50.65062-US... - Page 22 Adjusting screw Tray seat Step 3: Adjust the adjusting screw of the tray seat by turning it to the left or right. Tray Step 4: Lay the tray on the tray carrier and check the gap once again. If the gap is still not correct, repeat Steps 2 and 3.
-
Page 23: Initialisation
6.8 Initialisation Before and during initialisation, check and make sure that the safety switches are contacted. The lifting system is initialised by pressing and holding the button. It must be kept pressed until the drive reaches the lower end position. As soon as the drive stops in the lower end position, the button must be released for 2-3 seconds. -
Page 24: Maintenance And Care
WARNING sons. At regular intervals, remove dust and dirt from Qanto trays and make sure it is not damaged or cracked. Please clean with a mild household cleaner and a soft cloth. -
Page 25: Spare Parts
8.2 Spare parts You can order the following spare parts from your specialist dealer. Top tray Article no.: 5602.11 Bottom tray Article no.: 5603.11 Middle tray: optional Qanto_Id_A5_ 0000.50.65062-US... -
Page 26: Repair
Repairs on Qanto may be performed by authorised workshops or service personnel only as special tools must be used. Please contact your specialist dealer. If parts on Qanto are opened, there is a subsequent risk mal- functions. Such actions void all warranty claims. 9. Disassembly/assembly Before disassembly and during assembly: •... -
Page 27: Exchange Of The Led Lighting
9.1 Exchange of the LED lighting NOT FOR US-VERSION Disassembly Plug + Bushing Cable duct LED lamp TX20 Step 1: Remove the LED lamp plug from the connection bushing and pull the cable out of the cable duct. Step 2: Loosen both fastening screws of the LED lamp using a screw- driver TX20. - Page 28 Assembly Plug + Bushing Cable duct LED lamp TX20 Step 4: Put the new LED lamp into place. Step 5: Tighten the LED lamp with both fastening screws and a screw- driver TX20. Step 6: Lay the lamp cable in the cable duct. Step 7: Insert the lamp plug into the socket.
-
Page 29: Recycling/Disposal
10. Recycling/disposal The recycling or disposal possibilities for motorised systems are regulated in the country of use. Please obtain information from your respective public authority or ask your specialist dealer. We recommend the disassembly of our product in as many parts as possible for disposal and recycling. - Page 30 Before disassembly, disconnect Qanto from the mains by pulling the mains plug. WARNING shock or injury to persons. We recommend the disassembly of our product in as many parts as possible for disposal and recycling. Trays – Plastic – Recycling Body –...
- Page 31 LED lamp Electronic scrap • Remove the LED lamp plug from the connection bushing and pull the cable out of the cable duct. • Loosen both fastening screws of the LED lamp using a screw- driver TX20. • Remove the LED lamp. Control unit Electronic scrap •...
- Page 32 • Disconnect all connecting cables. Tray carrier • Detach all parts. assembly • Remove the tray carrier assembly. • Detach the drive. • Remove the drive. Drive Electronic scrap Drive Qanto_Id_A5_ 0000.50.65062-US...
-
Page 33: Troubleshooting
11. Troubleshooting Lifting system does not work • The lifting system does not move down. ► Check the setting of the safety switches according to the assembly instructions. • The trays do not sit in place properly. ► Check the position of the trays. •... - Page 34 3.1 Denominación comercial del equipo......40 3.2 Uso previsto ..............40 3.3 Acabados (montaje a la izquierda / a la derecha) ..40 4. Datos técnicos ..............41 5. Montaje de Qanto ..............42 5.1 Indicaciones generales de montaje ......42 5.2 Suministro ..............43 6. Manejo de Qanto ...............44 6.1 Electrificación ..............44...
- Page 35 7. Mantenimiento y conservación ..........56 8. Garantías postventa ............56 8.1 Garantía ..............56 8.2 Recambios ..............56 8.3 Reparación ..............57 9. Desmontaje / Montaje ............58 9.1 Sustitución de la iluminación LED ......59 10. Reciclaje / Eliminación ............61 11. Reparación de averías ............65 Qanto_Id_A5_ 0000.50.65062-US...
-
Page 36: Explicación De Los Símbolos
1. Explicación de los símbolos DANGER PELIGRO indica una situación peligrosa que, si no se evita, cau- sará la muerte o lesiones graves. ADVERTENCIA ADVERTENCIA indica una situación peligrosa que, si no se evita, podría causar la muerte o lesiones graves. PRECAUCIÓN PRECAUCIÓN indica una situación peligrosa que, si no se evita, podría producir lesiones leves o moderadas. -
Page 37: Importantes Instrucciones De Seguridad
• Asegúrese de que no penetre agua dentro del armario del Qanto tanto durante su montaje como su funcionamiento • Nunca trabaje con el Qanto si el cable o la toma eléctrica están dañados. • Mantenga a los niños alejados del sistema de elevación. - Page 38 • Pueden utilizar el Qanto los niños a partir de 8 años, así como las personas con discapacidad física, sensorial o mental o sin estén bajo supervisión o hayan sido instruidos en el manejo se- guro del Qanto y comprendan los peligros derivados del mismo.
- Page 39 • No utilice el Qanto al aire libre. • No permita que ningún objeto caiga sobre el Qanto. • Accione el sistema de elevación solamente con los estantes colocados.
-
Page 40: Datos Generales
Acabados El Qanto es apto para una colocación «a la derecha» o bien «a la izquierda». El Qanto puede estar equipado con 2 o con 3 estantes a elección. Qanto_Id_A5_ 0000.50.65062-US... -
Page 41: Datos Técnicos
4. Datos técnicos Conexión de red 120 V / 60 Hz / 16 A PRECAUCIÓN Elevación: 19,69“ (500mm) Estante superior: carga máx. 22 lb (10 kg) Estante intermedio: carga máx. 22 lb (10 kg) Estante inferior: carga máx. 33 lb (15 kg) Dimensiones internas del estante 18,66“... -
Page 42: Montaje De Qanto
7,87” (200 mm) tanto hacia arriba como hacia los lados. Entre el Qanto y una cocina de gas deberá existir siempre una distancia mínima de 11,82” (300 mm). ejemplo, con una toma de enchufe doble detrás del armario en la zona del zócalo). -
Page 43: Suministro
5.2 Alcance del suministro Armario con dispositivo de elevación Patas de apoyo Estante superior Estante inferior (intermedio: 1x ( 2x ) opcional) Listones separadores opcionales Qanto_Id_A5_ 0000.50.65062-US... -
Page 44: Manejo De Qanto
De lo contrario, no podrá conectar el Qanto. Póngase en contacto con su distribuidor especializado. 6.2 Elemento de mando PRECAUCIÓN... - Page 45 Al APRETAR y MANTENER APRETADA la tecla, se moverá el accionamiento hacia arriba. Al APRETAR y MANTENER APRETADA la tecla, se moverá el accionamiento hacia abajo. Al SOLTAR las teclas, el accionamiento STOP se detiene en posición STOP. Qanto_Id_A5_ 0000.50.65062-US...
-
Page 46: Desconexión De Seguridad
STOP Al APRETAR y MANTENER APRETADA la tecla, se moverá el accionamiento hacia arriba activará el STOP. Al APRETAR y MANTENER APRETADA STOP la tecla, se moverá el accionamiento hacia abajo activará el STOP. 6.3 Desconexión de seguridad Solamente se podrán mover hacia abajo los estantes superiores cuando estén colocados. -
Page 47: Iluminación
6.4 Iluminación LED opcional NO DISPONIBLE EN LOS ESTADOS UNIDOS El armario se puede suministrar con un iluminación LED que no requiere mantenimiento alguno. Al extraer el estante, la iluminación LED se enciende automática- mente («ENCENDIDO»). Al apoyar el estante, la iluminación LED se apaga automáticamen- te («APAGADO»). -
Page 48: Ajuste De La Altura Del Estante Intermedio
6.5 Ajuste de la altura del estante intermedio Paso 1: Suba el estante superior hasta arriba del todo presionando la tecla + en el teclado del elemento de mando. Estante Paso 2: Levante el estante intermedio y extráigalo de su soporte. Qanto_Id_A5_ 0000.50.65062-US... - Page 49 1x 360° Paso 3: 7/64“ (3 mm) aplicando un giro de 360º. Soporte del estante Paso 4: Ahora puede desplazar el estante inter- medio alrededor de ± 1,96“ (± 50 mm). Paso 5: Vuelva a apretar los 4 tornillos con una llave Allen 7/64“...
- Page 50 Soporte Estante del estante Paso 6: Coloque el estante sobre el soporte intermedio. Paso 7: Baje el estante superior hasta abajo del todo presionando la tecla - en el teclado del elemento de mando. Qanto_Id_A5_ 0000.50.65062-US...
-
Page 51: Ajuste De La Altura De Los Estantes
6.6 Ajuste de la altura de los estantes H = H Estante Paso 1: Marco cobertor Compruebe la atura del estante y la del marco cobertor. Estante Apoyo del estante Paso 2: Levante el estante del soporte. Paso 3: Suba o baje el apoyo del estante haciéndolo girar. - Page 52 H = H Paso 4: Coloque el estante sobre el sopor- te y compruebe que la altura del estante coincida con la altura del marco cobertor. Si no coinciden las alturas, vuelva a repetir los pasos 2 + 3. Nivel de burbuja / Regla Interruptor de seguridad TX20...
-
Page 53: Ajuste De La Ranura Para Los Estantes
6.7 Ajuste de la ranura para los estantes Marco cobertor Estante Paso 1: Compruebe el hueco entre el estante y el marco cobertor. Estante Paso 2: Levante el estante del soporte. Qanto_Id_A5_ 0000.50.65062-US... - Page 54 Tornillo de ajuste Colocación del estante Paso 3: Coloque correctamente el estante girando a izquierda o derecha el tornillo de ajuste. Estante Paso 4: Coloque el estante sobre el sopor- te y vuelva a comprobar si existe hueco. Si no coincide el hueco, vuelva a repetir los pasos 2 + 3.
-
Page 55: Inicialización
6.8 Inicialización Antes y durante la inicialización, se debe comprobar y asegurar que los interruptores de seguridad hagan contacto. El sistema de elevación se inicializa manteniendo pulsada la tecla. Debe mantenerse pulsada hasta que el accio- durante 2 - 3 segundos. A continuación se debe volver a mantener pulsada durante 6 - 8 segundos más. -
Page 56: Mantenimiento Y Conservación
Para reducir el riesgo de quemaduras, incendio, descarga eléc- trica o lesiones personales. Elimine de forma periódica el polvo y la suciedad del Qanto y asegúrese de que no presenta desperfectos ni grietas. Límpielo con un producto de limpieza doméstico utilizando un paño suave. -
Page 57: Recambios
8.2 Recambios Podrá adquirir los siguientes recambios a través de su distribuidor especializado. Estante superior Nº de artículo: 5602.11 Estante inferior Estante inferior Nº de artículo: 5603.11 opcional Qanto_Id_A5_ 0000.50.65062-US... -
Page 58: Reparación
Diríjase a su distribuidor especializado. Si se abren ciertas partes del Qanto, existe el riesgo de fallos en su funcionamiento. Se perderán entonces los derechos de reclamación de la garantía. -
Page 59: Sustitución De La Iluminación Led
9.1 Iluminación LED opcional NO DISPONIBLE EN LOS ESTADOS UNIDOS Desmontaje Conector + casquillo Canal para cables Luz LED TX20 Paso 1: Extraiga el conector de la luz LED del casquillo de conexión y el cable del canal para cables. Paso 2: llador TX20. - Page 60 Montaje Conector + casquillo Canal para cables Luz LED TX20 Paso 4: Coloque la luz LED nueva. Paso 5: ción con la ayuda de un destornillador TX20. Paso 6: Lleve el cable de la luz LED a lo largo del canal para cables. Paso 7: Enchufe el conector de la luz LED al casquillo de conexión.
-
Page 61: Reciclaje / Eliminación
10. Reciclaje / Eliminación Las opciones para reciclar o eliminar sistemas motorizados están reguladas a nivel nacional dependiendo del país. Infórmese en la autoridad competente o consulte con su distribuidor especializado. Le recomendamos desmontar nuestros productos en tantas piezas como sea Armario Armazón Residuos voluminosos... - Page 62 Antes de empezar con el desmontaje, desconecte del a red eléctrica el Qanto extrayendo la clavija de enchufe. ADVERTENCIA Para reducir el riesgo de quemaduras, incen- dio, descarga eléctrica o lesiones persona- les. Le recomendamos desmontar nuestros productos en tantas piezas Estante - Plástico - Material reciclable...
- Page 63 Luz LED Chatarra eléctrica • Extraiga el conector de la luz LED del casquillo de conexión y el cable del canal para cables. • llador TX20. • Extraiga la luz LED. Unidad de mando Chatarra eléctrica • Desenchufe todos los cables de conexión de la unidad de mando.
- Page 64 • Desenchufe todos los cables de Grupo de soportes conexión. de los estantes • • Extraiga el grupo de soportes de los estantes • • Extraiga el accionamiento Accionamiento Chatarra eléctrica Accionamiento Qanto_Id_A5_ 0000.50.65062-US...
-
Page 65: Reparación De Averías
11. Reparación de averías El sistema de elevación no funciona • El sistema de elevación no va hacia abajo. ► Compruebe el ajuste del interruptor de seguridad según las instrucciones de montaje. • Los estantes no apoyan correctamente ► Compruebe la posición de los estantes •... - Page 66 3. Indications générales ............72 3.1 Désignation de l’appareil ...........72 3.2 Destination ..............72 3.3 Versions (montage gauche / droit) ......72 4. Caractéristiques techniques ..........73 5. Montage Qanto ..............74 5.1 Consignes générales de montage ......74 5.2 Livraison ..............75 6. Utilisation Qanto ..............76 6.1 Électrification .............76 6.2 Élément de commande..........76...
- Page 67 7. Maintenance et entretien ...........88 8. Garantie commerciale et garantie légale ......88 8.1 Garantie commerciale ..........88 8.2 Pièces de rechange ...........89 8.3 Réparation ..............90 9. Démontage / montage ............90 9.1 Remplacement de l’éclairage LED ......91 10. Recyclage / élimination ............93 11.
-
Page 68: Explication Des Symboles
1. Explication des symboles DANGER DANGER indique une situation dangereuse qui, si elle n’est pas évitée, entraînera la mort ou de sérieuses blessures. MISE EN GARDE MISE EN GARDE indique une situation dangereuse qui, si elle n’est pas évitée, pourrait entraîner la mort ou de sérieuses bles- sures. -
Page 69: Remarques De Sécurité Importantes
« Attention » peut conduire à des dommages considé- rables. MISE EN GARDE • Ne raccordez la Qanto qu’à une prise correctement mise à la terre. • Veillez à ce qu’aucune eau ne pénètre dans l’armoire lors du montage et du fonctionnement de la Qanto. - Page 70 • La Qanto peut être utilisée par des enfants âgés de 8 ans et plus ainsi que par des personnes à capacités physiques, sen- sorielles ou mentales réduites ou manquant d’expérience et de connaissances si ces dernières sont surveillées ou ont été infor- mées de la manière d’utiliser la Qanto en toute sécurité...
- Page 71 • N’utilisez pas la Qanto à l’extérieur. • Ne laissez jamais d’objets tomber dans la Qanto. • Ne faites fonctionner le système de levage qu’avec les ta- blettes posées dessus.
-
Page 72: Indications Générales
être levées et baissées à l’aide d’un système de levage. 3.3 Versions La Qanto convient à un montage « à gauche » ou « à droite ». La Qanto est équipée de 2, au choix 3 tablettes. La Qanto est équipée au choix avec / sans lumière LED. -
Page 73: Caractéristiques Techniques
4. Caractéristiques techniques Raccordement de réseau 120 V / 60 Hz / 16 A PRUDENCE Levage 19,69“ (500 mm) Tablette du haut: charge max. 22 lb (10 kg) Tablette du milieu: charge max. 22 lb (10 kg) Tablette du bas: charge max. 33 lb (15 kg) Dimension intérieure tablette 18,66“... -
Page 74: Montage Qanto
Qanto. Une distance d’au moins 7,88“ (200 mm) par rapport aux autres armoires ou étagères doit être respectée vers le haut et les côtés lorsque ce dernier est sorti. -
Page 75: Livraison
5.2 Étendue de la livraison Armoire avec dispositif de levage Pieds de réglage Tablette en haut Tablette en bas (milieu en option) 1x ( 2x ) Baguettes d’écartement en option Qanto_Id_A5_ 0000.50.65062-US... -
Page 76: Utilisation Qanto
à la tension d’entrée indiquée sur la plaquette signalétique. La tension du réseau et la tension d’entrée admissible doivent être identiques. Si ça n’est pas le cas, la Qanto ne doit pas être rac- cordée. Veuillez vous adresser à votre revendeur spécialisé. - Page 77 L’entraînement se déplace vers le haut lorsqu’on APPUIE sur la touche en la MAINTENANT appuyée. L’entraînement se déplace vers le bas lorsqu’on APPUIE sur la touche en la MAINTENANT appuyée. Lorsqu’on RELÂCHE les touches, l’entraî- STOP nement se commute sur STOP. Qanto_Id_A5_ 0000.50.65062-US...
-
Page 78: Arrêt De Sécurité
STOP L’entraînement se déplace vers le haut lorsqu’on APPUIE sur la touche en la MAINTENANT appuyée. Et se commute STOP. L’entraînement se déplace vers le bas STOP lorsqu’on APPUIE sur la touche en la MAINTENANT appuyée. Et se commute STOP. 6.3 Arrêt de sécurité... -
Page 79: Éclairage
6.4 Éclairage LED (optional) L’armoire peut être livrée avec un éclairage LED sans mainte- nance. Lorsque les tablettes sont sorties, l’éclairage LED se commute automatiquement sur « MARCHE ». Lorsque les tablettes sont abaissées, l’éclairage LED se commute automatiquement sur « ARRÊT ». Si un dysfonctionnement apparaît, adressez-vous à... -
Page 80: Réglage En Hauteur Au Moyen D'une Tablette
6.5 Réglage en hauteur de la tablette du milieu Étape 1 : Amenez les tablettes tout en haut en appuyant sur la touche + sur l’élément de commande. Tablette Étape 2 : Soulevez la tablette du milieu et retirez-là du porte-tablette. Qanto_Id_A5_ 0000.50.65062-US... - Page 81 1x 360° Étape 3 : Dévissez les 4 vis à l’aide d’une clé tuant une rotation de 360°. Porte-tablette Étape 4 : Vous pouvez maintenant déplacer le porte-tablette du milieu de ± 1,96“ (± 50 mm). Étape 5 : Revissez à nouveau à fond les 4 vis à...
- Page 82 Tablette Porte-tablette Étape 6 : Posez la tablette sur le porte-tablette du milieu. Étape 7 : Amenez les tablettes tout en bas en appuyant sur la touche - sur l’élément de commande. Qanto_Id_A5_ 0000.50.65062-US...
-
Page 83: Réglage En Hauteur Des Tablettes
6.6 Réglage en hauteur des tablettes H = H Tablette Étape 1 : Contrôlez la hauteur de la tablette Cadre de recouvrement jusqu’au niveau du cadre de recouvre- ment. Tablette Support de tablette Étape 2 : Soulevez la tablette du porte-tablette. Étape 3 : Soulevez ou abaissez en imprimant une rotation aux supports de tablette. - Page 84 H = H Étape 4 : Posez la tablette sur le porte-ta- blette et contrôlez à nouveau la hauteur de la tablette par rapport au cadre de recouvrement. Si la hauteur ne convient pas encore, répétez les étapes 2 + 3. Niveau à...
-
Page 85: Réglage Des Espacements Entre Les Tablettes
6.7 Réglage des espacements entre les tablettes Cadre de recouvrement Tablette Étape 1 : et le cadre de recouvrement. Tablette Étape 2 : Soulevez la tablette du porte-tablette. Qanto_Id_A5_ 0000.50.65062-US... - Page 86 Vis de réglage Réception de tablette Étape 3 : Changez le réglage de la récep- tion de tablette en tournant la vis de réglage vers la gauche ou vers la droite. Tablette Étape 4 : Posez la tablette sur le porte-ta- blette et contrôlez à...
-
Page 87: Initialisation
6.8 Initialisation interrupteurs de sécurité créent un contact. Le système de levage est initialisé en appuyant sur la touche et en maintenant cette dernière appuyée. Elle doit être mainte- nue appuyée jusqu’à ce que l’entraînement ait atteint la position secondes. Il faut alors maintenir la touche appuyée pendant 6 à... -
Page 88: Maintenance Et Entretien
Éliminez à des intervalles réguliers la poussière et la saleté sur la Qanto et assurez-vous qu’il n’y ait pas de petits dommages ni de et séchez à fond. Pour les tâches particulièrement tenaces, on peut utiliser un nettoyant ménager sans dilution ou bien encore un nettoyant pour verre. -
Page 89: Pièces De Rechange
8.2 Pièces de rechange Vous pouvez vous procurer les pièces de rechange suivantes au- près de votre revendeur spécialisé. Tablette en haut N° d’article : 5602.11 Tablette du bas Tablette au milieu N° d’article : 5603.11 en option Qanto_Id_A5_ 0000.50.65062-US... -
Page 90: Réparation
SAV du fait que celles-ci requièrent l’utilisation d’outils spéciaux. Adressez-vous à votre revendeur spécialisé. Le fait d’ouvrir des pièces de la Qanto risque de provoquer les dysfonctionnement suivants. L’ensemble des droits à la garantie légale disparaissent. -
Page 91: Remplacement De L'éclairage Led
9.1 L’éclairage LED option PAS DISPONIBLE AUX ÉTATS UNIS Démontage Fiche + Prise Gaine de câble Lampe LED TX20 Étape 1 : et sortez le câble de la gaine de câble. Étape 2 : TX20. Étape 3 : Retirez la lampe LED défectueuse. Qanto_Id_A5_ 0000.50.65062-US... - Page 92 Montage Fiche + Prise Gaine de câble Lampe LED TX20 Étape 4 : Insérez la nouvelle lampe LED. Étape 5 : un tournevis TX20. Étape 6 : Posez le câble de lampe dans la gaine de câble. Étape 7 : Qanto_Id_A5_ 0000.50.65062-US...
-
Page 93: Recyclage / Élimination
10. Recyclage / élimination Les possibilités de recyclage ou d’élimination des déchets de chaque pays. Veuillez vous informer auprès de votre administra- tion compétente ou demandez à votre revendeur spécialisé. Nous recommandons de désassembler nos produits en autant cler. Armoire Corps Déchet encombrant Pieds de réglage... - Page 94 Avant de commencer le désassemblage, déconnectez la Qanto en débranchant la MISE EN GARDE cendie, électrocution ou blessures de per- sonnes. Nous recommandons de désassembler nos produits en autant de Tablettes - Plastique – Matériaux Corps - Bois - Déchet encombrant Sol de l’armoire - Plastique –...
- Page 95 Lampe LED Déchets électriques • ment et sortez le câble de la gaine de câble. • tournevis TX20. • Retirez la lampe LED. Unité de commande Déchets électriques • Retirez tous les câbles de raccordement de l’unité de com- mande. •...
- Page 96 • Déconnectez tous les câbles de rac- Sous-ensemble cordement. du porte-tablette • Détachez tous les composants. • Retirez le sous-ensemble du porte-tablette. • Dévissez l’entraînement. • Retirez l’entraînement. Entraînement Déchets électriques Entraînement Qanto_Id_A5_ 0000.50.65062-US...
-
Page 97: Élimination Des Dysfonctionnements
11. Élimination des dysfonctionnements Le système de levage ne fonctionne pas • Le système de levage ne descend pas. ► Vérifier l’interrupteur de sécurité selon l’instruction de montage. • Les tablettes ne reposent pas correctement ► Vérifier la position des tablettes •... - Page 98 Qanto_Id_A5_ 0000.50.65062-US...
- Page 99 Qanto_Id_A5_ 0000.50.65062-US...
- Page 100 We are gladly available in case of any questions. Quedamos a su entera disposición si desea realizar cualquier consulta. Nous nous tenons volontiers à votre disposition pour toute question enretour. Service number • Número de atención al cliente • Numéro du SAV +49 (0) 5222 / 949494...
Need help?
Do you have a question about the Qanto and is the answer not in the manual?
Questions and answers