
Related Manuals for +GF+ MSA 2 MULTI


Summary of Contents for +GF+ MSA 2 MULTI
- Page 1 GF Piping Systems Instruction manual Bedienungsanleitung MSA 2 MULTI Electrofusion Unit MSA 2 MULTI Elektroschweissgerät...
-
Page 3: Table Of Contents
Operating Instructions MSA 2 MULTI General Information Index Page General Information Warning notice Introduction Product description Components description 1.2.1 Operation Controls 1.2.2 Display 1.2.3 Ambient Temperature Sensor 1.2.4 USB Interface 1.2.5... - Page 4 General Information Operating Instructions MSA 2 MULTI Working with safety in mind Other disposal ...
-
Page 5: I General Information
Anyway, the manufacturer reserves the right to make technical changes to MSA 2 MULTI which may result in differences from the pictures and information contained in this manual. To point out relevant aspects operating this electrofusion unit, symbols are frequently used. -
Page 6: Introduction
In addition, the MSA 2 MULTI is tracking and storing in the internal memory up to 500 welding protocols, that can be browsed by the user even days or months after the welding execution. -
Page 7: Components Description
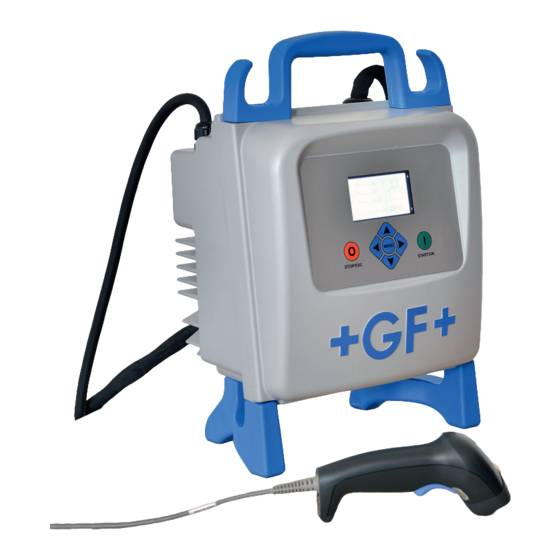
Operating Instructions MSA 2 MULTI Introduction Components description 1.2.1 Operation Controls There are seven buttons the user can press to operate the machine. START (green button) and STOP (red button) are the most important, used to get a confirmation or a stop for all the actions. -
Page 8: Display
Introduction Operating Instructions MSA 2 MULTI 1.2.2 Display The graphical display is the main user interface of the welding machine. It shows the steps to be executed in sequence, the fusion data, possible errors and alarm messages. It is possible to change its brightness using the and buttons ... -
Page 9: Welding Cable
Operating Instructions MSA 2 MULTI Introduction 1.2.6 Welding Cable The fusion cable shall be connected to the fitting pins. As standard the terminals are supplied with straight female connectors, Ø4mm. Barcode Reader Scanner The barcode scanner allows a quick reading of welding parameters by reading the related barcode, pointing the barcode (at a distance of 10-15 cm) and pressing its button. -
Page 10: Start/Stop Card
Introduction Operating Instructions MSA 2 MULTI START/STOP Card START / STOP card can be used as alternative to the buttons on the keypad. For instance, you can confirm the commands or start the welding process by scanning the START bar code on the card. -
Page 11: Fusion Process
V 2.01 S156A6308001 Material selection The first step is the plastic material selection: the MSA 2 MULTI can weld PE, PP-R, PP/PVDF or PB INSTAFLEX fittings. As the fusion parameters change depending on the material, the user has to set the proper one. This shall be done reading with the scanner the desired barcode, out of the 4 shown below This must be done, when the display is showing the “connect... - Page 12 Fusion process Operating Instructions MSA 2 MULTI As soon as the MSA 2 MULTI has captured the code, it will change the icon accordingly. For PE: t = ----s Vo= --.-V R = --.-- 25°C 12/06/12 15:50 For INSTAFLEX BIG...
-
Page 13: Overview Of Operating Procedure
Operating Instructions MSA 2 MULTI Fusion process Overview of operating procedure The welding workflow is shown in the picture below t = ----s Vo= --.-V Prepare the welding and R = --.-- connect the fitting 12/06/12 15:50 25°C t = ----s... -
Page 14: Connect Fitting
Operating Instructions MSA 2 MULTI Connect fitting The first step the operator has to connect the fitting. As soon as a fitting presence is recognized, the MSA 2 MULTI moves automatically forward, asking for the fusion parameters in case of PB/PP-R/PE material. -
Page 15: Enter Fusion Data
12/06/12 15:50 25°C In case the operator code is mandatory the first row ‘----‘ will blink and the MSA 2 MULTI will not move forward, blocking the acquisition of the fusion parameters. Enter fusion data After that, the user can insert the fusion parameters. - Page 16 Fusion process Operating Instructions MSA 2 MULTI In case of manual mode, the machine works in different ways, depending on the material selection. If the material selection is PE or PP-R, then time and voltage values must be entered, pressing the START/OK ( I ) button to go in “edit”...
-
Page 17: Preparation
Preparation As soon as the operator confirms with the START/OK button, before starting the fusion process, the MSA 2 MULTI shows a reminder to the operator to be sure that pipes have been scraped, cleaned, aligned following the instructions of the fitting manufacturers. -
Page 18: Fusion Process
Fusion process Operating Instructions MSA 2 MULTI Fusion process 2.8.1 Welding phase During the fusion process, the display shows the information concerning the output voltage, the remaining fusion time and the applied energy. t = 0020s Vo= 39.7V E = 003.1kJ... -
Page 19: Cooling Time
Operating Instructions MSA 2 MULTI Fusion process 2.8.2 Cooling time After the completion of the process, the fusion summary and the remaining cooling time, if defined in the barcode, are displayed alternately. Messages are active till the user will press the STOP/ESC (O) button, to proceed with the next welding. -
Page 20: Configuration Settings
Configuration settings Operating Instructions MSA 2 MULTI Configuration settings The MSA 2 MULTI does not need any configuration. Only possible change is the date/time adjustment, to adapt to different time zones. To enter into this menu, press twice the MENU button. The calendar menu allows date and time modification. -
Page 21: Data Management
Operating Instructions MSA 2 MULTI Data Management Data Management The electro-fusion unit saves the welding protocols for each fusion cycle in the internal memory. These data can be saved in a PDF/BINARY file too. When the memory is full, the oldest protocol is overwritten by the most recent. -
Page 22: Protocol View
Data Management Operating Instructions MSA 2 MULTI Protocol view To view the saved protocols, press MENU once: the most recent protocol appears as first. 123 E-0 d110 [ +GF+ 12/06/12 15:54 25°C 123 Vo=39.5V t =1000s E = 200kJ P=215V The buttons ()() allow to scroll up and down the list of... -
Page 23: Protocol Export
Operating Instructions MSA 2 MULTI Data Management Protocol export The protocols stored in the internal memory of the MSA 2 MULTI can be copied in a memory stick for being analysed in a PC in a later stage, both in PDF and BINARY format. -
Page 24: Error Messages
Error messages Operating Instructions MSA 2 MULTI Error messages In case of anomalies or errors, the MSA 2 MULTI pops up a specific message useful to identify the possible issue. The related number will be even tracked within the welding protocol, to give evidence of the accident. -
Page 25: Technical Characteristics
Operating Instructions MSA 2 MULTI Technical characteristics Technical characteristics Mains voltage and 230 V (265V÷190V) 50/60 Hz frequency Suggested power 3.5kW generators Welding technique Voltage controlled Fusion voltage 3.6÷40V Operating temperature - 20 °C / +50°C Internal temperature - 20°C / +70°C Temperature sensor ±... -
Page 26: Maintenance
Maintenance Operating Instructions MSA 2 MULTI Maintenance Cleaning Clean the unit regularly with a slightly damp cloth. The membrane keyboard and other plates can be cleaned with industrial alcohol if necessary (no solvents or Trichlor products). Under no circumstances should the unit be sprayed or immersed in water nor cleaned with compressed air. -
Page 27: Accident Prevention
Operating Instructions MSA 2 MULTI Accident Prevention Accident Prevention Operating the Unit Do not let unauthorized or untrained personnel use the unit. When the unit is not in operation, avoid unauthorized use by keeping it in a dry, locked room. -
Page 28: Defect Unit
Accident Prevention Operating Instructions MSA 2 MULTI Defect Unit Arrange that damaged housings or other parts are replaced or repaired by an authorized service agent. If the unit is not working properly it must be sent without hesitation to an authorized service agent. - Page 29 Operating Instructions MSA 2 MULTI Accident Prevention...
- Page 30 GF Piping Systems Bedienungsanleitung MSA 2 MULTI Elektroschweissgerät...
- Page 31 Operating Instructions MSA 2 MULTI Inhaltsverzeichnis Page Allgemeines Warnhinweise Einleitung Produktbeschreibung Detailbeschreibung 1.2.1 Bedienfeld 1.2.2 Anzeige 1.2.3 Sensor für Umgebungstemperatur 1.2.4 USB-Schnittstelle 1.2.5 Netzkabel 1.2.6 Schweisskabel Barcodescanner ...
- Page 32 Operating Instructions MSA 2 MULTI Arbeitssicherheit Entsorgung...
-
Page 33: I Allgemeines
Sehr geehrter Kunde, wir danken Ihnen für das Vertrauen in dieses Produkt und wünschen Ihnen viel Erfolg bei der Anwendung. Das Elektro - schweissgerät MSA 2 MULTI wurde entsprechend der aktuell gültigen technischen Standards entwickelt. Ein anderer Einsatz dieser Anleitung... -
Page 34: Warnhinweise
Allgemeines Operating Instructions MSA 2 MULTI Warnhinweise In dieser Anleitung werden Warnhinweise verwendet, um Sie vor Verletzungen oder vor Sachschäden zu warnen. Lesen und beachten Sie diese Warnhinweise immer! Warnsymbol Bedeutung Unmittelbar drohende Gefahr! Bei Nichtbeachtung drohen Ihnen Tod oder schwerste Verletzungen. -
Page 35: Einleitung
Der Prozessor überwacht die Werte der Schweissparameter und regelt die Leistungsabgabe. und Dank der Displayanzeigen wird der Bediener durch alle notwendigen Arbeitsschritte geführt. Das MSA 2 MULTI speichert in einem internen Speicher bis zu 500 Schweissprotokolle ab. Um eine Qualitätsverbindungen sicherzustellen, stellt das Gerät entsprechend der gemessenen Umgebungstemperatur die Schweisszeitautomatisch setzen. -
Page 36: Detailbeschreibung
Einleitung Operating Instructions MSA 2 MULTI Detailbeschreibung 1.2.1 Bedienfeld Das Bedienfeld besteht aus sieben Tasten. START (grüne Taste) und STOP (rote Taste) sind am Wichtigsten, diese werden als Bestätigung oder Abbruch von allen Aktionen verwendet. Die anderen (blau Tasten) werden als Hilfstasten zur Menünavigation und Dateneingabe benutzt. -
Page 37: Anzeige
Operating Instructions MSA 2 MULTI Einleitung 1.2.2 Anzeige Die grafiche LCD Anzeige ist die Benutzerschnittstelle der Schweissmaschine. Hier werden Arbeitsschritte, Schweissdaten, sowie mögliche Fehler und Alarme angezeigt. Die Helligkeit ist mit den Pfeiltasten und veränderbar und wird mit der Taste gespeichert. Diese Einstellung ist nur aktiv, wenn auf der Anzeige folgendes symbol steht 1.2.3... -
Page 38: Schweisskabel
Einleitung Operating Instructions MSA 2 MULTI 1.2.6 Schweisskabel Schweisskabel werden Fittingkontakten angeschlossen. Werkseitig werden die Kabel mit Steckbuchsen Ø4,0 mm ausgeliefert. Barcodescanner Scanner ermöglicht schnelle Einlesen Schweissparametern und Bedienerdaten entsprechend der Barcodeinformation. Den Scanner nahe an den einzulesenden Barcode heranführen (10-15cm) und mit der Taste am Scanner das Einlesen starten. -
Page 39: Start/Stop Karte
Operating Instructions MSA 2 MULTI Einleitung START/STOP Karte Alternativ zu den START/STOP Tasten auf den Tastatur, können mit der START/STOP Karte Vorgänge der MSA 2 MULTI über den Barcode Scanner bestätigt (START) bzw. gelöscht (STOP) werden. Um einen laufenden Schweissvorgang zu unterbrechen, empfehlen wir die STOP-Taste auf der Tastatur der MSA 2 MULTI. -
Page 40: Schweissen
Maschinentyp, Seriennummer und Software Version. Material auswählen Der Systemauswahl ist die erste Aktion: das MSA 2 MULTI schweißt PE, PP-R, PP/PVDF oder PB INSTAFLEX fitting. Mit den folgenden Barcodes können Sie einfach und schnell das gewünschte System wählen. So hat der Anwender die richtige eins gesetzt. - Page 41 Operating Instructions MSA 2 MULTI Schweissen Wenn der Code gelesen wird, das Gerät ändert das Symbol. Für t = ----s Vo= --.-V R = --.-- 25°C 12/06/12 15:50 Für INSTAFLEX t = ----s INSTAFLEX Vo= --.-V R = --.-- 25°C 12/06/12 15:50 Für SEADRAIN...
-
Page 42: Übersicht Bedienungsablauf
Schweissen Operating Instructions MSA 2 MULTI Übersicht Bedienungsablauf Abgebildet ist ein Beispiel eines Bedienungsablaufs. t = ----s Vo= --.-V Fitting anschliessen R = --.-- 12/06/12 15:50 25°C t = ----s ------ ------ Vo= --.-V Schweissdaten einlesen R = 07.45 12/06/12 15:50 25°c... -
Page 43: Fitting Anschliessen
Sie bitte den Anschluss der Kabel an den Fitting. Im Falle von PP, können mehrere Fitting gleichwertig angeschlossen werden. Das MSA 2 MULTI zeigt, wie viele angeschlossen sind. Der Benutzer muss jeden Anschluss Schritt für Schritt verbinden. Das Gerät wird ein Aufzählungspunkt hinzuzufügen, wenn die Verbindung ist in Ordnung. -
Page 44: Eingabe Bedienerausweis/ Auftragsnummer
Das Einlesen des Schweisserausweises kann als Pflichteingabe oder als Option programmiert werden. Wenn das Schweissgerät mit dem Fitting korrekt angeschlossen wurde, überprüft das Gerät den Fittingwiderstand und zeigt diesen an. Beim MSA 2 MULTI kann der Anwender vor Eingabe der Schweissparameter Hilfe Scanners Schweisserausweis... -
Page 45: Schweissdaten Einlesen
Operating Instructions MSA 2 MULTI Schweissen Schweissdaten einlesen Schweissdaten werden mittels Barcodescanner oder manuell eingegeben. Als Standard ist das Einlesen mit Barcodescanner vorgesehen. Falls die Schweissdaten nicht angenommen werden, können dies mehrere Gründe haben: Lesegerät nicht vorschriftsmässig angewendet: bei Verwendung des Scanners variieren Sie den Abstand zum Code, bei Verwendung des Lesestifts führen Sie diesen... - Page 46 Schweissen Operating Instructions MSA 2 MULTI E-10 12/06/12 15:50 25°C manuellen Modus wählt Anwender Schweissspannung und Zeit am Gerät aus PP-R und PE. Mit Hilfe der Tasten ()() wird die Spannung ausgewählt und mit START/OK ( I ) bestätigt, automatisch wechselt man zu der Schweisszeit.
-
Page 47: Schweissvorbereitung
= 0020s Vo= 39.7V E = 003.1kJ N 150 Das MSA 2 MULTI passt die Schweisszeit entsprechend der Umgebungstemperatur an. Die resultierende Schweisszeit kann sich somit von der nominalen Zeit, welche vom Barcode gelesen wurde unterscheiden. Der Schweissvorgang kann jederzeit mit der Taste STOP/ESC unterbrochen werden. -
Page 48: Abkühlzeit
Schweissen Operating Instructions MSA 2 MULTI t = 0040s Vo= 39.6 V E = 007.5kJ N 150 Nach Beendigung der Schweisszeit werden die tatsächliche Schweisszeit und die eingetragene Energie angezeigt. Diese Daten werden im Protokoll abgespeichert. 2.8.2 Abkühlzeit Nach erfolgreicher... -
Page 49: Konfiguration
Operating Instructions MSA 2 MULTI Konfiguration Konfiguration Um in das Konfigurationsmenü zu gelangen, drücken Sie die Taste MENU: es können Datum und Zeit geändert werden. Das Datum wird in folgendem Format dargestellt: Tag / Monat / Jahr Stunden : Minuten :... -
Page 50: Datenmanagement
Datenmanagement Operating Instructions MSA 2 MULTI Datenmanagement Elektroschweissgerät speichert Protokoll jeder Schweissung in einen internen Speicher. Sobald der Speicher voll ist, wird die erste Schweissung mit der aktuellen überschrieben (FIFO – Prinzip). Die Daten der Protokolle entsprechen mehreren Normen, es sind folgende Informationen in PDF/BINARY Datei verfügbar:... -
Page 51: Anzeigen Von Protokollen
Operating Instructions MSA 2 MULTI Datenmanagement Anzeigen von Protokollen Eine Kurzform des Protokolls wird am Display angezeigt. Die Protokolle der letzten Schweissungen werden zuerst angezeigt. 123 E-0 d110 [ +GF+ 12/06/12 15:54 25°C 123 Vo=39.5V t =1000s E = 200kJ P=230V Mit den Pfeiltasten ()() blättert man durch die Protokolle, die... -
Page 52: Export Von Protokollen
Datenmanagement Operating Instructions MSA 2 MULTI Export von Protokollen Bei der Verwendung eines USB-Stickswerden alle Protokolle aus dem internen Speicher exportiert. Setzen Sie den USB-Stick in die Schnittstelle ein, drücken Sie MENU und wählen Sie das Exportsymbol aus. Drücken Sie START/OK (I) zum Start der Übertragung auf den USB-Stick. -
Page 53: Fehlermeldungen
Operating Instructions MSA 2 MULTI Fehlermeldungen Fehlermeldungen Bei Auftreten kritischer Zustände oder Fehlern zeigt das Display eine entsprechende Fehlermeldung an. Die entsprechende Fehlernummer wird in das Schweissprotokoll eingetragen. Beispiel einer Fehler Meldung: Die Tabelle beinhaltet alle möglichen Fehlermeldungen mit einer kurzen Angabe der Fehlerursache. -
Page 54: Technische Daten
Technische Daten Operating Instructions MSA 2 MULTI Technische Daten Netzspannung/Frequenz 230 V (265V – 190V) 40 – 70 Hz Empfohlene 3.5kW Generatoren Leistung Schweissart Kontrollierte Spannung Invertertechnologie Schweissspannung 3.6 – 40V Arbeitstemperatur - 20 °C – +50°C Gerätetemperatur - 20°C – +70°C... -
Page 55: Unterhalt
Operating Instructions MSA 2 MULTI Unterhalt Unterhalt Während der Kontrolle, Wartung und Reinigung das Gerät immer vom Netz trennen ! Gefahr Reinigung Gerät regelmässig mit einem feuchten Lappen reinigen. Die Frontplatte und Schilder können bei starker Verschmutzung mit Alkohol gereinigt werden (kein Verdünner oder Trichlor). -
Page 56: Unfallschutz Vorschriften
Unfallschutz Vorschriften Operating Instructions MSA 2 MULTI Unfallschutz Vorschriften Betrieb des Gerätes Das Gerät vor Unbefugten, nicht instruiertem Personal und Kindern fernhalten. Nichtbenutzte Geräte vor unbefugter Benutzung gesichert in einem trockenen, verschlossenen Raum aufbewahren. Der sichere Betrieb des Gerätes setzt Folgendes voraus: ... -
Page 57: Kontrolle Vor Der Benutzung
Operating Instructions MSA 2 MULTI Unfallschutz Vorschriften Kontrolle vor der Benutzung Vor jeder Benutzung das Gerät auf Beschädigungen und auf einwandfreie bestimmungsgemässe Funktionsfähigkeit kontrollieren. Gerät schützen Das Netz- und die Schweisskabel vor scharfen Kanten schützen. Beschädigte Kabel unverzüglich durch eine autorisierte Servicestelle ersetzen lassen. - Page 58 Unfallschutz Vorschriften Operating Instructions MSA 2 MULTI Arbeitssicherheit “Leisten Sie Ihren Beitrag zur Sicherheit am Arbeitsplatz." Melden Sie unverzüglich jegliche Abweichung der Arbeitsweise des Gerätes an die verantwortlice Person in Ihrem Unternehmen. Achten Sie immer auf Sicherheit während Ihrer Tätigkeiten.
- Page 59 Déclaration de conformité UE (DoC) Declaracion de conformidad UE (DoC) Declaração de conformidade UE (DoC) The following product : Fusion control unit MSA 2 MULTI Die Bauart der Machine : Schweissautomat Il seguente prodotto : Saldatrice automatica Le produit suivant: Machine à...
- Page 64 GF Piping Systems Worldwide at home Our sales companies and representatives ensure local customer support in over 100 countries www.gfps.com Argentina / Southern South America Finland Mexico / Northern Latin America Singapore Georg Fischer Central Plastics Georg Fischer AB Georg Fischer S.A. de C.V. George Fischer Pte Ltd Sudamérica S.R.L.
Need help?
Do you have a question about the MSA 2 MULTI and is the answer not in the manual?
Questions and answers