Table of Contents
Advertisement
Quick Links
Advertisement
Table of Contents

Related Manuals for Hypercable HYC-N4006-26

Summary of Contents for Hypercable HYC-N4006-26
- Page 1 HYC-N4006-26 4.4~4.9GHz 2x2 MIMO HT-OFDM Radio PTP Bridge / PTMP Mesh User Manual Includes install, configuration and trouble shooting information for the broadband wireless access outdoor radio. Version 1.0.1 www.hypercable.fr www.e-rake.fr Dec, 2016...
- Page 2 2x2 MIMO HT-OFDM radio. It can help you in avoiding the unforeseen problems and use the outdoor radio correctly. Technical Support If you have difficulty resolving the problem while installing or using the radio, Please contact the supplier for support. www.hypercable.fr www.e-rake.fr...
-
Page 3: Table Of Contents
ESCRIPTION 2-4 H ........................12 ARDWARE NSTALLATION CHAPTER 3 CONFIGURATION ..................... 13 3-1 S ........................13 TART UP AND OG IN 3-2 M ....................... 23 ROTOCOL ONFIGURATION 3-3 W ..........................24 IRELESS ETUP 3-4 M ..........................27 ANAGEMENT www.hypercable.fr www.e-rake.fr... -
Page 4: Conventions
This warning symbol means danger. You are in a situation that could cause bodily injury. Before you work on any equipment, be aware of the hazards involved with electrical circuitry and be familiar with standard practices for preventing accidents. www.hypercable.fr www.e-rake.fr... -
Page 5: Chapter 1 Introduction
Provides the easy installation for outdoor PTP bridge / PTMP Mesh applications with high performance. ±2 ppm Frequency Stability for Mobility & NLOS 7 Channel BW (2.5/5/10/15/20/30/40 MHz) 5 bits/s/Hz amazing spectral efficiency Network Architecture: P-T-P Bridge Mesh - Peer to peer www.hypercable.fr www.e-rake.fr... - Page 6 Supports settable transmit power levels to adjust coverage cell size, ranging from max.(100%) to 30% of max., the adjustment step is 1dB. Fast Seamless Roaming GPS Coordinates and Internet map database IEC61000-4-5 Surge Protection IP-68 Water & Dust Resistant www.hypercable.fr www.e-rake.fr...
-
Page 7: Chapter 2 Hardware Installation
The 4GHz 2x2 MIMO HT-OFDM radio and POE injector can be damaged by incorrect power application. Read and carefully follow the installation instructions before connecing the system to its power source. www.hypercable.fr www.e-rake.fr... -
Page 8: Product Kit
Category 5 UTP or STP networking cable. (From the PC to POE) Category 5 SSTP or SFTP networking cable. (From the radio to POE) A Web browser for configuration: Google Chrome or Microsoft IE 9.0 or later. Installing TCP/IP protocol to the computer. www.hypercable.fr www.e-rake.fr... -
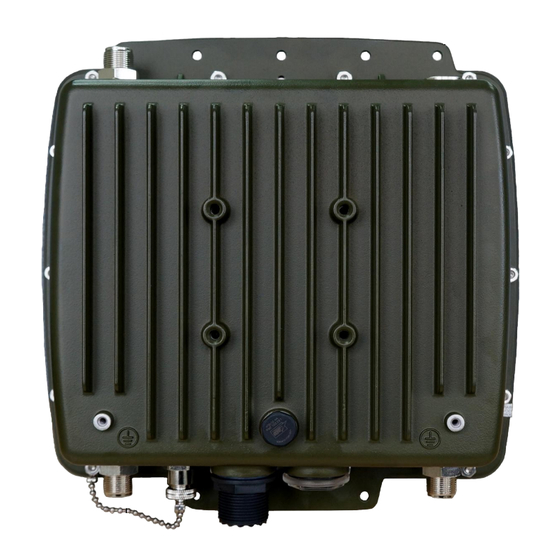
Page 9: Mechanical Description
This equipment must be grounded. Never defeat the ground conductor or operate the equipment in the absence of a suitably installed ground conductor. Contact the appropriate electrical inspection authority or an electrician if you are uncertain that suitable grounding is available. www.hypercable.fr www.e-rake.fr... - Page 10 GPS Ant RF1- Secondary RF1- Primary ※ Note: 1. When you set the RF to 1x1 instead of 2x2 MIMO, only Primary port works. 2. RF1 = Wireless 1 / RF2 = Wireless 2 in the configuration page. www.hypercable.fr www.e-rake.fr...
- Page 11 Connect to the 48VDC Power adaptor for DC input. LED Indicator (PWR) Power LED Grounding stud Connect to the ground conductor with the ground wire. Power Over Ethernet Injector is not a waterproof unit, should not be exposed to the outdoor without any protection. www.hypercable.fr www.e-rake.fr...
-
Page 12: Hardware Installation
4GHz 2x2 MIMO Radio operations first before you mount the radio in a remote location. Power Over Ethernet Injector is not a waterproof unit, should not be exposed to outdoor without any protection. www.hypercable.fr www.e-rake.fr... -
Page 13: Chapter 3 Configuration
Wireless, Management and Logout buttons will be shown in left part. The main menu provides links to the whole sections of the web configuration interface. Information This page shows most of the product information briefly, that includes General Information, Network Information, MESH, Wireless and Wired Network www.hypercable.fr www.e-rake.fr... - Page 14 Information -1 Information -2 Status This page shows all the status of the radio in one page, such as System, mesh, wireless and port statistics. www.hypercable.fr www.e-rake.fr...
- Page 15 Click the Refresh button to run the parameters Status 1 Status -2 www.hypercable.fr www.e-rake.fr...
- Page 16 1. You can select “Obtain current position from GPS receiver” with the radio type that integrated GPS module. Attach an external GPS active antenna to the GPS port, you can see the received list of the GPS satellites. www.hypercable.fr www.e-rake.fr...
- Page 17 2. Enter the coordinates manually (this can also be done in System / Basic Setup) or 3. Drag the location mark of the radio to anywhere in the map you want. 3. select the purple land mark and drag it to the location you want to install. www.hypercable.fr www.e-rake.fr...
- Page 18 MAP – Topology PTP Topology Map – Data rate / RSSI / Distance / Frequency www.hypercable.fr www.e-rake.fr...
- Page 19 Vlan ID will not be allowed to connect this radio and configure it. GPS Coordinates: Input the Latitude and Longitude info of the 4GHz 2x2 MIMO Radio’s location, and click apply. Connect the radio to internet, then it will get the map from internet www.hypercable.fr www.e-rake.fr...
- Page 20 Default Gateway: The 4GHz 2x2 MIMO Radio will use this value for default Gateway. Primary DNS Server: The 4GHz 2x2 MIMO Radio will use this value for primary Domain Name Server. Secondary DNS Server: The 4GHz 2x2 MIMO Radio will use this value for secondary Domain Name Server. System /DHCP Setting www.hypercable.fr www.e-rake.fr...
- Page 21 Specifies the interval that the bridge waits to hear Max Age BPDUs from the spanning tree root Forward Delay Specifies a forward delay interval on the bridge Note: If you complete the settings, please click on “Apply” for changes to take effect. www.hypercable.fr www.e-rake.fr...
- Page 22 Time Zone: You may select the appropriate local time zone for your radio from a list of all available time zones. Such as below list: GPS time settings: Sync the time with GPS module. Time Server: the central time of the Time Server. Time Server Port: the port of the Time Server. www.hypercable.fr www.e-rake.fr...
-
Page 23: Mesh Protocol Configuration
Maximum Hops (1~30): Define the max repeating hops in the mesh network. Acceptable RSSI (-50~-90dBm): This RSSI threshold is an important reference parameter to decide to hold the link between the Mesh nodes or change to other better optional path. Probe interval time: Configuring the Time Interval between Probes. www.hypercable.fr www.e-rake.fr... -
Page 24: Wireless Setup
Perform as a point to point bridge, enter the MAC address of the remote radio that you want to connect. MESH (Peer-to-peer) Perform as a mesh node in the mesh network. model: Server mode and Unstructured peer to peer mode. www.hypercable.fr www.e-rake.fr... - Page 25 Due to Destination Address (DA) and sender Address (SA) in the sub-frame header must match to same receiver address (RA) and the transmitter address (TA) in the MAC header, A-MSDU cannot be used for broadcast & multicast. www.hypercable.fr www.e-rake.fr...
- Page 26 To prevent unauthorized radios from accessing data transmitted over the link, the Encryption Settings window offers WPA2 PSK features, making your data transmission over air more secure and allows you to specify Encryption Key(s). WPA2 PSK – AES encryption www.hypercable.fr www.e-rake.fr...
-
Page 27: Management
Note: After you change password, please take note of your new password. Otherwise, you will not able to access the radio with correct password. Management / Remote Management You can configure the remote Management via Secure Shell (SSH) or SNMP by setting the parameters in this page. www.hypercable.fr www.e-rake.fr... - Page 28 The current system settings can be saved into a file as a backup by clicking “Backup”. The saved file can be loaded back on the radio by clicking “Browse”. When you have selected the settings file, click “Retrieve” to begin the process. Furthermore, you may click “Restore” to factory default settings. www.hypercable.fr www.e-rake.fr...
- Page 29 The Web-browser will not be accessible until the 4GHz 2x2 MIMO Radio has finished its reboot process. Management / Logout Click log out when you finished all the configuration, if there is anything missed, you can selected “login again” to enter the configuration process again. www.hypercable.fr www.e-rake.fr...
- Page 30 RESET button for 6~9 seconds. This will reset the Radio to the factory default settings. If you applied any personal configuration settings, you will need to make the changes again. Reset Button Reset button of the radio www.hypercable.fr www.e-rake.fr...
Need help?
Do you have a question about the HYC-N4006-26 and is the answer not in the manual?
Questions and answers