
Related Manuals for OPTO-EDU A59.3508


Summary of Contents for OPTO-EDU A59.3508
- Page 1 A59.3508 Digital Camera, 8.0M WIFI+HDMI+USB+WAN Mouse Control Measuring Instruction Manual www.optoedu.com Page 1 of 18 sale@cnoec.com...
-
Page 2: Specification
UVC (USB) Real Time Image Output to PC With S-Eye Measure Software ⚫ 60FPS For HDMI & USB Output, Store Image to USB Hard Disk Specification Items A59.3508 WIFI+HDMI+Type-C+WAN, Digital Camera Sensor Sony IMX334, 1/1.8" CMOS 2.0μm*2.0μm Pixel size Resolution 8.0M... -
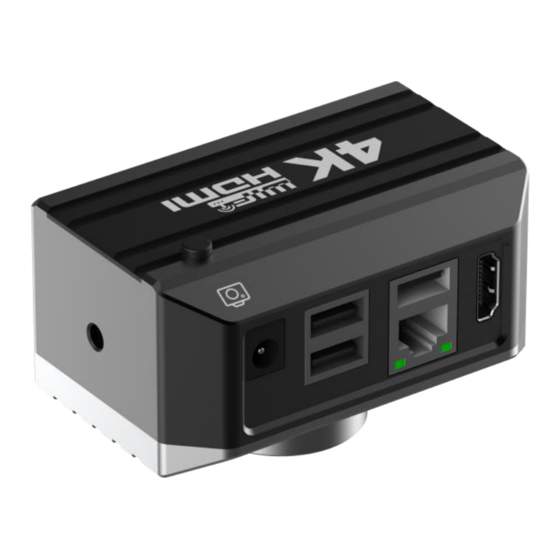
Page 3: Camera Panel
Six Directions View Camera Panel UVC for PC USB Snap Key DC12V Power HDMI to Monitor USB For Mouse USB For USB Stick LAN Port www.optoedu.com Page 3 of 18 sale@cnoec.com... -
Page 4: Quick Start
Quick Start 1. HDMI 1. Connect camera to monitor by HDMI cable 2. Connect the mouse and U disk to USB port 3. After connecting the DC-12V power supply, the product will automatically turn on, the LED will light up in blue color, the camera‘s HDMI & WIFI will run and wait for the display. 4. - Page 5 2. Click computer's WIFI icon, find and connect pc to "Camera". The password is 12345678, which is the default hotspot of WIFI camera. Camera 3. Click Yongwin Netcam to start it, you will see image from camera and microscope like this www.optoedu.com Page 5 of 18...
- Page 6 Before use USB output, you need to select and open UVC function in camera. Open UVC -- Camera’s USB port used to output image to PC’s USB port Close UVC – Camera’s USB used to connect mouse, keyboard, or USB disk. Remark: UVC means USB.
- Page 7 Start to use USB 1. On your computer or laptop, install software S-Eye for image view. 2. Connect the camera to pc via USB cable. 3. Start to view the image, take picture & video, or do measure work on PC 1.
- Page 8 www.optoedu.com Page 8 of 18 sale@cnoec.com...
-
Page 9: Function Introduction
Function Introduction Boot Screen Connect 12V power, press the ON/OFF button, camera will turn on and show following screen will show. Main Interface User moves the mouse to the bottom and the main menu will pop up as following Snap Video Preview Measurement www.optoedu.com Page 9 of 18 sale@cnoec.com... - Page 10 Zoom in Zoom out Mirror Flip Freeze Monochrome 2 Split 4 Split 2 Split:Image in 2 windows compares with live video 4 Split:Image in 4 windows, when double clicking any one of four images, the image will be frozen. When double clicking again, it will be back to normal. Click to enter image setting: Move the mouse to drag the corresponding slide bar under this menu, it can adjust the...
- Page 11 Click to enter more image setting . Under this menu, you can drag the progress bar by the mouse to adjust the parameters of relevant images Click to enter measure & grid setting Line color: nine colors optional Line width: Press "+" or "-", five kinds of line width are available Text color: nine colors optional Text size: Press "+"...
- Page 12 Gridline settings. Group: there are A/B/C/D/E/F/G/H, 8 groups of grid lines Line: There are V1-V8/H1-H8 (i.e. 8 horizontal and vertical) Color: there are nine colors optional Line width: there are five kinds of line width optional Click on the scale, the screen will show the scale Click to enter time, hardware, version setting.
- Page 13 Click to switch language, total 6 languages optional Click to set WIFI connection Hotspot O WIFI In HDMI interface, click WIFI icon, you can choose Hotspot mode or WIFI mode. www.optoedu.com Page 13 of 18 sale@cnoec.com...
- Page 14 Hotspot mode: Camera will set hotspot, default “Camera” with password 12345678, computer or mobile phone can connect to the hotspot and see image from camera. You can customize the hotspot name and password too in this menu. WIFI mode: Camera can join other WIFI to share the image. Other computers in this WIFI network can start Yongwin Netcam and set the IP to 192.168.6.1 to view the image from camera.
- Page 15 :Draw point: After clicking the button with the mouse, click OK at any point in the interface to draw a point :Straight line: after the mouse click on the button, click on any point in the interface to determine the starting point, the second click to determine the distance between the starting point and the end point, and measure the length of the straight line (after drawing the line, and then click the mouse at the appropriate location, the length of the line will be displayed)
- Page 16 the third click to determine the straight line between the second point and measure the angle between the two lines :Circular arc: after the mouse click button, click on any point in the interface to determine the starting point, the second click to determine the straight line, the third point to determine the straight line with the second point, after three points of arc size, measuring the length of the circular arc :Radius drawing circle: after mouse click on the button, click on any point in the...
- Page 17 annotation :Select and delete: After mouse clicking on this button, mouse drags to select the area to be deleted, and click the mouse again to delete :Delete All: When the mouse clicks on this button, all items on the screen are deleted :Screenshot: Click on this button to take a screenshot of the interface and save it to the storage space.
-
Page 18: Reset Camera
1, click to set the calibration, and mouse click a point to confirm the starting point, click again to confirm the end, this figure is: 706.000px 2, According to the actual length, input the number of the actual length, and select the length of the unit (this figure is 4.000nm) 3, Calibration will be automatically calculated the ratio according to the actual length and pixel length...
Need help?
Do you have a question about the A59.3508 and is the answer not in the manual?
Questions and answers