
Related Manuals for RME Audio 12Mic-D


Summary of Contents for RME Audio 12Mic-D
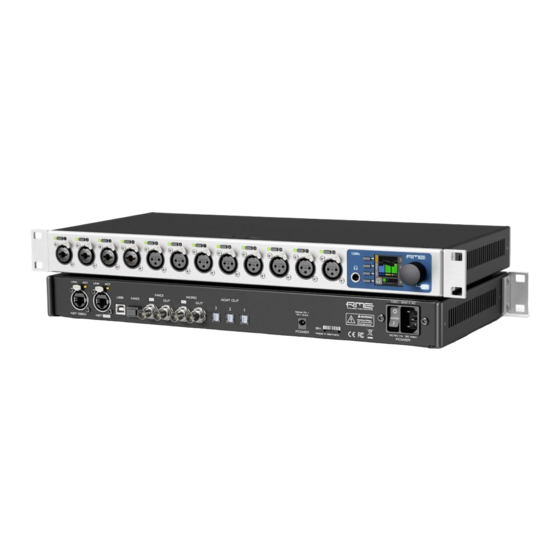
- Page 1 Microphone Preamp 12Mic-D DANTE | MADI 12-Channel digitally controlled Microphone Preamplifier with Dante, ADAT and MADI User’s Guide...
- Page 2 RME 12Mic-D User’s Guide...
-
Page 3: Table Of Contents
Table of Contents 1. Safety Precautions ............... ... - Page 4 7.3.1. Dark Mode .............. ...
- Page 5 10.3. Sample Rates Overview ............ ...
-
Page 6: Safety Precautions
RME 12Mic-D User’s Guide 1. Safety Precautions WARNING DO NOT OPEN DEVICE - RISK OF ELECTRIC SHOCK The unit has non-isolated live parts inside. No user serviceable parts inside. Refer service to qualified service personnel. CAUTION General Safety Information Read read the following safety information thoroughly and keep it in a safe place for later reference. -
Page 7: Introduction
2. Introduction Thank you for purchasing the 12Mic-D. The 12Mic-D is a 12 channel microphone preamplifier designed to be the centerpiece of any professional recording. Among its outstanding features: digital no-compromise studio quality converters, remote control, integrated Dante® and MADI connectivity, and a user interface optimized for rapid configuration and control. -
Page 8: Firmware Update
RME 12Mic-D User’s Guide information within this guide. RME reserves the right to change specifications at any time without notice. 2.2. Firmware Update New and improved features for this device, as well as bug fixes, are published on the RME website in the download section as a firmware update. -
Page 9: Controlling The Device
2.3. Controlling the device The 12Mic-D can be controlled directly at the unit. For this purpose, a display, buttons, and an encoder provide access to all features. From the main screen, the encoder knob is used to access the main menu. -
Page 10: Tabs
RME 12Mic-D User’s Guide To access the INPUT section: 1. Push the encoder to open the menu 2. Rotate the encoder to highlight the "INPUT" section 3. Push the encoder to open the "INPUT" section. 2.3.2. Tabs The STATE, INPUT and OUTPUT sections are further divided into tabs, which are shown when the section is opened. - Page 11 RME 12Mic-D User’s Guide The following table shows the possible status indicator colors for reference. Status Color Description Warning Requires a configuration change or matching external signal. Notice yellow There is a potential issue. Notice (in progress) yellow with dots There is a temporary issue that should resolve automatically.
-
Page 12: Hardware
RME 12Mic-D User’s Guide 3. Hardware Section 3.6, “Analog Input Connectors” Section 3.10, “Control Section” Section 3.11, “Headphone Output” Section 3.4, “Standby Switch” Section 3.14, “Network Connection”, Secondary (SEC) Section 3.14, “Network Connection”, Primary (PRI) Section 3.16, “USB 2.0 Type B Jack”... -
Page 13: Hardware Specifications
3.3. Power On The 12Mic-D has a power switch at the AC inlet and a standby switch at the front. Perform the following steps to power on the 12Mic-D: 1. Ensure that one of the power inlets is properly connected to a power source. -
Page 14: Standby Switch
RME 12Mic-D User’s Guide 3.4. Standby Switch The front panel encoder acts as a standby switch. While in standby mode, the device is completely powered down except for a red LED. No signals are processed or passed on. Possible actions: •... -
Page 15: Analog Input Connectors
RME 12Mic-D User’s Guide 3.6. Analog Input Connectors XLR/TRS combo jacks 1-4 On the front of the device, four combined XLR/TRS inputs labeled "1" to "4" can be used for microphone, line and instrument signals. Phantom power (48 V) for microphones can be activated on each XLR input, high impedance ("Hi-Z") can be activated when using unbalanced TS connectors. -
Page 16: Frequency And Impulse Response
• Switchable high impedance (unbalanced TS): 1 MOhm 3.7. Frequency and Impulse Response The A/D converters of the 12Mic-D are optimized for extremely low latencies (Short Delay IIR filters). At single speed, the conversion prioritizes frequency response to ensure linear conversion across the entire frequency band. -
Page 17: Control Section
Section 3.4, “Standby Switch” Encoder The 12Mic-D can be configured at the device. To do so, the TFT display shows a menu. The adjacent encoder knob and buttons are used to navigate and change settings. In addition, each input channel has a dedicated button to access its controls. -
Page 18: Headphone Output
RME 12Mic-D User’s Guide 3.11. Headphone Output The 12Mic-D features a stereo headphone output, 1/4" (6.3mm) TRS on the front panel. It can also function as a dual mono unbalanced output (13 dBu) and as a mono balanced line level output (19 dBu). -
Page 19: Power Supply
3.12. Power supply The 12Mic-D has an internal power supply (PSU) that is connected via an IEC C14 inlet labeled "PSU" at the rear of the device. It is a high performance switch mode power supply that accepts 100V to 240V AC. -
Page 20: Madi Coaxial And Sfp
RME 12Mic-D User’s Guide 3.13. MADI Coaxial and SFP The rear of the 12Mic-D features coaxial and SFP MADI (AES10-2003) I/O. Each input receives up to 64 audio channels. Auto Input (see Section 8.2.2, “Connecting Two Identical MADI Signals for Redundancy”) can be activated to treat both inputs as one. -
Page 21: Network Connection
Dante Redundancy. If both ports are connected to the same network, for example to create a daisy-chain of several 12Mic-D, then the setting must be changed to Switched. In the default mode, the device is configured so that each port connects to separate networks (Redundancy). -
Page 22: Word Clock
RME 12Mic-D User’s Guide 3.15. Word Clock Word clock can be sent and received via 75 Ω coaxial cabling at the corresponding BNC connectors. The cable length should not exceed 100 m (330 ft). The input is terminated with 75 Ω internally. To pass on the word clock to other devices, ... -
Page 23: Usb 2.0 Type B Jack
3.16. USB 2.0 Type B Jack The USB jack at the rear of the 12Mic-D provides an alternative connection method for web remote control when a network connection is not available. When connecting the 12Mic-D with a standard ("printer") USB 2.0 cable to a current Microsoft Windows™... -
Page 24: Mounting The Rack Adapter Brackets
RME 12Mic-D User’s Guide Each port can send up to eight audio channels. At double and quad speed, the maximum of channels per port is reduced to four and two respectively. Even when no signal is routed, the outputs send a valid ADAT signal at the current sample rate. -
Page 25: Accessories
RME 12Mic-D User’s Guide 4. Accessories RME offers optional accessories for the 12Mic-D: Part Number Description SFP Modules MADI-SFP-MM MADI optical multi-mode module, 2 km, LC MADI-SFP-SM MADI optical single-mode module, 20 km, LC 4. Accessories | 20... -
Page 26: Dante Connectivity
Dante controller. When the 12Mic-D is leader, it can either use its internal clock oscillator as a reference, or one of the incoming MADI or word clock signals. -
Page 27: Changing The Device Name
It must be unique on a network, otherwise a receiver cannot distinguish which device is transmitting the audio channels requested. For this reason, each 12Mic-D unit is given unique names from the factory, similar to "RME12Mic-d65432". The Device Name can only be changed by the Dante Controller. -
Page 28: Warranty And Support
The distributor does not accept claims for damages of any kind, especially consequential damage. Liability is limited to the value of the 12Mic-D. The general terms of business drawn up by the distributor apply at all times. -
Page 29: Support Contacts
RME 12Mic-D User’s Guide 6.3. Support Contacts Additionally, the following global service centers can provide support assistance: Europe Audio AG, Germany support@rme-audio.de Synthax U.K. info@synthax.co.uk Asia/Australia RME Trading Ltd., Hong Kong support@rme-trading.hk Americas Synthax Inc., U.S.A. tech.support@synthax.com Global support@rme-audio.de 6.3. Support Contacts | 24... -
Page 30: State Section
Any change in the device configuration is persistent. After a power loss, the device will revert back to its last state. Additionally, the 12Mic-D can save fifteen states in presets numbered 1-15. After a preset is loaded, any change in the configuration will result in an unsaved changes state. - Page 31 • Device name Quick Start Preset Pressing and holding the first (top) button next to the display while powering on the 12Mic-D (and until the channel LEDs start flashing) activates the Quick Start Preset. Loading this preset does not affect any internally saved presets until it is saved.
-
Page 32: Saving Presets
• ADAT 2 Ch. 1 - 4 (input 9 to 12) 7.1.1. Saving Presets Up to 15 presets can be saved in the internal storage of the 12Mic-D. To save a preset on the device: 1. Open the preset tab in the STATE section. The currently loaded preset is shown. - Page 33 RME 12Mic-D User’s Guide To save a preset using the web remote: 1. Open the web remote and locate the preset tab. Status Indicator and tab Current preset and state Selected preset Save preset 2. Click on a preset name in the left column to select a preset.
-
Page 34: Loading Presets
RME 12Mic-D User’s Guide 7.1.2. Loading Presets Up to 15 custom presets can be loaded from the internal storage of the 12Mic-D. Loading a preset cannot be undone. Ensure that any important configuration has been saved to another preset before proceeding. -
Page 35: Locking The Device
RME 12Mic-D User’s Guide The device lock does not protect against changes via remote control. The lock configuration is not stored within a preset. A four to six digit code can be configured on the device. If this code is lost or forgotten, it is ... -
Page 36: Front Panel Illumination
The device can only be locked and unlocked at the front panel. These controls are not accessible remotely. 7.3. Front Panel Illumination The 12Mic-D front panel illumination reveals the current device state at a glance. It combines: • full color LEDs at each input • a standby indicator with integrated status warning •... - Page 37 RME 12Mic-D User’s Guide To turn off illumination on the device: 1. Open the visual feedback tab in the STATE section. 2. Change any of the following: a. Display to off to turn off the display. b. Status indicator to off to turn off the standby/status indicator c.
-
Page 38: Changing The Meters To Peak Or Rms Mode
RME 12Mic-D User’s Guide To turn off illumination on the web remote: 1. Connect to the device remotely (see: web remote). Status Indicator State of Visual Feedback Front Panel Dark Mode Global Metering Options Peak/Over Hold Reset 2. Use the corresponding toggle switches on the web remote to switch off device lighting. -
Page 39: Persistent Clipping Notifications And Peak Hold
RME 12Mic-D User’s Guide To change the metering mode on the device: 1. Open the visual feedback tab in the STATE section. 2. Open "Global Meters" using the corresponding button. 3. Press the first button to toggle between Peak and RMS metering. - Page 40 RME 12Mic-D User’s Guide To switch over notifications on or off: 1. Open the visual feedback tab in the STATE section 2. Change Peak Hold to either: ◦ 5s to notify for five seconds ◦ On to notify until manually reset ◦...
- Page 41 RME 12Mic-D User’s Guide The remote shows an over notification above the level meter, both in miniature port level meters and the larger level meters when a port is open. To switch persistant over notifications on or off: 1. Locate the Visual Settings Tab.
-
Page 42: Metering Of Digital Signals
RME 12Mic-D User’s Guide 7.3.4. Metering of Digital Signals The incoming and outgoing digital signals can be visually inspected to ensure that signals are properly connected and routed. Level meters are included for each port in the corresponding input and output... -
Page 43: Remote Control Overview
RME 12Mic-D User’s Guide 7.4. Remote Control Overview The 12Mic-D can be remote controlled. Remote control is activated by default and is not affected by preset changes or device lock. The remote control protocols are not protected against malicious use. When activated, the ... -
Page 44: Static Ip Address
7.4.2. Static IP Address Both network ports of the 12Mic-D automatically retrieve an IP address if a DHCP server is present on the corresponding network. If there is no DHCP server on the network, a manual IP can be configured. -
Page 45: Web Remote
7.4.3. Web Remote An integrated web server provides an easy-to-use remote control interface for the 12Mic-D. It requires a network connection from a desktop or tablet computer with a current browser version. Due to the amount of features, the web remote manual has been separated from this ... -
Page 46: Json(Osc) Remote Control
Control protocol. Detailed background information on the underlying technology can be found on the Sennheiser® website. The 12Mic-D can be remote controlled with HTTP POST requests. Each request carries a data payload that contains a JSON object modeled after the open sound control (OSC) protocol. - Page 47 RME 12Mic-D User’s Guide entire device schema as a JSON object: Request: curl --header "Content-Type: application/json" --request POST --data '{"osc":{"schema":null}}' RME12Mic-d65432.local/api/v2/self Response: "osc": { "schema": { "osc": { "version": null, "schema": [] "device": { ...
-
Page 48: Json(Osc) Implementation Chart
RME 12Mic-D User’s Guide ⑤ URL or IP of the device on the network with path to API Executing this command delivers the expected result: {"device":{"vendor_name":"RME Audio"}} The entire web remote application is based on this protocol. It is therefore possible to ... -
Page 49: Device Information
RME 12Mic-D User’s Guide 7.5. Device Information The information tab is located in the STATE section. It shows the current device name and firmware version. The information tab is only available on the device itself. 7.6. Power State The power tab in the STATE section informs the user which of the two power inlets receive power. - Page 50 RME 12Mic-D User’s Guide To check the current power state: 1. Connect the device by USB or network cable and open the web remote. 2. A click on the Power icon shows the current state of the power supplies. 45 | 7.6. Power State...
-
Page 51: Notification Of Single Power Failure
RME 12Mic-D User’s Guide 7.6.1. Notification of Single Power Failure A warning can be displayed when one of two connected power sources fails. On the display, the "S" state indicator will turn red. In the main menu, a warning is signaled as an icon... -
Page 52: Input Section
8.1. Analog Inputs The analog inputs of the 12Mic-D can be configured at the device or remotely. Gain, AutoSet gain, phase, and phantom power (48V) can be set for individual inputs. In addition, the first four channels support toggling the input to TRS. -
Page 53: Analog Input User Interfaces
RME 12Mic-D User’s Guide The default setting in preset 1 routes the analog inputs 1-12 to: • both MADI coaxial and optional MADI SFP (channel 1-12), • Dante® channel 1-12 • ADAT port 1 (inputs 1-8) and port 2 (inputs 9-12) 8.1.1. - Page 54 RME 12Mic-D User’s Guide [{211 3T 2}] To adjust the input gain: 1. In the web remote, open the analog input port. Each input is represented with a channel strip. 2. Drag the GAIN knob vertically or horizontally. ◦ Hold SHIFT to adjust in smaller increments (fine-adjust).
-
Page 55: Enabling Phantom Power (P48)
RME 12Mic-D User’s Guide 8.1.3. Enabling Phantom Power (P48) Channels with active phantom power are shown on the standby-screen with a yellow square indicator. To activate phantom power on several channels: 1. While the standby screen shows the input level meters, press and hold the first button next to the yellow indicator. -
Page 56: Switching Between Xlr And Trs Inputs
RME 12Mic-D User’s Guide To adjust the input line level on the web remote: 1. In the web remote, open the analog input port. Each input is represented with a channel strip. 2. Press the 48V button in the corresponding channel strip. -
Page 57: Activating High Impedance (Hi-Z) On Trs Inputs
RME 12Mic-D User’s Guide To toggle between XLR and TRS inputs on several channels: 1. While the standby screen shows the input level meters, press and hold the second button next to the X|T indicator. An instruction is shown on the display and the LEDs next to the input channels change to off (XLR) or white (TRS). - Page 58 RME 12Mic-D User’s Guide To activate high impedance on several channels: 1. While the standby screen shows the input level meters, press then hold down the first button. An instruction is shown on the display and the LEDs next to the TRS input channels change to white (low impedance) or blue (high impedance).
-
Page 59: Inverting The Phase Of An Analog Input Signal
RME 12Mic-D User’s Guide 8.1.6. Inverting the Phase of an Analog Input Signal The phase of analog input signals can be inverted at the input. The setting persists even if the input source is toggled between XLR and TRS. -
Page 60: Activating Autoset
RME 12Mic-D User’s Guide activate AutoSet, then apply the loudest signals to be expected at the corresponding inputs. When signals exceed the -6 dBFS threshold, the gain is quickly attenuated. While recording, AutoSet is usually switched off to avoid accidental gain reductions triggered by toggling phantom power, plugging in signals, etc. -
Page 61: Gain Groups
RME 12Mic-D User’s Guide To activate or deactivate AutoSet of an input channel 1. In the web remote, open the analog input port. Each input is represented with a channel strip. 2. Use the AutoSet button in the corresponding channel strip. -
Page 62: Creation And Use Of A Gain Group
RME 12Mic-D User’s Guide Group Overview Level meters Add channels to group Save group Current offset Linked gains Gain indicator It is possible to adjust the gain of individual channels even when they are part of a gain group. -
Page 63: Saving, Using And Deleting Gain Groups
RME 12Mic-D User’s Guide When the device is idle (main screen): 1. Press and hold the first button at the first input. The channel is selected as the first channel in a group. 2. While holding down the first button, press a second button at another input. All inputs in-between will be added to the group. -
Page 64: Monitor Analog Inputs At Phones Output
8.1.12. Monitor Analog Inputs at Phones Output The phones output at the front of the 12Mic-D can receive any input signal. Permanent routings are configured in the Phones Output settings (see Routing Signals to the Outputs and Section 9.2, “Analog... -
Page 65: Madi Inputs
This function is only available on the device. 8.2. MADI Inputs The 12Mic-D accepts up to two MADI signals, one electrical (BNC input) and one optical via SFP option (LC input). To connect a MADI signal: 1. Ensure that you have set the correct sample rate and clock source in the CLOCK section. -
Page 66: Madi At High Sample Rates
RME 12Mic-D User’s Guide 8.2.1. MADI at High Sample Rates The MADI standard (AES10) allows transport of audio at sample rates beyond 48 kHz by reducing the number of available channels. Double speed (88.2 kHz, 96 kHz) Double speed audio signals can be transmitted and received in two different ways. Manufacturers can implement one or both modes, usually referred to as "96k frame"... -
Page 67: Dante Input
2. Click the icon that appears within the port. 3. Toggle the switch "Auto Input" to ON. 8.3. Dante Input Connections to the 12Mic-D are created and inspected using the Dante® Controller. It can be downloaded as described here: Dante Connectivity. 8.3. Dante Input | 62... - Page 68 RME 12Mic-D User’s Guide On the web remote, the Dante input is shown as an expandable tile with all incoming audio levels: Routes from any incoming Dante channel can be internally connected to any output channel. The current routings are indicated as lines between inputs and outputs.
-
Page 69: Output Section
In the OUTPUT section, MADI Optical 1-12 is chosen as source for Dante® channel 1-12. The 12Mic-D is clock master, but the incoming MADI signal is not correctly synchronized. This causes a warning in the INPUT section. If MADI Optical is not routed to any output, an invalid or missing signal does not cause a warning. -
Page 70: Routing Signals To The Outputs
9.1. Routing Signals to the Outputs Each output channel of the 12Mic-D can receive any input signal. If preset 1 has not been modified, it contains a routing of all analog inputs to all digital outputs. However, this can be adjusted and changed easily. -
Page 71: Analog Outputs
RME 12Mic-D User’s Guide To create a routing to a MADI Coaxial output: 1. Open the routing tab of the MADI Coaxial output in the OUTPUT section (see device control). 2. Activate the routing destination and choose an output channel with the encoder (steps 1 and 2). -
Page 72: Adjusting The Headphone Volume
RME 12Mic-D User’s Guide 9.2.2. Adjusting the Headphone Volume The volume of the unbalanced phone outputs can be adjusted separately or as a stereo pair. To adjust the headphone volume on the device: 1. While on the main screen, rotate the encoder. The current volume will be shown below the encoder on the screen. -
Page 73: Muting The Phones Output
RME 12Mic-D User’s Guide To adjust the phones output level: 1. Open the corresponding output channel strip. 2. Use the encoder to adjust the gain in the 'PHONES' channel strip. Press the Shift key while dragging the knob for finer adjustments. -
Page 74: Madi Outputs
9.3. MADI Outputs The MADI outputs of the 12Mic-D are always active. If no routing is configured, an empty stream is sent that can be used for clocking. The state without routing is represented with a light-green Status Indicator. -
Page 75: Madi Daisy Chains
The 12Mic-D features independent routing for both MADI output ports. For this reason, a "mirroring" of the signal must be manually created. In order to do this, the routing of the two MADI outputs should be configured to contain the same routing. -
Page 76: Dante Output
9.5. ADAT Outputs The ADAT outputs of the 12Mic-D are always active. On a new device, with preset 1 loaded and not modified, the analog input channels 1-8 are sent to ADAT port 1, and channels 9-12 are sent to ADAT port 2. -
Page 77: Clock Section
RME 12Mic-D User’s Guide 10. CLOCK Section The CLOCK section is used to inspect and configure the clock source and sample rate of the 12Mic-D. Web remote Clock Section Selected Reference Clock Status Indicator Current Clock Reference and Rate Sample Rate Selection... - Page 78 When receiving MADI signals from other devices, these signals must use the same reference clock as the 12Mic-D. This is usually achieved by connecting a MADI or Word Clock signal from the 12Mic-D to the other MADI device. The other device must then be configured to use that signal as a reference clock signal.
-
Page 79: Synchronizing To External
1. In the Clock panel, locate the button for the corresponding clock and click it. 2. Within the dropdown, press Set as external clock preference . 10.3. Sample Rates Overview The 12Mic-D supports the following sample rates: Supported sample rates 10.3. Sample Rates Overview | 74... -
Page 80: Number Of Channels
RME 12Mic-D User’s Guide Single speed 44.1 kHz, 48 kHz Double speed 88.2 kHz, 96 kHz Quad speed 176.4 kHz, 192 kHz 10.3.1. Number of Channels The supported number of channels per port at different sample rates is shown in the following table. -
Page 81: Effects Of Sample Rate Changes On Existing Routing
10.3.4. Effects of Sample Rate Changes on Existing Routing The 12Mic-D saves one routing table per preset, regardless of sample rate. A change of sample rate or MADI frame mode can reduce the number of input and output channels available for routing. This does not alter the routing table. -
Page 82: Set Word Clock Output To Single Speed
RME 12Mic-D User’s Guide first 14 channels of MADI coaxial input are routed to the optical output. Switching the sample rate to 44.1 or 48 kHz will reveal the previous routing for 32 channels. 10.4. Set Word Clock Output to Single Speed At sample rates >... -
Page 83: Annex
RME 12Mic-D User’s Guide 11. Annex Trademarks and Copyright All trademarks, registered or otherwise, are the property of their respective owners. RME is a registered trademark of RME Intelligent Audio Solutions. SyncCheck, SteadyClock, ICC, Intelligent Clock Control and Digiface are trademarks of RME Intelligent Audio Solutions. -
Page 84: Glossary
RME 12Mic-D User’s Guide Glossary 96k frame MADI sources with a sample rate of 88.2kHz or 96kHz can be configured to use the so-called 96k frame. If this frame is used, a sample rate of 88.2 or 96 kHz can be detected on the receiver side automatically. -
Page 85: Note On Disposal
RME 12Mic-D User’s Guide frequency energy and, if not installed and used in accordance with the instructions, may cause harmful interference to radio communications. However, there is no guarantee that interference will not occur in a particular installation. If this equipment does cause harmful interference to radio or television...
Need help?
Do you have a question about the 12Mic-D and is the answer not in the manual?
Questions and answers