Sangean MMR-88 - Radio Manual
- Instruction manual (21 pages) ,
- Operating instructions manual (70 pages)
Advertisement
- 1 Overview
- 2 Important safety instructions
- 3 Controls
- 4 LCD display icon
- 5 Inserting the supplied rechargeable battery
- 6 Recharging the radio
- 7 Using Dynamo power
- 8 Using solar power
- 9 Setting the clock
- 10 Radio operation
- 11 Tuning the radio - using Seek Tuning, Manual Tuning and Memory preset recall
- 12 Telescopic Antenna
- 13 Stereo / Mono switch
- 14 Volume Control
- 15 Display information
- 16 Changing the AM / FM tuning step
- 17 Emergency Siren
- 18 LED Flashlight
- 19 Listening with Headphones
- 20 Charging mobile phones and MP3 players
- 21 Strap holder
- 22 Conditional water resistant
- 23 Specifications
- 24 Videos
- 25 Documents / Resources
Overview

Important safety instructions
- Please read these instructions carefully.
- Please keep these instructions for future reference.
- Heed all warnings.
- Follow all instructions.
- Do not use this apparatus near water.
- Clean only with dry cloth.
- Do not block any ventilation openings. Install in accordance with the manufacturer's instructions.
- Do not install near any heat sources such as radiators, heat registers, stoves or other apparatus (including amplifiers) that produce heat.
- Do not defeat the safety purpose of the polarized or grounding-type plug. A polarized plug has two blades with one wider than the other. A grounding type plug has two blades and a third grounding prong. The wide blade or the third prong are provided for your safety. If the provided plug does not fit into your outlet, consult an electrician for replacement of the obsolete outlet.
- Protect the power cord from being walked on or pinched particularly at plugs, convenience receptacles and the point where they exit from the apparatus.
- Only use attachments / accessories specified by the manufacturer.
- Use only with the cart, stand, tripod, bracket or table specified by the manufacturer or sold with the apparatus. When a cart is used, use caution when moving the cart / apparatus combination to avoid injury from tip-over.
- Unplug this apparatus during lightning storms or when unused for a long period of time.
- Refer all servicing to qualified service personnel. Servicing is required when the apparatus has been damaged in any way, such as power-supply cord or plug is damaged, liquid has been spilled or objects have fallen into the apparatus, the apparatus has been exposed to rain or moisture does not operate normally or has been dropped.
- Apparatus shall not be exposed to dripping or splashing and no objects filled with liquids, such as vases, shall be placed on the apparatus.
- To reduce the risk of fire or electric shock, do not expose this apparatus to rain or moisture.
![]()
Danger of explosion if battery replaced. Replace only with the same or equivalent type.- Battery shall not be exposed to excessive heat such as direct sunlight, fire or the like.

IMPORTANT NOTE:
To comply with t he FCC RF exposure compliance requirements, no change to the antenna or the device is permitted. Any change to the antenna or the device could result in the device exceeding the RF exposure requirements and void user's authority to operate the device and all product warranties.

To reduce the risk of the electric shock, do not perform any servicing other than that contained in the operating instructions unless you are qualified to do so.
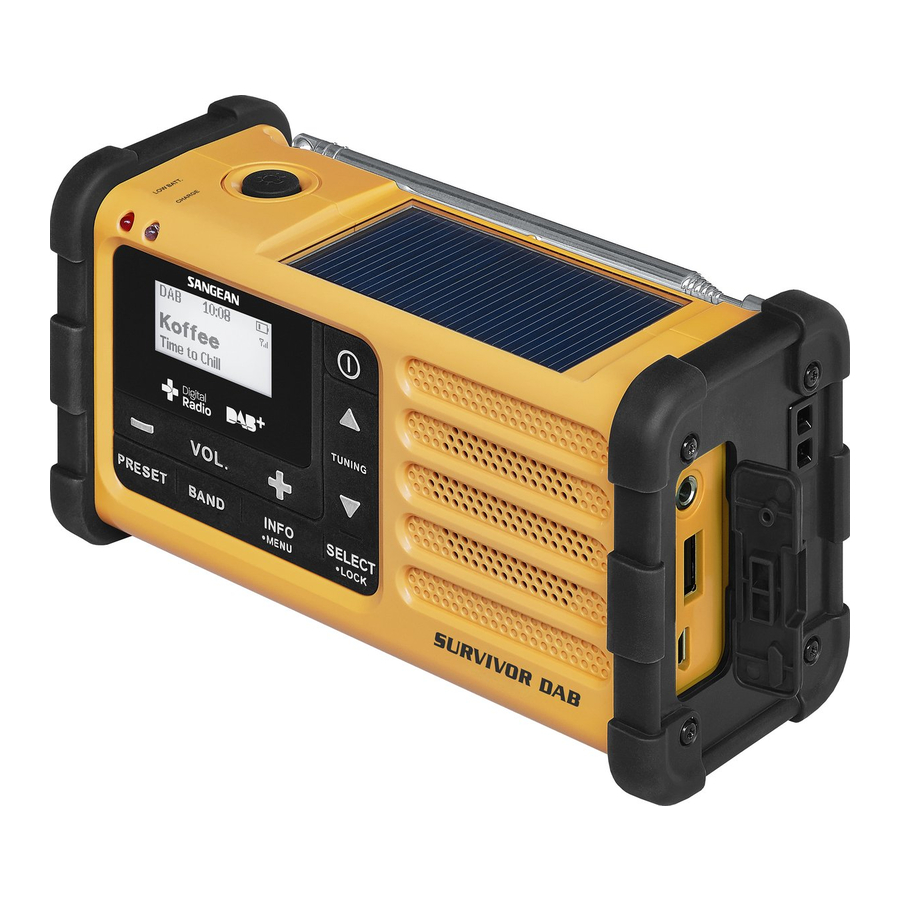
Controls
- LED Flashlight switch
- Solar charging panel
- Charging indicator
- Tuning LED indicator
- LCD display
- Tuning Up
- Power button
- Tuning Down
- Speaker
- Emergency siren button
- Display / Mono button
- Band selection / Time set button
- Preset station
- Volume Control-down
- Volume Control-up
- LED Flashlight
- 3.5mm headphone socket
- USB charging socket to mobile phones or MP3 players
- Micro USB charging outlet
- Carrying strap holder
- Telescopic antenna
- Dynamo power hand crank
- Battery compartment
LCD display icon
- Battery power level meter
- FM stereo indicator
- Auto shut off indicator
- Memory preset
- Time and radio frequency
- AM / PM local time indicator
- AM Frequency Band
- FM Frequency Band
The MMR-88 is powered by an 850mAh rechargeable Lithium-ion battery (supplied). Before operating the radio for the first time, ensure that you fully charge the supplied battery.
Inserting the supplied rechargeable battery
- Open the battery compartment on the back of the unit by pushing the battery door following the arrow direction.
- Insert the supplied rechargeable battery into the space in the compartment. Make sure the battery is inserted with correct polarity as shown in the compartment.
Recharging the radio
Note:
Please use one of the following methods to recharge your radio or when the battery power indicator LED blinks indicating the battery power is low.
- Using the supplied USB to Micro USB cable simply plug the USB end into a USB socket on a computer, tablet or any USB power supply. Then plug the Micro USB end into the Micro USB socket on the right hand side of the radio.
- Using an AC adapter with a Micro USB connector (not supplied) plug the AC adapter into a standard AC outlet. Then plug the Micro USB end into the Micro USB socket on the right hand side of the radio. The battery power icon will illuminate showing that charging is in progress. The CHARGE LED indicator will also be on at the same time during the charging process.
Note:
The radio will begin charging the Lithium-ion battery. Charging time will take approx. 2hours to be fully charged. The battery power icon will stop flashing when the radio is fully charged. Reduced power, distortion, stuttering sounds or when the battery power indicator light is low are all signs that the battery needs to be recharged.
Note:
The radio can play approx. 10hours when the battery is fully charged.
Using Dynamo power
- Make sure the telescopic antenna is in the rest position before rotating the dynamo handle.
- Take the Dynamo power handle from its rest position.
- Rotate the Dynamo power handle approx. 120 rotations per minute, either clock-wise or counter-clock wise until the charging LED indicator appears red.
- Under normal listening conditions, one minute of charging from Dynamo power will allow you to listen to the radio for approx. 5-7 minutes (AM band mode using the speaker at a moderate volume level).
- Make sure the handle is in its rest position after charging is completed.
Using solar power

The radio does not need to be switched on in order for the solar panel to operate.
- In order to recharge your MMR-88 battery using solar power, position the radio so that the solar panel receives direct sunlight. The more direct sunlight that shines on the solar panel, the more electricity it can generate to power the radio.
- Adjust the position of the radio to achieve maximum brightness of the CHARGE indicator LED.
- It takes approx.15 hours to fully charge the battery under direct sunlight.
Note:
The best performance of the solar panel will be achieved when the sun is directly overhead, and the sunlight is unobstructed by clouds, foliage, curtains etc. In certain situations and poor light conditions, the solar panel may not be effective and should not be relied upon as the primary energy source for standard usage. The solar panel is designed as a supplementary energy source which under suitable light conditions is able to contribute up to 100% of the radio energy requirements.
The solar panel will charge the battery only under natural sunlight. It will not deliver a charge in artificial light.
DO NOT attempt to charge the battery by placing the solar panel directly under any kind of sun-lamp, this will cause irreversible damage to the radio and may damage the casing. (Doing so will void all warranties)
Setting the clock
You can set the clock with either the radio turned on or off.
After the radio is charged, the display will appear with (-: --) Press and hold BAND / TIME SET button until the hour setting begins blinking. Select the hour by pressing Tuning UP / Down button until desired hour is displayed. Press BAND / TIME SET button again to set the minutes. The minute indicator should now be blinking, press the Tuning button UP / DOWN until the desired minutes are displayed. Press BAND / TIME SET button again to complete clock setting. The time should display solidly with the colon blinking periodically.
Radio operation
Note:
The MMR-88 features a 90 minute auto shut off feature.
Turn on the radio, press and hold the power button for approx. 1 / 2 second, the radio will turn on and the 90 minute auto shut off icon will appear on the display indicating the radio will auto shut off after 90 minutes of operation. If you don't require this feature, press and hold the power button a little bit longer until the icon disappears from the display.
Turn off the radio by pressing the Power button for approx. 1 / 2 second until the display shuts OFF. The radio will appear with the clock time in the display.
Tuning the radio - using Seek Tuning, Manual Tuning and Memory preset recall
Seek Tuning
Turn the radio on by pressing the Power button. Select the desired band by pressing the BAND button.
Press and hold the Tuning UP / Down button for approx. 1 / 2 second, the radio will seek for the next active station. Repeat as many times until the desired station is found.
Manual tuning
Turn the radio on by pressing the Power button; select the desired band by pressing the Band button.
Press Tuning Up / Down button repeatedly until the desired frequency is found.
To Preset stations
- Turn the radio on and use seek tuning or manual tuning as described above to tune to your desired station.
- Press and hold the PRESET button for approx. 2 seconds until the display blinks M (Memory) to enter the preset mode.
- When the M (Memory) display blinks with the previous preset station frequency, press the Tuning UP / Down button to select the desired memory position as shown on the display.
- Press the PRESET button again to complete the memory setting, the display will appear with a P (preset) and the chosen preset position. After the P and preset position disappear from the display, you may then press the Tuning UP / Down button again to tune to next desired station.
- This radio features a total of 19 preset memories in random selection for AM / FM.
Recall stations
- Turn on the radio, press the PRESET button to enter the preset mode, the display will show your last preset station position.
- Press the Tuning Up / Down button to select your desired preset station.
- Press and release the PRESET button to skip preset mode, the P (preset) and preset position will disappear. You may then press the Tuning UP / Down button to tune to the next desired station.
Telescopic Antenna
The telescopic antenna is used for the FM reception. Extend fully and rotate for the best FM reception. There is a built-in directional bar antenna for the AM band reception. To achieve the best AM reception, it may be necessary to move the radio to achieve proper reception.
Stereo / Mono switch
If the FM radio station being listened to has a weak signal, some hiss may be audible. It is possible to reduce this hiss by forcing the radio to play the station in mono rather than stereo.
Press and hold the Display / Mono button to switch to mono. LCD display Stereo icon will disappear.
Note:
FM stereo is only available via earphones.
Volume Control
Press the Volume Control Button (+ / -) to adjust the desired level of sound.
Display information
When the radio is on, press and release the Display button. You can switch the on-screen information between station frequency and time.
Changing the AM / FM tuning step
In Europe and other parts of the world the AM tuning step is 9kHz, in North America the AM tuning step is 10kHz. FM tuning steps also vary from country to country. To change the AM / FM tuning step, proceed as follows.
- When the radio is turned OFF, press and hold the PRESET button for approx. 2 seconds, the display will first show software version (e.g. P01) then blink the FM tuning step 100 (kHz). During the blinking, press Tuning UP / DOWN to cycle through 100 and 50 (kHz) tuning step. Press PRESET button again to choose your desired FM tuning step.
- The display will then blink the AM tuning step 10 (kHz), press Tuning UP / DOWN button to cycle through 10 and 9 (kHz). Press the PRESET button again to choose your desired AM tuning step.
- The radio will default to clock mode (radio is off) after re-setting tuning step.
Note:
Re-setting the AM tuning step will erase all the preset AM stations.
Note:
Re-setting the FM tuning step will not erase preset FM stations.
Emergency Siren
The Emergency Siren will work when either the radio is switched on or off. Simply press and hold Emergency Siren button for 1 second, this w ill activate the siren until it's switched off by pressing the Emergency Siren button for 1 secon d or the Power button.
LED Flashlight
The MMR-88 features 4 selections for the LED once for High, again for Low, again for BlinkingFlashlight. Press the LED Flashlight button once more for SOS (Morse Code Distress Signal, three short flashes, three long flashes, thr ee short fla) and one more time to shut the Flashlight off. Or in any mode you can hold th e Flashlight button down until the Flashlight shuts off.
Listening with Headphones
Plug the headphones into the headphone socket ffor private listening.
This will disconnect the external speaker.
Charging mobile phones and MP3 players
The MMR-88 features a USB charging socket too charge your mobile phone or MP3 player and related devices with the its built-in Lithium-ionn battery.
- In order not to interfere with radio listening, we suggest to charge your mobile phone, MP3 player and related devices when the radio is swwitched off.
- The USB charging socket can provide a maxim um of 500mAh of charging current.
Strap holder
You may attach the supplied carrying strap into th e strap holder for easy transport.
Conditional water resistant
This radio is a water resistant device NOT a waaterproof device. Please ensure the rubber cover on the USB, Micro USB and Headphone jacck section is properly secured.
Specifications
| Power Supply | 850mAH rechargeable Lithium-ion battery (supplied) x 1 |
| Dynamo-charging to rechargeable Lithium battery. | |
| Solar panel-charging to rechargeable Lithium battery | |
| Optional Power Supply | AC power adaptor with Micro USB connector, (not included) |
| Audio Output | 400mW (DC In (5V / 0.5A) Micro USB B Type Socket for Charging the MMR-88. USB A to Micro B Cable & Hand strap included) |
| Frequency Coverage | |
| FM (VHF) | 87.50-108 MHz |
| AM | 522-1710 kHz (9kHz tuning step) |
| 520-1710 kHz (10kHz tuning step) | |
| Antenna | |
| Telescopic antenna | FM |
| Built-in Ferrite rod antenna | AM |
| Socket | |
| DC Socket | DC IN Micro USB 5V 500mA |
| DC OUT USB Type A 5V 300mA | |
| Earphones Jack | 3.5mm in diameter, Stereo, 32ohm Impedance |
| Dimension Dimension | 152 x 85 x 69 mm (W x H x D) 152 x 85 x 69 mm (W x H x D) |
| Weight Weight | 400g (excluding battery) 400g (excluding battery) |
| ※ The barcode label on the product is defined as below: | |

|

|
The company reserves the right to amend the specification without notice.

If at any time in the future you should need to dispose of this product please note that: Waste electrical products should not be disposed of with household waste. Please recycle where retailer for recycling advice. (Waste Electrical facilities exist. Check with yourLocalAuthority or and Electronic Equipment Directive)


VideosSangean MMR-88 - Review Video
Documents / ResourcesDownload manual
Here you can download full pdf version of manual, it may contain additional safety instructions, warranty information, FCC rules, etc.
Advertisement


Need help?
Do you have a question about the MMR-88 and is the answer not in the manual?
Questions and answers