Advertisement
Quick Links
YOSUDA CYCLING BIKE MANUAL
Pro
Please read this manual before installing and using. In accordance with the
principle of sustainable development, the product may be updated when necessary,
and no notice will be given at that time. In case of any discrepancy between the
specification and the product, the actual product shall prevail.
Advertisement

Related Manuals for YOSUDA Pro


Summary of Contents for YOSUDA Pro
- Page 1 YOSUDA CYCLING BIKE MANUAL Please read this manual before installing and using. In accordance with the principle of sustainable development, the product may be updated when necessary, and no notice will be given at that time. In case of any discrepancy between the...
- Page 2 TABLE OF CONTENTS Customer Service ......................1 Product Overview ......................2 Safety Instructions ......................4 Assembly Instructions ....................8 Care & Maintenance ....................14...
- Page 3 Customer Service If you have any questions or concerns, please feel free to contact us. Email address: service@yosudabikes.com ● You can also search "YOSUDA exercise bike" on YouTube to get an ● assembly video. www.yosudabikes.com ● Contact Us Assembly Guide...
- Page 4 Warnings and Safety Information Keep this instruction booklet for future reference. 1. Before starting any exercise program, consult your physician to determine if you have any medical or physical condition that could put your health and safety at risk or prevent you from using the equipment properly.
- Page 5 13. Pay special attention to all wearable parts. 14. This physical training product is equipped with a flywheel inertial system, so foot, ankle, leg, and knee injuries may occur during exercise. If you wish to stop cycling, press the brake knob to immediately stop pedal movement.
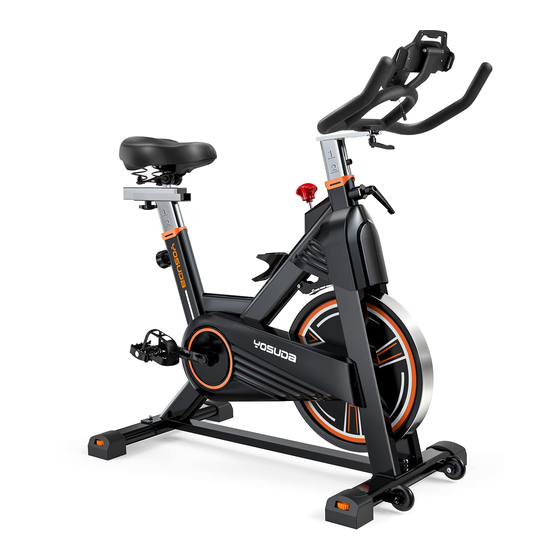
- Page 6 Product Overview Bike Overview: MAIN ACCESSORIE LIST NAME UNIT NAME UNIT Seat Belt Cover Seat Slider Flywheel Plum Blossom Knob Flywheel Cover Seat Post Main Frame Adjustment Pull Pin IPad Holder Left Pedal Handlebar Post Left Crank Inner Bush Rear Stabilizer Monitor Right Crank Handlebar...
- Page 7 TOOLS: L Shape Knob 2pcs...
- Page 9 NAME NAME Seat Seat Slider Plum Blossom Knob Seat Post Adjustment Pull Pin Left Pedal(With Bolts) Left Crank Rear Stabilizer Right Crank Right Pedal(With Bolts) Front Stabilizer Belt Cover Flywheel Flywheel Cover Main Frame IPAD Holder Handlebar Post Inner Bush Monitor Handlebar Brake Knob...
- Page 10 Assembly Instructions STEP 1. Install the Front and Rear Stabilizer Required parts: #8-Rear Stabilizer #11-Front Stabilizer #23-Plain Washer (8x16, 4pcs) #22-Carriage Bolt (M8x5, 4pcs) #24-High Cap (M8, 4pcs) #28-Multi-functional Wrench Ⅱ 1. Attach the #8-Rear Stabilizer and #11-Front Stabilizer to the #15-Main Frame. 2.
- Page 11 STEP 2. Install the Left and Right Pedal Required parts: #6-Left Pedal #10-Right Pedal #28-Multi-functional Wrench Ⅱ #65-Multi-functional Wrench Ⅰ Turn the Brake Knob CLOCKWISE as tightly as you can with your hand. 1. Install the Left Pedal: Unscrew the #6-2 nut from the #6-1 Left Pedal. Align the #6-1 Left Pedal with the #7-Left Crank at 90°, note to align the threads of the #6-1 Left Pedal bolt to the threads of the #7-Left Crank.
- Page 12 COUNTER-CLOCKWISE as tightly as possible with the #28 and #65 Multifunctional Wrench. NOTE: *The Pedals are marked "L" and "R" for Left and Right. Be sure to attach Pedals on the proper side of the Bike. Orientation is based from a seated position on the bike. *The threads for pedals and cranks will be damaged if the install directions are not following above instructions.
- Page 13 STEP 4. Install the Seat Required parts: #1-Seat #2-Seat Slider #28-Multi-functional Wrench Ⅱ #3-Plum Blossom Knob 1. Unscrew the #3-Plum Blossom Knob on the #2-Seat Slider, put #2-Seat Slider on the #4-Seat Post. 2. Adjust the #2-Seat Slider to a proper position, re-insert and tighten #3-Plum Blossom Knob to secure the slider in place.
- Page 14 STEP 5. Install the Handlebar Post Required parts: #17-Handlebar Post 1. Unscrew #25-L Knob counter-clockwise, and insert the #17-Handlebar Post to the handlebar tube. 2. Adjust the #17-Handlebar Post height to a suitable location and screw down clockwise the #25-L Knob. Step 6.
- Page 15 STEP 7. Install the Monitor Required parts: #19-Monitor Take out the #19-Monitor and put battery on, insert the #19-Monitor in the handlebar according to the direction shown on the picture, adjust the #19-Monitor view angle well, put the spring wire remaining part into the speed hole of the #19-Monitor.
- Page 16 Care & Maintenance Care WARM-UP A successful exercise program consists of three parts: warm-up, aerobic exercise, and cool-down. Warm-up is a very important part of your exercise routine and should be done before each exercise session. Warm-up exercises relax your body and stretch muscles so your body is ready for more strenuous work.
- Page 17 Maintenance This general information for daily, weekly, and monthly maintenance to be performed on your bike. Daily Maintenance After each exercise session, wipe down all the equipment: seat, frame, and handlebars. Pay special attention to the seat post, handlebar post, and belt guard. Sweat is very corrosive and may cause problems that require parts replacement later.
Need help?
Do you have a question about the Pro and is the answer not in the manual?
Questions and answers
the monitor doesn't work