Table of Contents
Advertisement
Quick Links
Advertisement
Table of Contents

Related Manuals for Intellisystem IT-VCHD710KIT


Summary of Contents for Intellisystem IT-VCHD710KIT
- Page 1 IT-VCHD710KIT USB2.0 HD Video Conference Camera Kit User Manual V1.1 (English)
- Page 2 Preface Thanks for using thisUSB2.0 HD Video Conference Camera Kit. This manual introduces the function, installation and operation of the HD camera. Prior to installation and usage, please read the manual thoroughly. Precautions This product can only be used in the specified conditions in order to avoid any damage to the camera: ...
-
Page 3: Table Of Contents
Contents Note ......................... 4 Supplied Accessories ..................4 Quick Start ...................... 5 Features ......................6 Product Specification ..................7 Main Unit ......................9 Size ........................ 10 IR Remote Controller Explanation ..............11 RS-232 Interface ................... 14 VISCA Network Configuration ..............15 Serial Communication Control .............. -
Page 4: Note
Note Electric Safety: Installation and operation must accord with electric safety standard. Caution to transport: Avoid stress, vibration and soakage in transport, storage and installation. Polarity of power supply: The power supply of the product is +12V, the max electrical current is 2A .Polarity of the power supply plug drawing as follows. -
Page 5: Quick Start
Quick Start Step1. Please connecting the power adapter to the camera, then Pan-Tilt will self-checking, the lens will lens introspection on the basis of push and pull. When lens and Pan-Tilt self-checking not normal, please confirm whether the power supply to pull plug normal power. If still invalid, please see the specification of the fault phenomenon and processing or phone seeking for technical support. -
Page 6: Features
phones’ working indicator light will light up. Such as working light is not bright, please pull out plug USB again, confirm USB is properly connected. If still invalid, please see the specification of the fault phenomenon and processing or phone seeking for technical support. Features ... -
Page 7: Product Specification
Product Specification Model IT-VCHD710KIT Name USB2.0 HD Video Conference Camera Kit Camera HD: 1080p/60, 1080p/50, 1080i/60, 1080i/50, 1080p/30, Video System 1080p/25, 720p/60, 720p/50, 720p/30, 720p/25 Sensor 1/2.7'', CMOS, Effective Pixel: 2.07M Scanning Mode Progressive Lens 12x, f3.5mm ~ 42.3mm, F1.8 ~ F2.8... - Page 8 USB Featured Windows XP, Windows Vista, Windows 7, Windows 8, Mac Operate System OS X, Linux Color System / Compression YUV 4:2:2 / H.264 / MJPEG 1080p/30, 1080p/25, 1080p/15, 1080p/10, 720p/30, 720p/25, Video Format 960x540p/30, 960x540p/25, 640x360p/60, 640x360p/50 Support 8K Hz,16K Hz,32K Hz,44.1K Hz ,48K Hz sampling Audio on USB rate audio input and output, Support AEC USB Video Communication...
-
Page 9: Main Unit
Size 128.5mm x 118mm x 156.2mm Net Weight 0.91Kg Main Unit 1. USB2.0 3. RS232 out Interface 2. RS232 IN Interface 4.DC IN 12V jack... -
Page 10: Size
Size... -
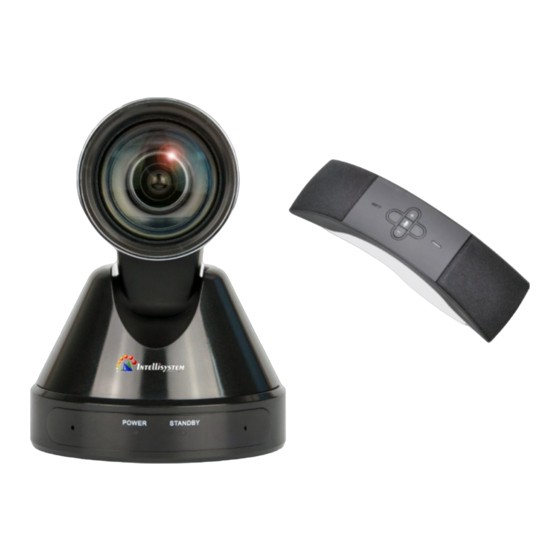
Page 11: Ir Remote Controller Explanation
IR Remote Controller Explanation 1. Standby Button Press this button to enter standby mode. Press it again to enter normal mode. (Note: Power consumption standby mode approximately half of the normal mode) 2. Position Buttons To set preset or call preset 3. - Page 12 9. Focus Buttons 16. BLC (Backlight Compensation) Button Used for focus adjustment. BLC ON/OFF: Press this button to enable the Press [AUTO] adjust the focuses on the center of backlight compensation. Press it again to disable the object automatically. To adjust the focus the backlight compensation.(NOTE: Effective only manually.
- Page 13 [*]+[#]+[3]: OSD menu default Chinese [*]+[#]+[8]: Look the camera version [*]+[#]+[5]: Save OSD [*]+[#]+[9]: Quickly set up inversion [*]+[#]+[6]: Quickly recover the default...
-
Page 14: Rs-232 Interface
RS-232 Interface Camera Windows DB-9 1.DTR 1.CD 2.DSR 2.RXD 3.TXD 3.TXD 4.GND 4.DTR 5.RXD 5.GND 6.GND 6.DSR 7.IR OUT 7.RTS 8.NC 8.CTS 9.RI Camera Mini DIN Function 1.DTR 1.DTR 2.DSR 2.DSR 3.TXD 3.TXD 4.GND 4.GND 5.RXD 5.RXD 6.GND 6.GND 7.IR OUT 7.NC 8.NC 8.NC... -
Page 15: Visca Network Configuration
VISCA Network Configuration... -
Page 16: Serial Communication Control
Serial Communication Control In default working mode, the camera is able to connect to a VISCA controller with RS232C serial interface. RS232 Communication Control: The camera can be controlled via RS232, the parameters of RS232C are as follows: Baud rate: 2400/4800/9600 bit/s. Start bit: 1 bit. -
Page 17: Menu Setting
Menu Setting EXPOSURE 1. MENU Mode Auto Press [MENU] button to display the main menu on ExpCompMode the normal screen, using arrow button to move the cursor to the item to be set. Press the [HOME] ExpComp button to enter the corresponding sub-menu. Backlight Gain Limit MENU... - Page 18 Optional items: On, Off (Effective only in Auto COLOR mode) WB Mode Auto DRC: DRC strength, Optional items: 0 ~ 8. Bright: Intensity control, Optional items: RG Tuning 00~17. (Effective only in Bright mode) BG Tuning Anti-Flicker Flicker: Anti-flicker. Optional Saturation 110% Items: Off, 50Hz, 60Hz (Effective only in Auto,...
- Page 19 Optional items: Normal, High, Low. Flip-H: Image flipped horizontally. Optional Items: On, Off. 4. IMAGE Flip-V: Image Flip Vertical. Optional items: Move the cursor to the Image item in the main On, Off menu and press [home] button, IMAGE menu B&W-Mode: Image color.
- Page 20 5. P/T/Z REDUCTION menu appears, as shown in the following figure. P/T/Z NOISE REDUCTION SpeedByZoom NR2D-Level AF Zone Center NR3D-Level AF-Sense High D-HotPixel L/R Set Display Info Select Item Select Item Change Value Change Value [Menu] Back [Menu] Back SpeedByZoom: The depth of field scale switch, Optional items: On, Off NR2D-Level: 2D noise reduction.
- Page 21 SETUP COMMUNICATION SETUP Language Protocol VISCA DVIMode V_Address V_AddrFix Net Mode Serial Baudrate 9600 Select Item Select Item Change Value Change Value [Menu] Back [Menu] Back Language: menu language, Optional items: EN, Protocol: Control protocol type. Optional Chinese, and Russian items: AUTO, VISCA, PELCO-D, PELCO-P DVI Mode, Optional items: DVI, HDMI V_Address: Protocol address, to be decided...
- Page 22 (When set to On, useless in 88 30 01 FF Parameter restore default, Include IR Remote Command) address and VISICA Address Net Mode: Set the serial port control Save: Save Options. Optional items: Yes, No networking, Optional items: Serial, Paral Baudrate: Serial port baud rate.
-
Page 23: Vc200-U User Manual
VC200-U User Manual 1. Speaker Grill Use with functions of network audio and video on the computer, according to the software instructions for audio and video function, then you can network with each other. 2. Volume Up/Down control In the process of conference call, can adjust the speaker volume through the volume switch. 3. -
Page 24: Usb2.0
USB2.0 Camera support UVC protocol, USB2.0 output USB2.0 support 960x540p/60 max output. Support OS Windows XP/2003/VISTA/7/8/10 and other system、Linux、Mac OS General software Windows: AMCAP, VLC, Debut Video Capture, etc. Linux: V412 software driver and VLC media player, etc. Mac OS: Face Time. IChat, Photo Booth and Debut Video Capture, etc. Notice: Recommend making AMCAP version 8.0 in Windows, which software performance is more relatively stable. -
Page 25: Maintenance And Troubleshooting
Maintenance and Troubleshooting Camera Maintains If camera will not be used for a long time, please turn off the power switch, disconnect AC power cord of AC adaptor to the outlet. Use soft cloth or tissue to clean the camera cover. ... - Page 26 Control IR remote controller cannot control the camera 1. Change the battery 2. Check the camera working mode. 3. Check IR address of the Remote Commander is set correctly. Serial communication cannot control the camera 1. Check the camera working mode. 2.
Need help?
Do you have a question about the IT-VCHD710KIT and is the answer not in the manual?
Questions and answers