
Related Manuals for TECHCON TS8100 Series


Summary of Contents for TECHCON TS8100 Series
- Page 1 TS8100 Series Progressive Cavity (PC) Pump System User Guide A continuously volumetric dispensing system based on Progressive Cavity Technology techcon.com/contact-us...
-
Page 2: Table Of Contents
TS8100 Series Progressive Cavity (PC) Pump User Guide CONTENTS PC PUMP SPECIFICATIONS ........................ 3 DIMENSIONS AND TYPICAL SETUP ....................4 PC PUMP UNPACKING AND INSPECTION ..................5 DESCRIPTION ............................. 6 THEORY OF OPERATION ........................7 SET-UP INSTRUCTIONS ........................8 6.1 Install the Stator ..........................8 6.2 Mechanical Mounting ........................ -
Page 3: Pc Pump Specifications
TS8100 Series Progressive Cavity (PC) Pump User Guide 1. PC PUMP SPECIFICATIONS SPECIFICATIONS Size (mm) 250 mm L X 34 mm W Size (inches) 9.8” L X 1.3” W Weight (g) 589g Weight (oz) 20.8 oz Wetted Parts Delrin, PFE, Stainless Steel, UHMWPE, Carbine... -
Page 4: Dimensions And Typical Setup
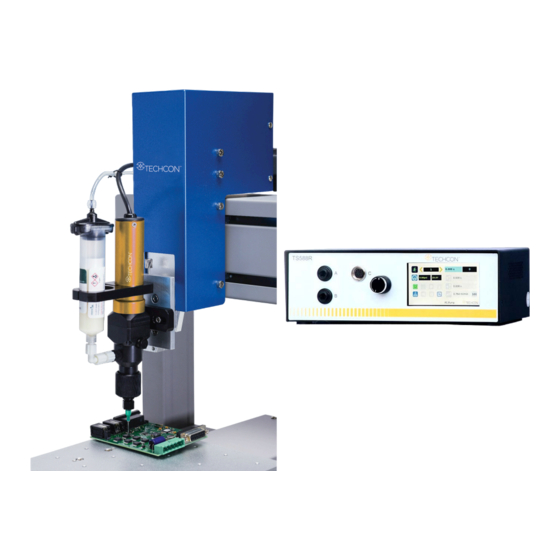
TS8100 Series Progressive Cavity (PC) Pump User Guide 2. DIMENSIONS AND TYPICAL SETUP Figure 1 TO AIR SOURCE Figure 2 (1) Air Source, (2) Valve (not included) (3) Syringe of Material (not included) (4) Smart Controller (5) Power Adapter (6) Foot Switch... -
Page 5: Pc Pump Unpacking And Inspection
TS8100 Series Progressive Cavity (PC) Pump User Guide 3. PC PUMP UNPACKING AND INSPECTION Carefully unpack the pump and examine the items contained in the carton (Figure 3). ITEM NO. PART NUMBER DESCRIPTION QTY. 7509-9201 PC PUMP/TS8100-100 (without Stator) 7509-9202... -
Page 6: Description
The TS8100 Series PC Pump provides a consistent dispensing output due to a special design of sealed cavities in the fluid chamber which create a volumetric fluid flow. Two main components are the stator and rotor. -
Page 7: Theory Of Operation
Progressive Cavity (PC) Pump User Guide 5. THEORY OF OPERATION The TS8100 Series PC Pump dispenses fluid with a positive displacement action using a progressive cavity technology (Figure 4). Fluid is held in a feed reservoir (2) under a positive head of air pressure, up to 30 psi (2.07 bar), depending upon the viscosity of the fluid. -
Page 8: Set-Up Instructions
TS8100 Series Progressive Cavity (PC) Pump User Guide 6. SET-UP INSTRUCTIONS 6.1 Install the Stator To ensure the safety of the pump’s components, the TS8100 is shipped without the stator attached to the motor/rotor assembly. Follow the instructions below to install the stator (Figure 5). -
Page 9: Mechanical Mounting
6.2 Mechanical Mounting Normally, the TS8100 Series PC Pump is used on an automation system such as a bench-top robot. It is very important that the pump is mounted on the Z-axis gantry, in a secure manner, that will not allow loosening during dispense operation. -
Page 10: Connect The Pump To The Controller
Progressive Cavity (PC) Pump User Guide Bracket Mounting Screw Figure 8 Figure 9 6.3 Connect the Pump to the Controller Refer to setup diaphragm below (Figure 10). The recommended controller for the TS8100 Series PC Pump is the TS588R. techcon.com/contact-us... -
Page 11: Prime The Pump
TS8100 Series Progressive Cavity (PC) Pump User Guide MOTOR CABLE AIR HOSE TO AIR SOURCE Figure 10 1. Connect the power adapter to the TS588R controller. 2. Connect the air hose to the TS588R controller. 3. Connect the motor cable to Port C. -
Page 12: Dispensing
TS8100 Series Progressive Cavity (PC) Pump User Guide 3. Press and hold the foot switch until a steady stream of material is flowing out the pump outlet without air bubbles. 4. Attach a dispense needle to the pump outlet. 5. Repeat step #2. - Page 13 TS8100 Series Progressive Cavity (PC) Pump User Guide 2. Enter the desired dispenser volume. 3. Press and release the Foot Switch to activate the dispense cycle. Figure 13 Note: if suck back is needed, touch the “Reverse” icon to setup reverse volume...
-
Page 14: Maintenance And Cleaning
Progressive Cavity (PC) Pump User Guide 7. MAINTENANCE AND CLEANING 7.1 Pump Purging Purging the pump with dispensing conditioner (Techcon Part Number 7305XCON) after each shift is recommended. The conditioner removes material residue from the material path and conditions the pump for future use. - Page 15 TS8100 Series Progressive Cavity (PC) Pump User Guide Figure 14 1. Perform the pump purging process by follow steps 1-6 in Section 9.1 “Purging.” 2. Remove the 1/8 NPT Inlet Fitting 3. Rotate the retaining cap (3) counterclockwise until it completely detaches from the stator housing (7).
- Page 16 TS8100 Series Progressive Cavity (PC) Pump User Guide 9. Use the same cleaning brush to clean the internal chamber of the stator cap. 10. Use a soft cloth to wipe off material residue on the rotor (2) surface. 11. Continue to clean the rotor by dipping it in a solvent bath, then use the brush to remove any leftover residue.
-
Page 17: Spare & Replacement Parts
TS8100 Series Progressive Cavity (PC) Pump User Guide 8. SPARE & REPLACEMENT PARTS Item Part Number Description 8100-100-007 Cable Assembly 7509-0340 Motor Sleeve 2800-0903 M3 x 6mm Set Screw 7509-0610 Flexible Coupling 3300-0586 U-Seal (x2) 2800-0836 M2.5 x 3mm Set Screw... -
Page 18: Standard Accessories
TS8100 Series Progressive Cavity (PC) Pump User Guide 9. STANDARD ACCESSORIES PART NUMBER DESCRIPTION 8100‐CLEANKIT Cleaning Kit 8100‐SYBRACKET Syringe Bracket Kit 8100‐MBRACKET Mounting Bracket TSD931‐96 Female Luer with 1/8 NPT Thread TSD931‐82B Male Adapter Luer Lock, Black Nylon TSD931‐81B Elbow 90° Luer Lock, Black‐ Nylon 10. -
Page 19: Ts588R Smart Controller Specs
TS8100 Series Progressive Cavity (PC) Pump User Guide 12. TS588R SMART CONTROLLER SPECS SPECIFICATIONS Size (mm) 290 mm x 212 mm x 98 mm 11.4” X 8.3” X 3.9” Size (inches) Weight (kg) 2.8 kg Weight (lbs) 6.17 lbs Input Voltage... -
Page 20: Limited Warranty
Manufacturer’s liability, as stated herein, cannot be altered or enlarged except by a written statement signed by an officer of the company. In no event shall the Manufacturer be liable for consequential or incidental damages. A return authorization is required from Techcon Systems prior to shipping a defective unit to the factory.
Need help?
Do you have a question about the TS8100 Series and is the answer not in the manual?
Questions and answers