Table of Contents
Advertisement
Available languages
Available languages
Quick Links
Advertisement
Chapters
Table of Contents

Subscribe to Our Youtube Channel
Related Manuals for AEG MSB2057D-B


Summary of Contents for AEG MSB2057D-B
- Page 1 MSB2057D-B Benutzerinformation Mikrowellenofen User Manual Microwave Oven Manual de instrucciones Horno de microondas Notice d'utilisation Four à micro-ondes Gebruiksaanwijzing Magnetron USER Manual de instruções Forno microondas MANUAL...
-
Page 2: Table Of Contents
13. INFORMATIONEN ZUR ENTSORGUNG............20 FÜR PERFEKTE ERGEBNISSE Danke, dass Sie sich für dieses AEG Produkt entschieden haben. Wir haben es geschaffen, damit Sie viele Jahre von seiner ausgezeichneten Leistung und den innovativen Technologien, die Ihnen das Leben erleichtern, profitieren können. Es ist mit Funktionen ausgestattet, die in gewöhnlichen Geräten nicht vorhanden... -
Page 3: Sicherheitshinweise
DEUTSCH SICHERHEITSHINWEISE Lesen Sie vor der Montage und dem Gebrauch des Geräts zuerst die Bedienungsanleitung. Bei Verletzungen oder Schäden infolge nicht ordnungsgemäßer Montage oder Verwendung übernimmt der Hersteller keine Haftung. Bewahren Sie die Anleitung zum Nachschlagen an einem sicheren und zugänglichen Ort auf. - Page 4 Kinder dürfen keine Reinigung und Wartung des • Geräts ohne Beaufsichtigung durchführen. 1.2 Allgemeine Sicherheit Dieses Gerät ist nur zum Kochen bestimmt. • Dieses Gerät ist für den Hausgebrauch in einem • Einfamilienhaus in Innenräumen bestimmt. Dieses Gerät darf in Büros, Hotelzimmern, •...
- Page 5 DEUTSCH WARNUNG: Wenn die Tür oder Türdichtungen • beschädigt sind, darf das Gerät erst wieder in Betrieb genommen werden, wenn es von einer Fachkraft repariert wurde. Verwenden Sie beim Garen in der Mikrowelle keine • Metallbehälter für Speisen und Getränke. Diese Vorgabe gilt nicht, wenn der Hersteller Angaben zur Größe und Form der Metallbehälter, die geeignet für das Garen in der Mikrowelle sind, zur Verfügung...
-
Page 6: Sicherheitsanweisungen
Wird das Gerät nicht in einem sauberen Zustand • gehalten, kann dies zu einer Verschlechterung der Oberfläche führen, die sich negativ auf die Lebensdauer des Geräts auswirkt und möglicherweise zu einer gefährlichen Situation führen kann. Die Temperatur der zugänglichen Oberflächen kann •... - Page 7 DEUTSCH • Alle elektrischen Anschlüsse sind von • Reinigen Sie das Gerät regelmäßig, einem geprüften Elektriker um eine Verschlechterung des vorzunehmen. Oberflächenmaterials zu verhindern. • Das Gerät muss geerdet sein. • Es dürfen sich keine • Stellen Sie sicher, dass die Daten auf Lebensmittelspritzer oder Reste von dem Typenschild mit den elektrischen Reinigungsmitteln auf den...
-
Page 8: Montage
• Schneiden Sie das Netzkabel in der Nähe des Geräts ab, und entsorgen Sie es. 3. MONTAGE WARNUNG! Siehe Kapitel 600 mm Sicherheitshinweise. 560+8 mm 3.1 Elektrischer Anschluss 18 mm WARNUNG! min. Der elektrische Anschluss 300 mm muss von einer qualifizierten... - Page 9 DEUTSCH 3. Befestigen Sie die obere Halterung 45 mm mit 2 Schrauben. 560+8 mm 600 mm min. 550 mm 380 +3 mm 4. Halten Sie den Mindestabstand zwischen der Mikrowelle und dem 3.3 Montage benachbarten Küchenmöbel ein. 1. Das elektrische Kabel darf auf keinen Fall eingeklemmt werden.
-
Page 10: Gerätebeschreibung
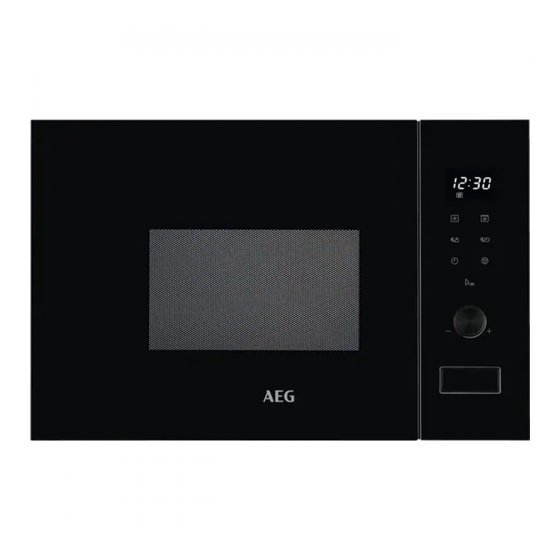
4. GERÄTEBESCHREIBUNG 4.1 Gesamtansicht Lampe Sicherheitsverriegelungssystem Display Bedienfeld Einstellknopf Türtaste Wellenleiterabdeckung Grillelement Drehspindel 4.2 Bedienfeld Anzeigeelement Funktionsbeschreibung Display Anzeige der Einstellungen und der aktu‐ ellen Uhrzeit. Einstellen der Mikrowellenfunktion. Einstellen des Grills oder der Kombi- Garfunktion. Einstellen der Uhr und des Timers. -
Page 11: Vor Der Ersten Inbetriebnahme
DEUTSCH Anzeigeelement Funktionsbeschreibung Ausschalten der Mikrowelle oder Lö‐ schen der Gareinstellungen. Einschalten des Geräts oder Verlänge‐ rung der Gardauer um 30 Sekunden bei voller Leistung. Einstellknopf Einstellen der Gardauer, des Gewichts oder der Funktion. Auftauen von Speisen nach Gewicht. Auftauen von Speisen nach Zeit. 4.3 Zubehör Glasteller und Rollenführung Grillrost... -
Page 12: Täglicher Gebrauch
3. Mit bestätigen. Sie können die Uhrzeit im 4. Drehen Sie den Einstellknopf, um die 24-Stunden-Format Minuten einzustellen. einstellen. 5. Mit bestätigen. 1. Drücken Sie zweimal. 2. Drehen Sie den Einstellknopf, um die Stunden einzustellen. 6. TÄGLICHER GEBRAUCH • Feste Gemüsesorten wie Karotten, WARNUNG! Erbsen oder Blumenkohl müssen in... - Page 13 DEUTSCH Gemüse ohne vorheriges Auftauen • Befolgen Sie die gegart werden. Herstelleranweisungen auf der Fertiggerichte Verpackung (z.B. Metalldeckel • Sie können Fertiggerichte im Gerät entfernen und Kunststofffolie nur zubereiten, wenn ihre Verpackung einstechen). mikrowellengeeignet ist. Geeignetes Kochgeschirr und Materialen Kochgeschirr/Material Mikrowelle Grillen Auftauen...
- Page 14 6.2 Ein- und Ausschalten der 6. Warten Sie, bis die Mikrowelle nach Ablauf der eingestellten Zeit Mikrowelle automatisch ausgeschaltet wird. Ein akustisches Signal ertönt. VORSICHT! Vorzeitiges Ausschalten der Mikrowelle: Nehmen Sie die Mikrowelle nicht in Betrieb, wenn sich • Drücken Sie keine Speisen in ihr •...
-
Page 15: Automatikprogramme
DEUTSCH 6.6 Mehrstufiges Garen Uhrzeigersinn, um die Gardauer einzustellen, und drücken Sie Wenn das Lebensmittel anschließend , um die Mikrowelle bei zuerst aufgetaut werden soll, voller Leistung zu starten. stellen Sie den Auftaumodus ein. 6.5 Auftauen Die Zubereitung von Speisen kann in Sie können zwischen zwei Auftaumodi maximal 2 Stufen erfolgen. -
Page 16: Verwendung Des Zubehörs
1. Drehen Sie den Einstellknopf im 4. Drücken Sie , um Ihre Auswahl zu Uhrzeigersinn, um das gewünschte bestätigen und die Mikrowelle Menü einzustellen. einzuschalten. 2. Mit bestätigen. 3. Drehen Sie den Einstellknopf, um das Gewicht einzustellen. Menü Menge... -
Page 17: Zusatzfunktionen
DEUTSCH 8.2 Einsetzen des Grillrostes 1. Legen Sie die Rollenführung um die Drehspindel. Legen Sie den Grillrost auf das 2. Stellen Sie den Glasteller auf die Drehteller-Set. Rollenführung. 9. ZUSATZFUNKTIONEN 9.1 Kindersicherung 1. Drücken Sie 2. Drehen Sie den Einstellknopf, um die Diese Kindersicherung verhindert eine Zeit einzustellen. -
Page 18: Reinigung Und Pflege
Problem Abhilfe Die Speise ist nach Ablauf der Zeit im‐ Längere Garzeit einstellen oder höhere Leistung mer noch nicht aufgetaut, heiß oder wählen. Beachten Sie, dass für die Zubereitung gegart. größerer Gargutmengen eine längere Gardauer erforderlich ist. Nach Ablauf der Garzeit ist das Gargut Stellen Sie das nächste Mal eine niedrigere Leis‐... -
Page 19: Fehlersuche
DEUTSCH • Reinigen Sie die Metalloberflächen • Um hartnäckige Rückstände leichter mit einem handelsüblichen entfernen zu können, stellen Sie ein Reinigungsmittel. Glas Wasser in das Gerät, und lassen • Reinigen Sie den Geräteinnenraum Sie das Wasser 2 bis 3 Minuten bei nach jedem Gebrauch. -
Page 20: Informationen Zur Entsorgung
Störung Mögliche Ursache Abhilfe Das Drehteller-Set Unter dem Glasteller befinden Reinigen Sie die Fläche unter macht Kratz- oder sich Gegenstände oder dem Glasteller. Mahlgeräusche. Schmutz. Das Gerät funktioniert Eine Störung ist aufgetreten. Falls dieser Vorfall wiederholt ohne ersichtlichen auftritt, wenden Sie sich an den Grund nicht mehr. - Page 21 DEUTSCH sondern über die bereitgestellten Die unentgeltliche Abholung von Elektro- Recyclingbehälter oder die und Elektronikgeräten ist dann aber auf entsprechenden örtlichen Wärmeüberträger (z. B. Kühlschrank), Sammelsysteme. Bildschirme, Monitore und Geräte, die Bildschirme mit einer Oberfläche von Recyceln Sie zum Umwelt- und mehr als 100 cm²...
-
Page 22: Safety Information
13. ENVIRONMENTAL CONCERNS..............38 FOR PERFECT RESULTS Thank you for choosing this AEG product. We have created it to give you impeccable performance for many years, with innovative technologies that help make life simpler – features you might not find on ordinary appliances. Please spend a few minutes reading to get the very best from it. - Page 23 ENGLISH of incorrect installation or usage. Always keep the instructions in a safe and accessible location for future reference. 1.1 Children and vulnerable people safety WARNING! Risk of suffocation, injury or permanent disability. This appliance can be used by children aged from 8 •...
- Page 24 (average) domestic usage levels. WARNING: The appliance and its accessible parts • become hot during use. Care should be taken to avoid touching heating elements. Always use oven gloves to remove or insert •...
- Page 25 ENGLISH warming pads, slippers, sponges, damp cloth and similar may lead to risk of injury, ignition or fire. If smoke is emitted, switch off or unplug the appliance • and keep the door closed in order to stifle any flames. Microwave heating of beverages can result in delayed •...
-
Page 26: Safety Instructions
2. SAFETY INSTRUCTIONS 2.1 Installation 2.3 Use WARNING! WARNING! Only a qualified person must Risk of injury, burns and install this appliance. electric shock or explosion. • Remove all the packaging. • Do not change the specification of this •... -
Page 27: Installation
ENGLISH 2.6 Disposal separately: These lamps are intended to withstand extreme physical conditions in household appliances, WARNING! such as temperature, vibration, Risk of injury or suffocation. humidity, or are intended to signal • Disconnect the appliance from the information about the operational mains supply. - Page 28 45 mm 560+8 mm 600 mm min. 550 mm 380 +3 mm 3. Fix the upper bracket with 2 screws. 3.3 Installation 1. The electrical cable must not be trapped in any way. 4. Keep the minimum distance between the microwave and the adjacent furniture.
-
Page 29: Product Description
ENGLISH 4. PRODUCT DESCRIPTION 4.1 General overview Lamp Safety interlock system Display Control panel Knob Door opener Waveguide cover Grill Turntable shaft 4.2 Control Panel Display element Function description Display Shows the settings and current time. To set the microwave function. To set the grilling or combination cook‐... -
Page 30: Before First Use
Display element Function description To deactivate the microwave or to delete the cooking settings. To start the appliance or increase the cooking time for 30 seconds at full pow‐ Setting knob To set the cooking time or weight or function. -
Page 31: Daily Use
ENGLISH 4. Turn the Setting knob to set the 5. Press to confirm. minutes. 6. DAILY USE • Do not use cookware made of WARNING! porcelain, ceramic or earthenware Refer to Safety chapters. with unglazed bottoms or small holes for example on handles. Moisture 6.1 General information about going into the holes can cause the using the appliance... - Page 32 Suitable cookware and materials Cookware / Material Microwave Grilling Defrosting Heating Cooking Ovenproof glass and porcelain with no metal components, e. g. Pyrex, heat- proof glass Non-ovenproof glass and porcelain Glass and glass ceramic made of oven‐ proof/frost-proof material (e. g. Arco‐...
- Page 33 ENGLISH comes to an end. An acoustic signal • open the door. The microwave stops sounds. automatically. Close the door and To deactivate the microwave earlier: press to continue cooking. Use this option to inspect food. • press 6.3 Power setting table Power setting Approximate Percentage of Power Press...
-
Page 34: Automatic Programmes
5. Turn the Setting knob to set the time. 3. Press to confirm and activate the microwave. 6. Press to confirm and activate the microwave. 6.6 Multistage cooking After each step an acoustic signal sounds. If one stage is defrosting, set 6.7 Grilling and Combi... -
Page 35: Using The Accessories
ENGLISH Menu Amount A - 7 1 cup (120 ml) Beverage 2 cups (240 ml) 3 cups (360 ml) A - 8 50 g Popcorn 100 g 8. USING THE ACCESSORIES 8.2 Inserting the grill rack WARNING! Refer to Safety chapters. Place the grill rack on the turntable set. -
Page 36: Hints And Tips
The Timer still works when you open When the set time is reached, an the door or pause the microwave. acoustic signal sounds. Press to cancel. 10. HINTS AND TIPS WARNING! Refer to Safety chapters. 10.1 Tips for the microwave... -
Page 37: Care And Cleaning
ENGLISH Each mode combines the microwave and the grill functions at different time periods and power levels. 11. CARE AND CLEANING • Clean stubborn dirt with a special WARNING! cleaner. Refer to Safety chapters. • Clean all accessories regularly and let them dry. -
Page 38: Environmental Concerns
Problem Possible cause Remedy There is sparking in There are metal skewers or alu‐ Make sure that the skewers or the cavity. minium foil that touches the inte‐ foil do not touch the interior rior walls. walls. The turntable set... - Page 39 13. ASPECTOS MEDIOAMBIENTALES..............57 PARA UNOS RESULTADOS PERFECTOS Gracias por elegir este producto AEG. Lo hemos creado para brindarle un rendimiento impecable durante muchos años, con tecnologías innovadoras que lo ayudan a simplificar la vida, características que quizás no encuentre en los electrodomésticos comunes.
-
Page 40: Información Sobre Seguridad
INFORMACIÓN SOBRE SEGURIDAD Antes de instalar y utilizar el aparato, lea atentamente las instrucciones facilitadas. El fabricante no se hace responsable de lesiones o daños producidos como resultado de una instalación o un uso incorrectos. Conserve siempre estas instrucciones en lugar seguro y accesible para futuras consultas. - Page 41 ESPAÑOL 1.2 Instrucciones generales de seguridad Este aparato está diseñado exclusivamente para • cocinar. Este aparato está diseñado para uso doméstico en • interiores. Este aparato se puede utilizar en oficinas, • habitaciones de hotel, habitaciones de Bed&Breakfast, casas de campo y otros alojamientos similares donde dicho uso no exceda (en promedio) los niveles de uso doméstico.
- Page 42 Utilice solamente utensilios aptos para hornos de • microondas. Cuando caliente alimentos en recipientes de papel o • plástico, vigile el aparato por la posibilidad de incendio. El aparato está diseñado para calentar alimentos y • bebidas. El secado de alimentos o ropa y el calentamiento de almohadillas térmicas, pantuflas,...
-
Page 43: Instrucciones De Seguridad
ESPAÑOL No utilice productos de limpieza abrasivos ásperos ni • rascadores de metal afilado para limpiar el cristal de las tapas abisagradas de la placa si no quiere arañar su superficie, lo que podría hacer que el cristal se hiciese añicos. No encienda el aparato cuando esté... -
Page 44: Instalación
2.5 Asistencia tecnica • Cerciórese de que los orificios de ventilación no están obstruidos. • Para reparar el aparato, póngase en • No utilice el aparato como superficie contacto con el centro de servicio de trabajo ni use el interior como autorizado. - Page 45 ESPAÑOL 3.2 Instalación - preparación 45 mm preliminar Para instalar el microondas en un armario con las dimensiones abajo especificadas, quite los 4 tornillos y el soporte de la parte inferior del aparato. 560+8 mm 600 mm min. 550 mm 380 +3 mm 600 mm 560+8 mm...
-
Page 46: Descripción Del Producto
3 mm 4. Mantenga la distancia mínima entre el microondas y el mueble adyacente. 4. DESCRIPCIÓN DEL PRODUCTO 4.1 Descripción general Lámpara Sistema de bloqueo de seguridad Pantalla Panel de control Mando Abridor de la puerta Cubierta de guíaondas... - Page 47 ESPAÑOL 4.2 Panel de control Elemento de la pantalla Descripción de la función Pantalla Muestra los ajustes y la hora actual. Para ajustar la función de microondas. Para ajustar la función de grill o cocción combinada. Para programar el reloj y el temporiza‐ dor.
-
Page 48: Antes Del Primer Uso
4.3 Accesorios Bandeja de cocción de cristal y guía de rodillos. Conjunto giratorio Rejilla del grill Utilice siempre el plato giratorio para preparar los alimentos en el microondas. Se usa para: • cocinar alimentos al grill • cocción combinada 5. - Page 49 ESPAÑOL que pueden estallar. Para los huevos vuelto del revés con un contenedor fritos, piche primero las yemas. debajo para recoger el líquido de • Pinche los alimentos con piel como descongelación. las patatas, los tomates, las • Dé la vuelta al alimento a la mitad del salchichas y similares varias veces tiempo de descongelación.
- Page 50 Material/recipiente Microondas Grill Desconge‐ Calenta‐ Cocción lación miento Cerámica , loza Plástico resistente al calor hasta 200 °C Cartón, papel Película para alimentos Película de asado con cierre apto para microondas Fuentes de metal, p. ej., esmalte, hierro fundido...
- Page 51 ESPAÑOL 6.3 Tabla de ajustes de potencia Ajuste de po‐ Porcentaje aproximado de potencia Pulse tencia 1 vez P100 100 % 2 veces P 80 80 % 3 veces P 50 50 % 4 veces P 30 30 % 5 veces P 10 10 % Cocción grill y combinada...
-
Page 52: Programas Automáticos
5. Gire el mando de ajuste para ajustar 3. Pulse para confirmar y activar el la hora. microondas. 6. Pulse para confirmar y activar el 6.6 Cocción en varias etapas microondas. Después de cada fase se emite una Si una etapa es la señal acústica. -
Page 53: Uso De Los Accesorios
ESPAÑOL Menú Cantidad A - 5 200 g Patatas 400 g 600 g A - 6 250 g Pescado 350 g 450 g A - 7 1 taza (120 ml) Bebidas 2 tazas (240 ml) 3 tazas (360 ml) A - 8 50 g Palomitas de maíz 100 g... -
Page 54: Funciones Adicionales
9. FUNCIONES ADICIONALES 9.1 Bloqueo de seguridad 9.2 Temporizador de cocina para niños Puede ajustar como máximo 95 minutos. El Bloqueo de seguridad para niños 1. Pulse impide que el microondas se utilice 2. Gire el mando de ajuste para ajustar accidentalmente. -
Page 55: Mantenimiento Y Limpieza
ESPAÑOL 10.3 Cocinar 10.5 Grill Saque siempre la carne y las aves frías Ase los alimentos de poco espesor en el del frigorífico al menos 30 minutos antes centro de la rejilla del grill. de cocinarlos. Dé la vuelta al alimento a la mitad del Deje tapados la carne, las aves, el tiempo establecido y continúe el asado. - Page 56 12.1 Qué hacer si... Problema Posible causa Solución El aparato no funcio‐ El aparato está apagado. Encienda el aparato. El aparato no funcio‐ El aparato no está enchufado. Enchufe el aparato. El aparato no funcio‐ Se ha fundido un fusible de la Revise el fusible.
-
Page 57: Aspectos Medioambientales
ESPAÑOL 13. ASPECTOS MEDIOAMBIENTALES marcados con el símbolo junto con Recicle los materiales con el símbolo los residuos domésticos. Lleve el Coloque el material de embalaje en los producto a su centro de reciclaje local o contenedores adecuados para su póngase en contacto con su oficina reciclaje. -
Page 58: Informations De Sécurité
13. EN MATIÈRE DE PROTECTION DE L'ENVIRONNEMENT......76 POUR DES RÉSULTATS PARFAITS Merci d’avoir choisi ce produit AEG. Nous l’avons conçu pour qu’il vous offre des performances irréprochables pendant de nombreuses années, en intégrant des technologies innovantes vous simplifiant la vie – fonctions que vous ne trouverez peut-être pas sur des appareils ordinaires. - Page 59 FRANÇAIS pourra être tenu pour responsable des blessures et dégâts résultant d'une mauvaise installation ou utilisation. Conservez toujours les instructions dans un lieu sûr et accessible pour vous y référer ultérieurement. 1.1 Sécurité des enfants et des personnes vulnérables AVERTISSEMENT! Risque d'asphyxie, de blessure ou d'invalidité...
- Page 60 1.2 Sécurité générale Cet appareil est exclusivement destiné à un usage • culinaire. Cet appareil est conçu pour un usage domestique • unique, dans un environnement intérieur. Cet appareil peut être utilisé dans les bureaux, les • chambres d’hôtel, les chambres d’hôtes, les maisons d’hôtes de ferme et d’autres hébergements similaires...
- Page 61 FRANÇAIS tant qu'il n'a pas été réparé par un professionnel qualifié. Les aliments ou boissons dans des récipients en • métal ne doivent jamais être chauffés au micro-ondes. Cet avertissement ne s'applique pas si le fabricant indique la taille et la forme des récipients métalliques adaptés à...
-
Page 62: Consignes De Sécurité
La température des surfaces accessibles peut être • élevée lorsque l’appareil fonctionne. Le four à micro-ondes ne doit pas être installé dans un • meuble, à moins qu'il n'ait été spécifiquement testé à... - Page 63 FRANÇAIS • Si l'appareil est branché à la prise • Les résidus de graisse et d'aliments murale en utilisant une rallonge dans l'appareil peuvent provoquer un électrique, assurez-vous qu'elle est incendie et un arc électrique lorsque reliée à la terre. la fonction micro-ondes est en cours.
-
Page 64: Installation
3. INSTALLATION AVERTISSEMENT! Reportez-vous aux chapitres 600 mm concernant la sécurité. 560+8 mm 3.1 Installation électrique 18 mm AVERTISSEMENT! min. Le branchement électrique 300 mm doit être confié à un 362 +3 mm électricien qualifié. Le fabricant ne pourra être... - Page 65 FRANÇAIS 45 mm 560+8 mm 600 mm min. 550 mm 380 +3 mm 3. Fixez le support supérieur à l'aide de 2 vis. 3.3 Installation 1. Le câble d'alimentation ne doit en aucun cas être coincé, de quelque façon que ce soit. 4.
-
Page 66: Description De L'appareil
4. DESCRIPTION DE L'APPAREIL 4.1 Vue d'ensemble Éclairage Système d'interverrouillage de sécurité Affichage Bandeau de commande Sélecteur Bouton d'ouverture de la porte Couvercle de guide d'ondes Gril Axe du plateau tournant 4.2 Bandeau de commande Éléments de l'affichage Description des fonctions Affichage Affiche les réglages et l'heure. -
Page 67: Avant La Première Utilisation
FRANÇAIS Éléments de l'affichage Description des fonctions Pour éteindre l'appareil ou supprimer les réglages de cuisson. Pour mettre l'appareil en marche ou aug‐ menter le temps de cuisson de 30 se‐ condes à pleine puissance. Manette de réglage Pour régler la durée de cuisson, le poids ou la fonction. -
Page 68: Utilisation Quotidienne
3. Appuyez sur pour confirmer. Vous pouvez sélectionner le 4. Tournez la manette de réglage pour format 24 heures pour sélectionner les minutes. l'horloge. 5. Appuyez sur pour confirmer. 1. Appuyez deux fois sur 2. Tournez la manette de réglage pour sélectionner les heures. - Page 69 FRANÇAIS • Utilisez une puissance de micro- • Vous devez suivre les instructions ondes plus élevée pour cuire les fruits imprimées sur l'emballage (par et légumes sans les décongeler. exemple « Retirez le couvercle en Plats préparés métal et percez le film plastique »). •...
- Page 70 Ustensile de cuisine / matériaux Micro-ondes Gril Décongéla‐ Résis‐ Cuisine tion tance Plats préparés et emballés 1) Sans couches/ornements en argent, or, platine ou métal 2) Sans composants en quartz ou en métal ou avec un revêtement contenant du métal 3) Vous devez suivre les instructions du fabricant concernant les températures maximales.
- Page 71 FRANÇAIS Réglage de la Mode de fonctionnement Appuyez sur puissance Cuisson combinée 2 fois C – 1 55 % micro-ondes, 45 % gril 3 fois C – 2 36 % micro-ondes, 64 % gril 6.4 Démarrage rapide pour la décongélation selon le temps.
-
Page 72: Programmes Automatiques
Gril ou 3. Appuyez sur pour confirmer et Combi sont activés. allumer le micro-ondes. Vous pouvez modifier le réglage de la puissance ou la durée pendant 7. PROGRAMMES AUTOMATIQUES 1. Tournez la manette de réglage vers AVERTISSEMENT! la droite pour sélectionner le menu... -
Page 73: Fonctions Supplémentaires
FRANÇAIS 8.1 Installation de l'ensemble 8.2 Installation de la grille du plateau tournant Placez la grille sur le plateau tournant. ATTENTION! Ne cuisez pas les aliments sans l'ensemble du plateau tournant. N'utilisez que l'ensemble du plateau tournant fourni avec le micro-ondes. -
Page 74: Conseils
10. CONSEILS AVERTISSEMENT! Reportez-vous aux chapitres concernant la sécurité. 10.1 Conseils pour le micro-ondes Problème Solution Vous ne trouvez pas les détails pour la Recherchez un aliment similaire. Diminuez ou ral‐ quantité de nourriture préparée. longez le temps de cuisson selon la règle suivan‐... -
Page 75: Entretien Et Nettoyage
FRANÇAIS Chaque mode associe les fonctions micro-ondes et gril à différents moments et à des niveaux de puissance différents. 11. ENTRETIEN ET NETTOYAGE • Nettoyez régulièrement tous les AVERTISSEMENT! accessoires et laissez-les sécher. Reportez-vous aux chapitres Utilisez un chiffon doux additionné concernant la sécurité. -
Page 76: Matière De Protection De L'environnement
Problème Cause probable Solution L'affichage indique La Sécurité enfants est activée. Désactivez la sécurité enfants. Appuyez sur pendant 3 se‐ condes. Des étincelles jaillis‐ Vous avez placé des plats en Retirez le plat de l'appareil. sent dans la cavité. - Page 77 FRANÇAIS ménagères. Emmenez un tel produit dans votre centre local de recyclage ou contactez vos services municipaux. Concerne la France uniquement :...
-
Page 78: Veiligheidsinformatie
13. MILIEUBESCHERMING................... 96 VOOR PERFECTE RESULTATEN Bedankt dat je voor dit AEG-product hebt gekozen. We hebben het gecreëerd om jarenlang onberispelijke prestaties te leveren, met innovatieve technologieën die het leven eenvoudiger maken – functies die je wellicht niet op gewone apparaten aantreft. - Page 79 NEDERLANDS niet verantwoordelijk voor verwondingen of schade die voortvloeit uit de onjuiste installatie of het onjuiste gebruik. Bewaar de instructies altijd op een veilige, toegankelijke plek voor toekomstig gebruik. 1.1 Veiligheid van kinderen en kwetsbare personen WAARSCHUWING! Gevaar voor verstikking, letsel of permanente invaliditeit.
- Page 80 Dit apparaat is bedoeld voor binnenshuis • huishoudelijk gebruik. Dit apparaat kan worden gebruikt in kantoren, • hotelkamers, bed & breakfast-kamers, boerderijgasthuizen en andere soortgelijke accommodaties waar dergelijk gebruik de (gemiddelde) huishoudelijke gebruiksniveaus niet overschrijdt. WAARSCHUWING: Het apparaat en de toegankelijke •...
- Page 81 NEDERLANDS Tijdens bereiding in de magnetron zijn geen metalen • voedselbakjes en drinkbekers toegestaan. Deze vereiste is niet van toepassing als de fabrikant heeft aangegeven dat het formaat en de vorm van het metalen voorwerp geschikt is voor bereiding in de magnetron.
-
Page 82: Veiligheidsvoorschriften
De temperatuur van de toegankelijke oppervlakken • kan hoog zijn als het apparaat in werking is. De magnetron mag niet in een kast worden geplaatst, • tenzij deze in een kast is getest. De achterzijde van apparaten moet tegen een wand •... -
Page 83: Montage
NEDERLANDS • Trek niet aan het netsnoer om het • Maak het apparaat schoon met een apparaat los te koppelen. Trek altijd vochtige zachte doek. Gebruik alleen aan de stekker. neutrale schoonmaakmiddelen. Gebruik geen schuurmiddelen, 2.3 Gebruik schuursponsjes, oplosmiddelen of metalen voorwerpen. - Page 84 De fabrikant is niet verantwoordelijk indien u 600 mm deze veiligheidsmaatregelen uit hoofdstuk 560+8 mm 'Veiligheidsinformatie' niet 18 mm opvolgt. Deze magnetron wordt geleverd met een min. 300 mm netsnoer en stekker. 362 +3 mm De kabel heeft geaarde bedrading met een geaarde stekker.
-
Page 85: Beschrijving Van Het Product
NEDERLANDS 3.3 Montage 3. Maak de bovenste beugel vast met 2 schroeven. 1. De elektrische kabel mag op geen enkele manier geblokkeerd worden. 4. Bewaar de minimumafstand tussen de magnetron en de aangrenzende kasten. 2. Plaats de magnetron in de kast. 3 mm 4. - Page 86 4.2 Bedieningspaneel Displayelement Functiebeschrijving Weergave Toont de instellingen en de huidige tijd. De magnetronfunctie instellen. De grill- of combinatiekokenfunctie in‐ stellen. De klok en de keukenwekker instellen. De magnetron uitschakelen of kookin‐ stellingen wissen. Om het apparaat te starten of de kooktijd te verlengen met 30 seconden op vol vermogen.
-
Page 87: Voordat U Het Apparaat Voor De Eerste Keer Gebruikt
NEDERLANDS 4.3 Accessoires Glazen plateau en wieltjes. Grillrooster Set draaiplateau Gebruik altijd het draaiplateau om voedsel in de magnetron te bereiden. Gebruiken voor: • grillen • combinatiekoken 5. VOORDAT U HET APPARAAT VOOR DE EERSTE KEER GEBRUIKT Na aansluiting van het apparaat op het WAARSCHUWING! stopcontact of na een stroomstoring, Raadpleeg de hoofdstukken... - Page 88 Bij gebakken eieren, moet u dooiwater in het bakje valt. het eigeel eerst doorprikken. • Draai het voedsel halverwege de • Prik eten met 'vel' of 'schil', zoals ontdooitijd om. Verdeel de stukken zo...
- Page 89 NEDERLANDS Materiaal van de pannen Magnetron Grillen Ontdooien Verwar‐ Koken Hittebestendig plastic tot 200°C Karton, papier Huishoudfolie Bakpapier met magnetronveilige afdich‐ ting Ovenschotels gemaakt van metaal, d.w.z. email, gietijzer Bakvormen, zwarte lak of siliconen‐ laag Bakplaat Braadkookgerei, bijv. Crostino of Crunch-bord Kant-en-klare maaltijden in de verpak‐...
- Page 90 6.3 Tabel vermogensinstelling Instelling ver‐ Geschat percentage vermogen Druk op mogen 1 keer P100 100 % 2 keer P 80 80 % 3 keer P 50 50 % 4 keer P 30 30 % 5 keer P 10 10 % Grillen en combinatiekoken Instelling ver‐...
-
Page 91: Automatische Programma's
NEDERLANDS 6.6 Meerfasekoken 6. Druk op om te bevestigen en de magnetron in te schakelen. Als één van deze fases Na iedere fase klinkt er een ontdooien is, stelt u dit in als geluidssignaal. de eerste fase. 6.7 Grillen en U kunt voedsel in maximaal 2 fases combinatiekoken bereiden. -
Page 92: Gebruik Van De Accessoires
Menu Hoeveelheid A - 6 250 g 350 g 450 g A - 7 1 kop (120 ml) Drank 2 koppen (240 ml) 3 koppen (360 ml) A - 8 50 g Popcorn 100 g 8. GEBRUIK VAN DE ACCESSOIRES 8.2 Het grillrek plaatsen... -
Page 93: Extra Functies
NEDERLANDS 9. EXTRA FUNCTIES 9.1 Kinderslot 1. Druk op 2. Draai aan de instelknop om de tijd in Het kinderslot voorkomt dat de te stellen. magnetron per ongeluk in werking wordt 3. Druk op om te bevestigen. gesteld. De Kookwekker werkt nog als u de Druk gedurende 3 seconden in. -
Page 94: Onderhoud En Reiniging
10.3 Koken 10.5 Grill Haal gekoeld vlees en gevogelte Voor het grillen van vlakke minstens 30 minuten voor bereiden uit levensmiddelen in het midden van het de koelkast. grillrek. Bewaar het vlees, gevogelte en groente Draai het voedsel halverwege de afgedekt tot de bereiding. - Page 95 NEDERLANDS 12.1 Problemen oplossen Probleem Mogelijke oorzaak oplossing Het apparaat werkt Het apparaat is uitgeschakeld. Schakel het apparaat in. niet. Het apparaat werkt De stekker zit niet in het stop‐ Sluit het apparaat aan op het niet. contact. stroomnet. Het apparaat werkt De zekering in de zekeringkast Controleer de zekering.
-
Page 96: Milieubescherming
13. MILIEUBESCHERMING Recycleer de materialen met het apparaten gemarkeerd met het symbool niet weg met het huishoudelijk afval. symbool . Gooi de verpakking in een Breng het product naar het milieustation geschikte afvalcontainer om het te bij u in de buurt of neem contact op met recycleren. - Page 97 13. PREOCUPAÇÕES AMBIENTAIS..............115 PARA RESULTADOS PERFEITOS Obrigado por escolher este produto AEG. Criámo-lo para lhe proporcionar um desempenho impecável durante muitos anos, com tecnologias inovadoras que tornam a sua vida mais fácil – funcionalidades que poderá não encontrar em aparelhos comuns.
-
Page 98: Informações De Segurança
INFORMAÇÕES DE SEGURANÇA Leia atentamente as instruções fornecidas antes de instalar e utilizar o aparelho. O fabricante não poderá ser responsabilizado por ferimentos ou danos resultantes de instalação incorreta ou utilização incorreta. Guarde sempre as instruções num sítio seguro e acessível para consultar no futuro. - Page 99 PORTUGUÊS 1.2 Segurança geral Este aparelho destina-se apenas a ser utilizado para • cozinhar. Este aparelho foi concebido unicamente para • utilização doméstica num ambiente interior. Este aparelho pode ser utilizado em escritórios, • quartos de hóspedes de hotéis, quartos de hóspedes de pousadas, casas de hóspedes de turismo rural e outros alojamentos semelhantes onde tal utilização não exceda os níveis de utilização doméstica...
- Page 100 Esta restrição não se aplica se o fabricante especificar o tamanho e a forma dos recipientes metálicos que podem ser utilizados para cozinhar com micro-ondas. Utilize apenas utensílios adequados para utilizar em • fornos micro-ondas. Quando aquecer alimentos em recipientes de plástico •...
-
Page 101: Instruções De Segurança
PORTUGUÊS A superfície traseira dos aparelhos deve ser colocada • contra uma parede. Não utilize agentes de limpeza abrasivos ou • raspadores metálicos afiados para limpar a porta de vidro, porque podem riscar a superfície e quebrar o vidro. Não ative o aparelho quando estiver vazio. As peças •... -
Page 102: Instalação
2.5 Assistência técnica • Não aplique pressão sobre a porta aberta. • Para reparar o aparelho, contacte o • Certifique-se de que as aberturas de Centro de Assistência Técnica ventilação não ficam obstruídas. Autorizado. Utilize apenas peças • Não utilize o aparelho como sobressalentes originais. - Page 103 PORTUGUÊS ligação à terra. Caso ocorra um curto- 45 mm circuito eléctrico, a ligação à terra reduz o risco de choque eléctrico. 3.2 Instalação - preparação prévia Para instalar o microondas num armário 560+8 mm com as dimensões especificadas em 600 mm min.
-
Page 104: Descrição Do Produto
3 mm 4. Deixe a distância mínima entre o microondas e o armário adjacente. 4. DESCRIÇÃO DO PRODUTO 4.1 Descrição geral Lâmpada Sistema de bloqueio de segurança Visor Painel de comandos Botão Abertura da porta Cobertura guia-ondas Grelhador Eixo do prato rotativo... - Page 105 PORTUGUÊS 4.2 Painel de comandos Elemento do visor Descrição da função Visor Apresenta as definições e a hora actual. Para seleccionar a função de microon‐ das. Para seleccionar a função de cozedura com grelhador ou combinação. Para acertar o relógio e o temporizador. Para desactivar o microondas ou cance‐...
-
Page 106: Antes Da Primeira Utilização
4.3 Acessórios Prato de vidro e guia com roletes. Prateleira do grelhador Conjunto do prato rotativo Utilize sempre o conjunto do prato rotativo para preparar alimentos no microondas. Utilize para: • grelhar alimentos • cozedura combinada 5. ANTES DA PRIMEIRA UTILIZAÇÃO Quando ligar o aparelho à... - Page 107 PORTUGUÊS podem explodir. No caso de ovos pequeno virado ao contrário e um estrelados, fure primeiro as gemas. recipiente por baixo, para que o • Antes de cozinhar, pique várias vezes líquido da descongelação possa com um garfo os alimentos que escoar para o recipiente.
- Page 108 Recipiente / Material Microondas Grelhador Desconge‐ Aqueci‐ Cozinhar mento Plástico resistente ao calor até 200 °C Cartão, papel Película aderente Película própria para assados com fe‐ cho seguro para microondas Assadeiras em metal, por exemplo, es‐ malte, ferro fundido...
- Page 109 PORTUGUÊS 6.3 Tabela de regulação da potência Regulação da Percentagem de potência aproximada Prima potência 1 vez P100 100 % 2 vezes P 80 80 % 3 vezes P 50 50 % 4 vezes P 30 30 % 5 vezes P 10 10 % Grelhador e Cozedura Combinada...
-
Page 110: Programas Automáticos
6.6 Cozinhar em múltiplas 6. Prima para confirmar e activar o etapas microondas. O aparelho emite um sinal sonoro no Se uma das etapas for a fim de cada etapa. descongelação, defina-a 6.7 Grelhador e Cozedura como primeira etapa. -
Page 111: Utilizar Os Acessórios
PORTUGUÊS Menu Quantidade A - 5 200 g Batatas 400 g 600 g A - 6 250 g Peixe 350 g 450 g A - 7 1 chávena, (120 ml) Bebida 2 chávenas, (240 ml) 3 chávenas, (360 ml) A - 8 50 g Pipocas 100 g... -
Page 112: Funções Adicionais
9. FUNÇÕES ADICIONAIS 9.1 Bloqueio de Segurança 9.2 Temporizador de cozinha para Crianças Pode definir o máximo de 95 minutos. O Bloqueio de Segurança para Crianças 1. Prima impede a activação acidental do 2. Rode o botão de definição para microondas. -
Page 113: Manutenção E Limpeza
PORTUGUÊS 10.4 Reaquecer Não descongele a carne tapada porque isso pode fazer com que coza em vez de Quando reaquecer refeições prontas descongelar. embaladas, siga sempre as instruções Descongele as aves inteiras sempre com da embalagem. a parte do peito virada para baixo. 10.5 Grelhador 10.3 Cozinhar Grelhar alimentos planos no centro da... - Page 114 12.1 O que fazer se… Problema Causa possível Solução O aparelho não fun‐ O aparelho está desactivado. Active o aparelho. ciona. O aparelho não fun‐ A ficha do aparelho não está li‐ Ligue a ficha do aparelho. ciona. gada na tomada.
-
Page 115: Preocupações Ambientais
PORTUGUÊS 13. PREOCUPAÇÕES AMBIENTAIS Recicle os materiais que apresentem o símbolo juntamente com os resíduos domésticos. Coloque o produto num símbolo . Coloque a embalagem nos ponto de recolha para reciclagem local contentores indicados para reciclagem. ou contacte as suas autoridades Ajude a proteger o ambiente e a saúde municipais. - Page 116 www.aeg.com/shop...
Need help?
Do you have a question about the MSB2057D-B and is the answer not in the manual?
Questions and answers