
Subscribe to Our Youtube Channel
Related Manuals for PRT PM381


Summary of Contents for PRT PM381
- Page 1 User Manual PM381 Xiamen PRT Technology Co.,Ltd. ADD: 4/5F, 8#, Gaoqi Nan Shi’er Road, (AideAirport Industrial Park) Xiamen, Fujian, China-361006. +86-(0)592-5932525 Tel.: Fax: +86-(0)592-5235252 Web: www.prttech.com...
- Page 2 REVISION RECORDS REV. DATE DESCRIPTION DRAWN CHECKED APPROVED 2017.06.01 Chen Hua Yang Kaiqu Ren Xiaowei —— A.Modify “Specification” (P8) 2017.08.04 Chen Hua Yang Kaiqu Ren Xiaowei B.Add dimension tolerance (P13) 2017.09.13 A.Add figure of black mark dimension (P13) Chen Hua Yang Kaiqu Ren Xiaowei A.Add “2.9 LED Indicator and Buzzer...
-
Page 3: Table Of Contents
Contents Statement............................4 Important safety instructions ......................5 1 Introduction..........................6 1.1 General Features........................ 6 1.2 Use of the Thermal Printer....................6 2 Installation and usage........................7 2.1 Appearance and Components .................... 7 2.2 Specification........................8 2.3 Paper..........................9 2.3.1 Paper Specification....................9 2.3.2 Print Area........................ -
Page 4: Statement
PM381 User Manual STATEMENT This manual content may be altered without permission, and Xiamen PRT Technology Co.,Ltd. reserves the right to make changes without notice in technology, spare parts, hardware and software of the products. If more information is needed about the products, please contact Xiamen PRT Technology Co.,Ltd. -
Page 5: Important Safety Instructions
PM381 User Manual IMPORTANT SAFETY INSTRUCTIONS 1. Safety warning Warnings: The print head will become very hot during printing; avoid contact with the print head after printing has finished. Warnings: Do not touch the printer head and connector in case static damage the printer head. -
Page 6: Introduction
PM381 User Manual 1 INTRODUCTION 1.1 General Features PM381 is an extremely simple and functional printer. It is equipped with a 203dpi thermal printing mechanism. The general features of PM381 thermal printer are as follows: Very silent printing via direct thermal printing method ... -
Page 7: Installation And Usage
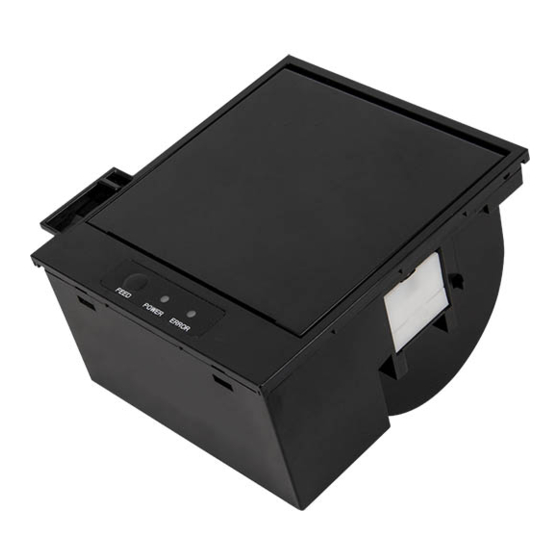
PM381 User Manual 2 INSTALLATION AND USAGE 2.1 Appearance and Components Rev.1.4 www.prttech.com... -
Page 8: Specification
PM381 User Manual 2.2 Specification 1.1-A Model PM381 Item Specification Print Method Thermal dot line printing Resolution 203 dpi(8 dots/mm) Print Width 72 mm Printing Parameter Print Speed* 170 mm/s Interface RS-232/USB Print Density Adjustable from level 1 to level 4... -
Page 9: Paper
PM381 User Manual 2.3 Paper 2.3.1 Paper Specification Paper Type Thermal paper Paper Width 79.5±0.5mm Paper Thickness 0.06~0.08mm Paper Roll 13mm(Inner diameter) Diameter 80mm(Outer diameter) Paper Loading Manual loading 2.3.2 Print Area Caution 1. Please use the recommended thermal paper or same quality paper, otherwise it influences the printing quality and decreases the thermal print head life. -
Page 10: Installing Paper Roll
PM381 User Manual 2.4 Installing Paper Roll 1.Push the cover opening lever on the left side and then lift the cover up to open it, shown as below. Cover Opening Lever 2.Install the paper roll as below diagram showed, the thermosensitive layer should face out. -
Page 11: Installing Print Module To The Base
PM381 User Manual 2.5 Installing Print Module to The Base 1.Step One: Place the print module into the base, shown as below. 2. Step Two: Push the cover opening lever to open the top cover. Step Three: Use cross screwdriver to rotate the two screws for 4 circles clockwise. -
Page 12: Installing Paper Roll Holder
PM381 User Manual 2.6 Installing Paper Roll Holder Take out the paper roll holder and make the paper roll go through it, then put them into the groove, shown as below. 2.7 Installing Paper Guide Take out the paper guide and place it into the paper slot followed by the direction of arrow shown below. -
Page 13: Dimensions
PM381 User Manual 2.8 Dimensions 1.1-B Overall dimensions: [Unit: mm] 1.2-A Black Mark Dimension thermosensitive layer. Remark: Black mark is printed on Rev.1.4 www.prttech.com... -
Page 14: Led Indicator And Buzzer Status
PM381 User Manual 1.4-A Installation dimensions: [Unit: mm] 1.3-A 2.9 LED Indicator and Buzzer Status Power LED Error LED Buzzer Ready Always on —— —— Open cover Always on Always on Didi Paper out Always on Always on Dididi~ Paper near end... -
Page 15: Interface
PM381 User Manual 3 INTERFACE 3.1 Interface Connector Pin No. Signal Name Function Receive data Transmit data Signal ground Data set ready Data terminal ready/ DTR/RTS Data request to send Frame ground 3.2 USB Connector Pin No. Signal Name Function... -
Page 16: Drawer Connector
PM381 User Manual 3.4 Drawer Connector Pin No. Signal Name Function /DRAWER1 Drawer 1 /DRAWER_SNS Drawer sensor +24V DC +24V DC /DRAWER2 Drawer 2 Caution 1. Do not plug/unplug the communication connector when the power is on. 2. Do not expose the cable to the strong sunlight. -
Page 17: Trouble Shooting
PM381 User Manual 1.3-B 4 TROUBLE SHOOTING Your printer is very reliable, but occasionally problems may occur. This chapter provides information on some common problems you may encounter and how to solve them. If you encounter problems that you can not resolve, contact your dealer for assistance. -
Page 18: Problems Emerge During The Paper Cutting
PM381 User Manual 4.4 Problems Emerge During The Paper Cutting Problem Description Probable Reason Resolution Cutter abrasion, Replace the cutter insufficient cutting Worm gear and worm Cutter jam, the Replace the worm gear and worm wheel wheel abrasion movable cutter cannot...
Need help?
Do you have a question about the PM381 and is the answer not in the manual?
Questions and answers