Table of Contents
Advertisement
Quick Links
Advertisement
Table of Contents

Related Manuals for HT Italia IMP57


Summary of Contents for HT Italia IMP57
- Page 1 ENGLISH User’s manual Copyright HT ITALIA 2013 Version EN 3.00 - 04/01/2013...
-
Page 3: Table Of Contents
IMP57 Contents: SAFETY PRECAUTIONS AND PROCEDURES ..................2 1.1. Preliminary Instruction ......................................2 1.2. During use ..........................................3 1.3. After use ............................................. 3 1.4. Definition of measuring (overvoltage) category ..............................3 GENERAL DESCRIPTION ........................ -
Page 4: Safety Precautions And Procedures
IMP57 1. SAFETY PRECAUTIONS AND PROCEDURES This apparatus conforms with safety standards EN61557 and EN 61010 relating to electronic measuring instruments. For your own safety as well as that of the apparatus you are recommended to follow the procedures described in this instruction manual and carefully read all the notes preceded... -
Page 5: During Use
IMP57 1.2. DURING USE Carefully read the following recommendations and instructions: WARNING No compliance with the Warnings and/or Instructions may damage the apparatus and/or its components or injure the operator. When the instrument is connected to the tested circuit never touch any test lead which is not being used. -
Page 6: General Description
IMP57 2. GENERAL DESCRIPTION Dear Customer, we thank you for your patronage. The instrument you have just purchased will grant you accurate and reliable measurements provided that it is used according to the present manual’s instructions. The instrument was designed to grant the user the utmost safety conditions thanks to a new concept assuring double insulation and overvoltage category III 240V (to Earth). -
Page 7: Preparation For Use
You are recommended, however, to carry our a rapid check to detect any possible damage which might have been caused during transport. Should this be the case, immediately contact HT Italia. Check also that the packaging contains all the parts listed under paragraph 9.3. In case of discrepancies contact the dealer. -
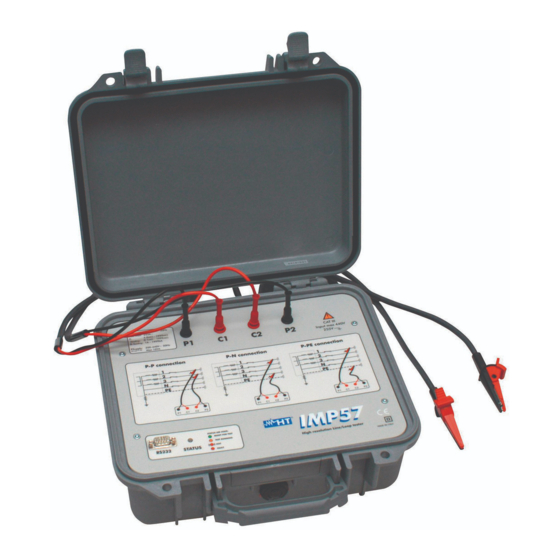
Page 8: Instrument Description
Check the nominal voltage range (220 415V) and the frequency range (47.5 52.5Hz). Also check anomalous situation in paragraph 6.1.5, 6.2.5, 6.3.5, 6.4.5 and 6.5.5. 4.2. INSTRUMENT'S COMMANDS LEGEND: 1 MASTER Instrument. 2 RS232 cable: C2001 C232NG1. Fig. 2: Connecting IMP57 to MASTER instrument EN - 6... - Page 9 IMP57 The instrument is fully controlled by means the RS232 serial interface. The IMP57 can be connected to the following MASTER instruments: MASTER Instrument Instrument Type Firmware Upgrading Proc. GSC57, GSC53, GENIUS5080E, 1.37 or successive User (*) GSC53N, SIRIUS 89 MACROTEST 5035, SIRIUS 87 1.16 or successive...
-
Page 10: Operating Instructions
Never disconnect the Alligator clips or Test leads during the Test. Fig. 3: Instrument connection for phase to phase impedance measurement 1. Connect the IMP57 RS232 to MASTER instrument through RS232 cable (see paragraph 4.2). 2. Connect the alligator clip to the Electrical plant according to Fig. 3. -
Page 11: Phase To Neutral Impedance Measurement And Phase To Neutral Prospective Short Circuit Current Calculation
Never disconnect the Alligator clips or Test leads during the Test. Fig. 4: Instrument connection for phase to neutral impedance measurement 1. Connect the IMP57 RS232 to MASTER instrument through RS232 cable (see paragraph 4.2). 2. Connect the alligator clip to the Electrical pant according to Fig. 4. -
Page 12: Phase To Pe (Protection Conductor) Impedance Measurement And Phase To Pe Prospective Short Circuit Current Calculation
Never disconnect the Alligator clips or Test leads during the Test. Fig. 5:Instrument connection for phase to ground impedance measurement 1. Connect the IMP57 RS232 to MASTER instrument through RS232 cable (see paragraph 4.2). 2. Connect the alligator clip to the Electrical pant according to Fig. 5. -
Page 13: Master Instrument Settings
The F3 button allows the selection of Prospective Short Circuit current calculation according to paragraph 6.1.2. By pressing the F4 button the instrument will show the IMP57 Serial Number, the Firmware release and the calibration date. Press ESC to quit this screen. -
Page 14: Prospective Short Circuit Current Calculation
0,95 1,05 6.1.3. Run the Test When the IMP57 has been connected according to paragraph 5 and the MASTER instrument has been set according to paragraph 6.1.1 and 6.1.2, you can run the Test by means the START button. During the test the STATUS LED will get Orange colour and when the Test is completed the results will be shown on instrument display. -
Page 15: Test Results Analysis
IMP57 6.1.4. Test results analysis "P-P" Test result After the Test the instrument will show a screen as indicated below: LOOP 05.06.02 Phase – Phase Impedance(m) Z= 35.3 Phase – Phase Resistance(m) m Measured Voltage R=9.1m X=34.1m Phase – Phase Reactance(m) IkMax3Ph=14kA V1-2=394V FRQ=50.0HZ... -
Page 16: Anomalous Results For "P-P", "P-N", "P-Pe" Test
The message " IMP57" indicate that IMP57 doesn't reply to RS232 commands of the MASTER instrument. Please check if: 1. The MASTER instrument is connected to IMP57 through C2001 optical cable. 2. The STATUS LED is green. After pressing START LOOP 05.06.02... - Page 17 IMP57 After pressing START LOOP 05.06.02 button, the message on Z= - - - - - side indicate that the mains voltage is too low R=----- X=----- IkSTD=----A (<190V). V1-2=181V FRQ=50.0HZ LOW VOLTAGE Low Voltage Indication P-N Z2...
- Page 18 will show the message on side. R=----- X=----- IkSTD=----A Please wait until the V1-2=461V FRQ=50.0HZ LED STATUS on IMP57 get back to Green light. HIGH TEMP P-P Z2 FUNC ZSTD ICAL Instrument overheated If You get the message LOOP 05.06.02...
-
Page 19: Operating Instrument For "Type 2" Instrument
IMP57 6.2. OPERATING INSTRUMENT FOR “TYPE 2” INSTRUMENT Operating Instruction are given according to Table 1 - Instrument Type definition. 6.2.1. Instrument Settings Select LOOP rotary switch position. Select one of the following connection by means FUNC button. "P-P", "P-N", "P-PE"... -
Page 20: Run The Test
IMP57 6.2.3. Run the Test When the IMP57 has been connected according to paragraph 5 and the MASTER instrument has been set according to paragraph 6.2.1and 6.2.2, you can run the Test by means the START button. During the test the STATUS LED will get Orange colour and when the Test is completed the results will be shown on instrument display. -
Page 21: Anomalous Results For "P-P", "P-N", "P-Pe" Test
The message " no con inS" indicate that IMP57 doesn't reply to RS232 commands of the MASTER instrument. Please check if: 1. The MASTER instrument is connected to IMP57 through C2001 optical cable. 2. The STATUS LED is green. - Page 22 LOW LOOP If instrument overheated display will show the message on side. Please wait until the LED STATUS on IMP57 get back to Green light. EN - 20...
- Page 23 IMP57 If You get the message LOW LOOP on side after pressing START button, please contact HT Service. PREVIOUS RESULT CAN'T BE STORED INTO INSTRUMENT MEMORY. LOW LOOP If the instrument measure The ">" symbol indicate that the >1999...
-
Page 24: Operating Instrument For "Type 3" Instrument
Prospective Short Circuit current calculation according to paragraph 6.3.2 by means , buttons. Select by means , buttons the virtual button RMT. The instrument will RMT: show: IMP57 Serial Number. Firmware release. calibration date. EN - 22... -
Page 25: Prospective Short Circuit Current Calculation
IMP57 6.3.2. Prospective Short Circuit Current Calculation The instrument calculated the Prospective short circuit current as: Connection Phase - Phase (P-P) Three Phase Maximum Prospective Short Circuit Current Three Phase Minimum Prospective Short Circuit Current ... -
Page 26: Run The Test
IMP57 6.3.3. Run the Test When the IMP57 has been connected according to paragraph 5 and the MASTER instrument has been set according to paragraph 6.3.1 and 6.3.2, you can run the Test by means the START button. During the test the STATUS LED will get Orange colour and when the Test is completed the results will be shown on instrument display. -
Page 27: Anomalous Results For "P-P", "P-N", "P-Pe" Test
"NO L O O P IMP57" indicate that IMP57 doesn't reply to Z = - - - - - Ω RS232 commands of R = - - - - - Ω X = - - - - - Ω MASTER I k S T D = - - - - A instrument. - Page 28 IMP57 After pressing L O O P GO/STOP button, the message side Z = - - - - - Ω indicate that the mains R = - - - - - Ω X = - - - - - Ω...
- Page 29 IMP57 If instrument L O O P overheated the display will show the message Z = - - - - - Ω on side. R = - - - - - Ω X = - - - - - Ω...
-
Page 30: Operating Instrument For "Type 4" Instrument
IMP57 6.4. OPERATING INSTRUMENT FOR “TYPE 4” INSTRUMENT Operating Instruction are given according to Table 1 - Instrument Type definition. 6.4.1. Instrument Settings Press power switch. Press the FUNC key to select CONTINUITY. Press the MODE key to select EXT mode. The instrument m ... -
Page 31: Prospective Short Circuit Current Calculation
400V-10% < Vmeasured < 400V+ 10% 400V 0,95 6.4.3. Run the Test When the IMP57 has been connected according to paragraph 5 and the MASTER instrument has been set according to paragraph 6.4.1 and 6.4.2, you can run the Test by means the START/STOP button. - Page 32 START/STOP button, the message on side indicate that the instrument is overheated. Please wait until the LED STATUS on IMP57 get back to Green light. After pressing START/STOP button, if the instrument indicate the message on side, please contact HT Service.
- Page 33 IMP57 After a negative result of the Test, the instrument will show a screen as m indicated on side. If instrument measure impedance higher than 1999m will m show the message on side. You can save these results by pressing the SAVE button twice.
-
Page 34: Operating Instrument For "Type 5" Instrument
6.5.1 and 6.5.2, you can run the Test by means the START button. The TEST led turns on indicating that l’IMP57 is testing. During the test the STATUS LED will get Orange colour and when the Test is completed the results will be shown on instrument display. -
Page 35: Anomalous Results
IMP57 by means of C232NG1 cable and that IMP57 is powered (green LED). 2. If after pressing START key, the message “180 Err.” is displayed and a 3 second long beep sound is emitted, it means that the voltage detected by IMP57 does not reach the minimum preset limit. -
Page 36: Test Results Download
IMP57 7. TEST RESULTS DOWNLOAD Please see MASTER instrument user's manual for download details. Always quit the Z2 High Resolution Measurement mode before attempt the download. 8. MAINTENANCE 8.1. GENERAL 1. The tester you have purchased is a precision instrument. Strictly follow the instructions for use and storage reported in this manual to avoid any possible damage or danger during use. -
Page 37: Technical Specifications
FREQUENCY Range Resolution Accuracy 47.5 – 52.5Hz 0.1Hz 0.2Hz 9.1.1. Safety Guidelines: IMP57 comply with: EN 61010, EN61557 Insulation: Class 2, Double Insulation Pollution degree: max altitude: 2000m Overvoltage category: CAT III 240V (to ground) CAT III 415V (between inputs P1, C1, P2, C2) 9.1.2. -
Page 38: Environment
IMP57 9.2. ENVIRONMENT 9.2.1. Environmental condition Reference temperature: 23°C ± 5°C Operating temperature: 0°C ÷ 40°C Allowed relative humidity: <80%HR Storage temperature: -10°C ÷ 60°C Storage humidity: <80%HR This product conforms to the prescriptions of the European directive on low voltage 2006/95/EEC (LVD) and to EMC directive 2004/108/EEC 9.3. -
Page 39: Service
IMP57 SERVICE 10.1. WARRANTY This instrument is guaranteed against any defect in material and manufacturing in compliance with the general sales terms and conditions. Throughout the period of guarantee all defective parts may be replaced and the manufacturer reserves the right to repair or replace the product.
Need help?
Do you have a question about the IMP57 and is the answer not in the manual?
Questions and answers