Table of Contents
Advertisement
Quick Links
Advertisement
Table of Contents

Related Manuals for HT Italia HT950N


Summary of Contents for HT Italia HT950N
- Page 1 User’s manual Copyright HT-ITALIA 2003 Release EN 1.04 - 13/10/04...
-
Page 2: Table Of Contents
5.2.5. T2 output alarm circuit ..................11 5.3. Messages on Power-ON ..................11 5.4. Setup of alarm thresholds ..................12 5.4.1. Example of HT950N meter setup ..............13 5.5. Clear of recorded max temperature value ............13 5.6. Setup of input probes number ................14 PREVENTIVE MAINTENANCE .................... -
Page 3: Safety Precautions And Procedures
HT950N 1. SAFETY PRECAUTIONS AND PROCEDURES This meter is designed in conformity to EN61010 standards relating to electronic measuring instruments. For your own safety and that of the apparatus, you must follow the procedures described in this instruction manual and specially read all the notes preceded by the symbol carefully. -
Page 4: General Description
HT950N 2. GENERAL DESCRIPTION Dear Customer, we thank you for your patronage. The HT950N meter you have just purchased will grant you accurate and reliable measurements, on protection of MV transformer, provided that it is used according to the present manual’s instructions. -
Page 5: Operating Instructions
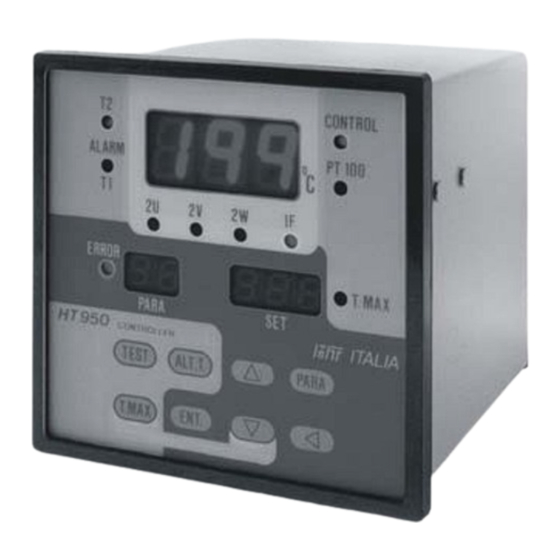
PT100 Led This Led shows that at least one of four controlled input probes (2U, 2V, 2W or 1F Led is blinking) is shorted or opened. In this case an alarm condition is activated by HT950N and relay T1 is opened. -
Page 6: Description Of Function Keys
ENT. Key, press ALT.T. key when C4 column appair or automatically after about 20 sec. From last operation. TEST key Press this key HT950N execute a functionally test on verify the light on of all Led and displays on the front panel. EN - 6... -
Page 7: Description Of Back Panel
WARNING T.MAX is automatically update only with higher values and remain saved inside HT950N also in switch off condition. T.MAX key don’t execute any operation if meter is inside setup parameters menu (see chapter 5.4). 4.3. DESCRIPTION OF BACK PANEL LEGEND: 1. -
Page 8: Operative Instructions
You must prepare a square hole on 36.8 x 36.8 inch (height x width). Insert HT950N and fix with standard screws and connectors. 5.2. ELECTRICAL CONNECTIONS Please see the following Fig. 3 to execute all electrical connections on HT950N meter. Fig. 3: electrical connections on HT950N meter EN - 8... -
Page 9: Power Supply Circuit
HT950N 5.2.1. Power supply circuit HT950N meter can be supplied with AC (50/60Hz frequency) or DC sources. If you use DC supply please connect positive (+) and negative (-) contact at terminals 30 and 32 respectively, like shown on Fig. 4 Fig. -
Page 10: Temperature Probes
Fig. 6: CONTR relay on no alarm condition (normally disabled) CONTR relay operate a commutation in the following cases: When HT950N measures a temperature over UA threshold CONTR is activated. When HT950N measures a temperature under UF threshold CONTR is disabled. -
Page 11: T1 Output Alarm Circuit
The output relay connection of T2 alarm circuit is presented on following Fig. 8: Fig. 8: T2 relay on no alarm conditions (normally disabled) T1 relay operates a commutation when HT950N measures a temperature over T2 threshold, after a delay time of 50 seconds. -
Page 12: Setup Of Alarm Thresholds
HT950N 5.4. SETUP OF ALARM THRESHOLDS On HT950N meter it’s possible to set up to four alarm thresholds with values within all measure range. The sequence of programmable parameters presented cyclically by meter is the following: T2 T1 UF UA Parameters setup is possible using PARA and arrows keys [], [], [] with the... -
Page 13: Example Of Ht950N Meter Setup
Fig. 9: Example of HT950N meter setup 5.5. CLEAR OF RECORDED MAX TEMPERATURE VALUE To execute clear of maximum value of temperature recorded by HT950N meter, do the following procedure: 1. Press T.MAX key to show the maximum temperature value on PARA and SET display. -
Page 14: Setup Of Input Probes Number
HT950N 5.6. SETUP OF INPUT PROBES NUMBER Default internal setup of HT950N meter consists on activation of 3 Pt100 probes only (2U, 2V, 2W). To modify this number operate in following way: Press PARA key until message C_End compare on SET display. -
Page 15: Technical Specifications
EN61326-1 (1997) + A1 (1998) + A2 (2001). 7.3. ACCESSORIES 7.3.1. Standard accessories HT950N meter with the following: No.8 extractable connectors for Pt100, output relays, power supply. No 1 EMC filter for power supply cable. -
Page 16: Service
HT950N 8. SERVICE 8.1. WARRANTY CONDITIONS This equipment is guaranteed against material faults or production defects, in accordance with the general sales conditions. During the warranty period (one year), faulty parts may be replaced. The manufacturer reserves the right to decide either to repair or replace the product. - Page 17 Via Righi 126 48018 – Faenza (RA)- Italy Tel: +39-0546-621002 (4 linee r.a.) Fax: +39-0546-621144 ht@htitalia.it email: http://www.htitalia.com...
Need help?
Do you have a question about the HT950N and is the answer not in the manual?
Questions and answers