Advertisement
Quick Links
User Guide
Model Designed By: Cemal ÖZÇELİK
Model Version: 2.0
Release Date: 18.10.2022
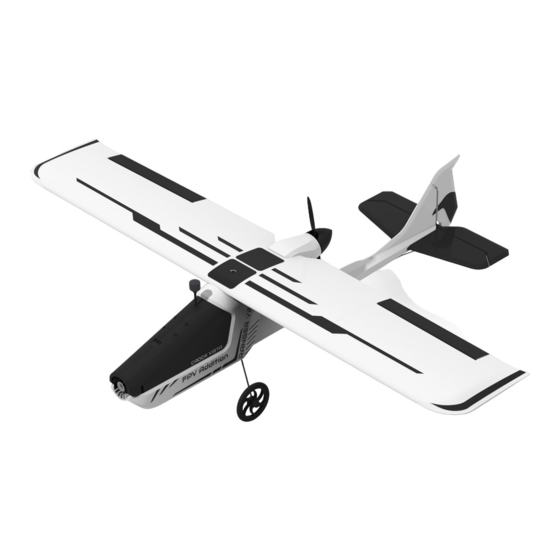
Ranger Sport
General Specifications
Length
Wingspan
Print Weight
Flying Weight
Wing Area
Wing Loading
Airfoil
Maker Skill
Pilot Skill
© 2022 Craycle Hobby. Copies allowed for personal use only. Not for commercial use.
: 575
23.4
mm
: 800
31.5
mm
: 311
11
g
oz.
: 500-650
17.6-22.9
g
: 11.1
dm2
: 49,4
g/dm2
: NACA 2412
www.craycle.com
Recommended Setup
Motor
inches
Propeller
inches
ESC
Servo
oz.
Battery
Analog/DJI/Vista FPV systems
: 2204/5/6 1500/2500
: 5" - 2/3/4 Blade
: 15-30A
: 4 X 9
g
: 3s 850-2500
mAh
Min. Printer Size
150*150*180 mm
Filament
PLA - PetG - TPU
kv
Advertisement

Related Manuals for Craycle Hobby Ranger Sport


Summary of Contents for Craycle Hobby Ranger Sport
- Page 1 Wing Loading : 49,4 Analog/DJI/Vista FPV systems g/dm2 Airfoil : NACA 2412 Min. Printer Size Maker Skill 150*150*180 mm Filament Pilot Skill PLA - PetG - TPU © 2022 Craycle Hobby. Copies allowed for personal use only. Not for commercial use.
- Page 2 Ailerons: 5. hole / Elevator: 3. hole / Rudder: 3. hole 1 2 3 4 5 6 Flap Movements (X) Ailerons: 9mm / Elevator: 13mm / Rudder: 6mm Lipo House Dimensions 42x42x125mm © 2022 Craycle Hobby. Copies allowed for personal use only. Not for commercial use.
-
Page 3: Part List
Part List 37 34 32 25 15 16 17 © 2022 Craycle Hobby. Copies allowed for personal use only. Not for commercial use. - Page 4 first part and then wait for 15 seconds to dry it. Then you can apply glue onto the other part and put the parts together for 5 seconds. Avoid excessive usage of glue. © 2022 Craycle Hobby. Copies allowed for personal use only. Not for commercial use.
- Page 5 CA hinges by using CA Hinge Maker Tool which is free on craycle.com . Be careful using CA accelerator and avoid to sprey onto the Hinge Slots. © 2022 Craycle Hobby. Copies allowed for personal use only. Not for commercial use.
- Page 6 flaps first. (Rudder image is wrong, elevator image is the true way to gluing hinges.) © 2022 Craycle Hobby. Copies allowed for personal use only. Not for commercial use.
- Page 7 PetG to get more lifetime and stifness. (You can make a clear hole in the “wheel35_rim” by drilling it with 2 mm drill bit.) Dimensions are in mm. © 2022 Craycle Hobby. Copies allowed for personal use only. Not for commercial use.
- Page 8 Install the pushrods by sticking horns onto its slots on the flaps for both rudder and elevator. You can also add pushrod connectors on the servo arms to adjust flaps. © 2022 Craycle Hobby. Copies allowed for personal use only. Not for commercial use.
- Page 9 Vista, AirUnit and Analog (29mm cameras). You can ask from us for a new canopy designs for different FPV systems. Caddx Vista DJI Air Unit Analog FPV © 2022 Craycle Hobby. Copies allowed for personal use only. Not for commercial use.
- Page 10 While assembling the wing parts together, you need to be sure the wings are holded in a straight line (Hold the wings upside down on the flat table). Same process goes for the right wing. © 2022 Craycle Hobby. Copies allowed for personal use only. Not for commercial use.
- Page 11 Note: You can replace the Servo Motor at anytime by releasing the Servo Hatch (Release by cutting its tiny connections). Hatch is the Red Part in image below. © 2022 Craycle Hobby. Copies allowed for personal use only. Not for commercial use.
- Page 12 You can also stick the fiber tape onto the leading edge to add more durability. Now you can assemble the wing on the fuselage quickly using M4x20 Imbus bolt. © 2022 Craycle Hobby. Copies allowed for personal use only. Not for commercial use.
- Page 13 Set a little trim up to elevators for the first flight. You can also add Insta360 Go2 holder onto the wing to make cinematic shots from the air. © 2022 Craycle Hobby. Copies allowed for personal use only. Not for commercial use.
- Page 14 We will help you as soon as possible and update the PDF if its necessary. Welcome to the Craycle Community! © 2022 Craycle Hobby. Copies allowed for personal use only. Not for commercial use.
- Page 15 Custom Printer to import a curaprofile succesfully. Open the Add Printer window, select Custom FFF printer, type your printer name and click to the add button for the next step © 2022 Craycle Hobby. Copies allowed for personal use only. Not for commercial use.
- Page 16 Nozzle size has to be 0,4 mm. If you have a different size nozzle then you have to change it with a 0,4 mm one. Click the next button, your printer settings are ready! © 2022 Craycle Hobby. Copies allowed for personal use only. Not for commercial use.
- Page 17 first. Click to the “Import” button and go to the next step. © 2022 Craycle Hobby. Copies allowed for personal use only. Not for commercial use.
- Page 18 Select “crayce.curaprofile” and click to the open button. Now you have the Craycle Profile! If you have an error in this step, you need to create Custom Printer or update your Cura Slicer. © 2022 Craycle Hobby. Copies allowed for personal use only. Not for commercial use.
- Page 19 Note: 0,2 mm layer height is the best setting for the Print Quality/Printing Time. © 2022 Craycle Hobby. Copies allowed for personal use only. Not for commercial use.
- Page 20 45 degrees to the bed. This way X and Y axis works coordinated and you can get maximum surface quality. Default Z Seam is Front-Left. © 2022 Craycle Hobby. Copies allowed for personal use only. Not for commercial use.
- Page 21 If you want to use a different slicer, you can use this table. You can also use this table for comparing print weights to optimaze flowrate as well. If you have any question, you can contact us at info@craycle.com. Enjoy with your build! @craycle © 2022 Craycle Hobby. Copies allowed for personal use only. Not for commercial use.
Need help?
Do you have a question about the Ranger Sport and is the answer not in the manual?
Questions and answers