Table of Contents
Advertisement
Available languages
Available languages
Quick Links
MODELOS
MODELS
TSSTTVLS25_TSSTTVLS35_21SEM1 (LA).indd 1
TSSTTVLS25_TSSTTVLS35_21SEM1 (LA).indd 1
TSSTTVLS25,
TSSTTVLS35
Manual de Instrucciones
HORNO DE MOSTRADOR CON FREIDORA DE AIRE
LEA TODAS LAS INSTRUCCIONES ANTES DE USAR ESTE APARATO
Instruction Manual
COUNTERTOP OVEN WITH AIR FRYER
READ ALL INSTRUCTIONS BEFORE USING THIS APPLIANCE
4/21/2021 3:39:50 PM
4/21/2021 3:39:50 PM
Advertisement
Table of Contents

Subscribe to Our Youtube Channel
Related Manuals for Oster TSSTTVLS25


Summary of Contents for Oster TSSTTVLS25
- Page 1 MODELOS TSSTTVLS25, TSSTTVLS35 MODELS Manual de Instrucciones HORNO DE MOSTRADOR CON FREIDORA DE AIRE LEA TODAS LAS INSTRUCCIONES ANTES DE USAR ESTE APARATO Instruction Manual COUNTERTOP OVEN WITH AIR FRYER READ ALL INSTRUCTIONS BEFORE USING THIS APPLIANCE TSSTTVLS25_TSSTTVLS35_21SEM1 (LA).indd 1 TSSTTVLS25_TSSTTVLS35_21SEM1 (LA).indd 1...
-
Page 2: Precauciones Importantes
PRECAUCIONES IMPORTANTES Cuando se utiliza cualquier artefacto eléctrico, siempre se deben seguir precauciones básicas de seguridad para reducir el riesgo de incendio, descarga eléctrica y/o lesiones a personas, incluyendo lo siguiente: 1. Lea todas las instrucciones antes de usar este producto. Este artefacto genera calor durante su uso. - Page 3 18. No almacene ningún material en este horno de mostrador cuando no lo esté utilizando, aparte de los accesorios recomendados por el fabricante. 19. No coloque ninguno de los siguientes materiales en el horno de mostrador: papel, cartón, plástico o cualquier material que pueda incendiarse o derretirse. 20.
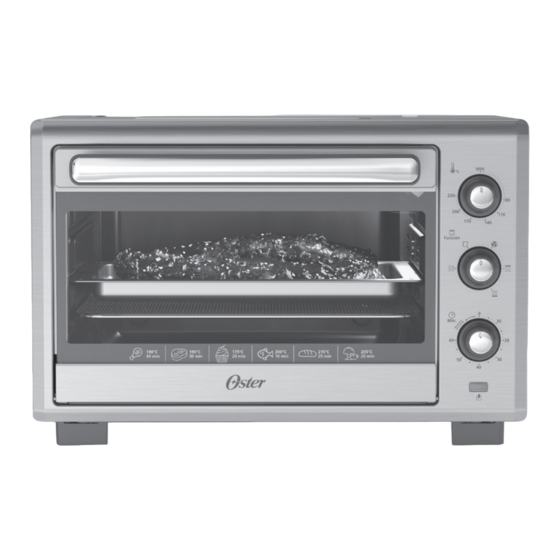
- Page 4 Bienvenido ¡Felicitaciones por su compra de un horno de mostrador OSTER ! Si usted necesita ® servicio para su horno de mostrador OSTER , no lo devuelva al lugar de compra. ® Contáctenos en www.oster.com. APRENDIENDO ACERCA DE SU HORNO DE MOSTRADOR Bandeja de Malla Posición de temperatura...
- Page 5 Preparación Para Usar Su Horno De Mostrador Por Primera Vez NOTA: Durante el primer uso usted podría detectar un ligero olor y/o humo. Gire la temperatura al máximo y deje prendido por aproximadamente 5 minutos. Si está usando su horno de mostrador por primera vez asegúrese de: •...
- Page 6 INFORMACIÓN GENERAL Consejo para la Posición de Marcador de tiempo/ Color de tostada Para fijar el marcador por menos de 20 minutos, SIEMPRE gire el marcador pasada la marca de 20 minutos para activar el interruptor del marcador y luego gírelo de vuelta hacia el tiempo deseado.
- Page 7 USANDO SU HORNO DE MOSTRADOR Uso de la Función Air Fry (freír con aire caliente) • Acomode los alimentos en la bandeja de freir al aire en la posición de rejilla superior. • Fije la perilla a la función AIR FRY. Cuando el horno esté en el modo de freír con aire caliente, los elementos de calefacción superiores y el ventilador para freír con aire caliente funcionarán, una vez que contador de tiempo haya sido fijado.
- Page 8 Uso de la Función de Tostada NOTA: Cada tipo de pan requiere de distintas posiciones. Los panes más blancos y los wafles requiere una posición mas clara. Los panes más oscuros y las tortitas (muffins y muffins Ingleses) requieren de posiciones más oscuras. •...
- Page 9 Uso de la Función de Horneado por Convección • Acomode la comida sobre la rejilla de metal o sobre la bandeja de hornear. • Fije la perilla a la función CONVECTION. Cuando el horno esté en el modo de horneado por convección, ambos elementos de calefacción superiores e inferiores funcionarán, una vez que el contador de tiempo haya sido fijado.
- Page 10 Uso de la Función Broil (Asar) Ajustable • Acomode la comida sobre la bandeja de hornear. • Cierre la puerta del horno hasta la primera muesca, dejando un espacio pequeño en la parte superior. Esto asegurará adecuado flujo de aire durante el ciclo de asado. •...
- Page 11 Limpiando su Horno de Mostrador 1. Antes de limpiar su Horno de mostrador Oster , desenchúfelo y deje enfriar. ® 2. Para limpiar pásele una tela húmeda. PRECAUCIÓN: ¡NO SUMERJA EN AGUA! Asegúrese de usar solamente agua con jabón suave. Los limpiadores abrasivos, escobillas o limpiadores químicos dañarán la unidad.
- Page 12 TABLA DE COCCIÓN PARA LA FUNCIÓN AIR FRY (FREÍR CON AIRE CALIENTE) emPerAturA iemPo de occión ¿A limento unción ceite (°c) minutos PAPAs 450g Freir con Aire 230 grados 17-20 minutos Sí APAs FritAs cortAdAs A mAno APAs FritAs de boniAto o 450g Freir con Aire 230 grados...
-
Page 13: Resolución De Problemas
RESOLUCIÓN DE PROBLEMAS roblemA osible AusA olución Alimentos demasiado Graduación incorrecta de Puede que tenga que ajustar el tiempo o no suficientemente temperatura o de tiempo y la temperatura a su gusto. Para fijar el cocidos marcador de tiempo por menos de 20 minutos, gire el marcador pasada la marca de los 20 minutos para activar el interruptor del marcador y luego regréselo al tiempo... -
Page 14: Important Safeguards
IMPORTANT SAFEGUARDS When using electrical appliances, basic safety precautions should always be followed to reduce the risk of fire, electric shock, and/or injury to persons including the following: 1. Read all instructions before using this product. This appliance generates heat during use. Do not touch hot surfaces. Use handles or knobs. - Page 15 2. During initial use of this appliance, some slight smoke and/or odor may be detected. This is normal with many heating appliances and will not recur after a few uses. WeLCome Congratulations on your purchase of an OSTER Countertop Oven! If you require service ®...
-
Page 16: Function Setting
LEARNING ABOUT YOUR COUNTER- TOP OVEN Mesh Air Frying Temperature Setting Function Setting Tray Adjust the dial thermostat to the Adjust the dial to the desired desired temperature. cooking function. Position on top of baking pan for all your air frying needs. - Page 17 Preparing To Use Your Countertop Oven For The First Time NOTE: During initial start up you may detect a slight smell and/or smoke. Turn the temperature to max and let run for approximately 5 minutes. If you are using your Countertop oven for the first time, please be sure to: •...
-
Page 18: General Information
General Information Timer / Toast Shade Setting Tip To set the timer for less than 20 minutes, ALWAYS turn the timer past the 20-minute mark to engage timer switch and then turn it back to desired time. Heating Elements The top and bottom heating elements will cycle ON and OFF to maintain the desired temperature. - Page 19 USING YOUR COUNTERTOP OVEN To Use The Air Fry Function • Arrange food on the air fry tray in the top rack position. • Set function to AIR FRY. When in Air Fry mode, the top heating elements and air fry fan will operate once the timer has been set.
- Page 20 To Use The Toast Function NOTE: Different types of bread require different settings. Lighter breads and waffles require a lighter setting. Darker breads, muffins, and English muffins require a darker setting. • Arrange food on the wire rack. • Set function to TOAST. When in Toast mode, both the top and bottom heating elements will operate once the timer has been set.
Need help?
Do you have a question about the TSSTTVLS25 and is the answer not in the manual?
Questions and answers