
Related Manuals for Aspira TEPORSPLIT


Summary of Contents for Aspira TEPORSPLIT
- Page 1 TERMOVENTILATORE M A N U A L E D ’ U S O E D I I N S T A L L A Z I O N E P A G . 3 FAN HEATER U S E R I N S T R U C T I O N S P A G .
-
Page 2: Caratteristiche Tecniche
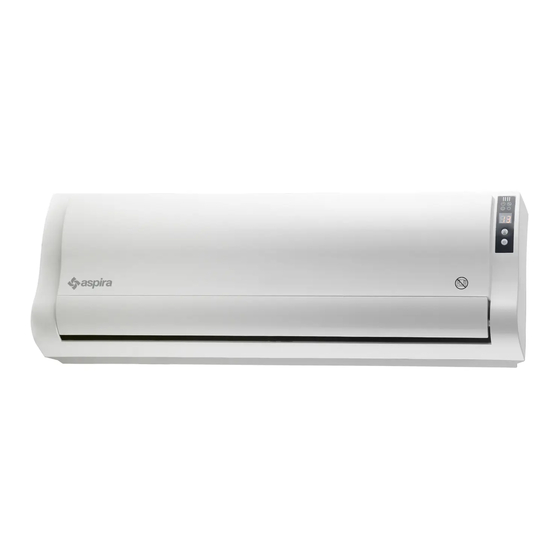
I T A L I A N O TEPORSPLIT CARATTERISTICHE TECNICHE Termoventilatori elettrici da parete Modello: TEPORSPLIT Potenza nominale: 2000W Tensione nominale: 230V~ 50Hz • Involucro esterno in ABS ad alta resistenza; • Riscaldatore ceramico PTC ad alta efficienza, alta velocità di riscaldamento, silenzioso, inodore, non inquinante;... -
Page 3: Installazione
I T A L I A N O TEPORSPLIT • Le batterie usate devono essere smaltite in modo appropriato • Il riscaldatore deve essere installato ad almeno 2.0 m dal pavimento. • In caso di guasto, rivolgersi al costruttore o a un installatore qualificato. -
Page 4: Funzionamento
I T A L I A N O TEPORSPLIT 3. FUNZIONAMENTO Assicurarsi che il dispositivo sia collegato a una rete monofase (220-240 V ~, 50-60 Hz). Inserire la spina nella presa a parete. Accendere il dispositivo selezionando l’impostazione desiderata. “0” è “SPENTO”. “I”: è “ACCESO”. - Page 5 I T A L I A N O TEPORSPLIT TELECOMANDO ACCENSIONE Premere il tasto come indicato di seguito: ON (ventola in funzione), OFF (la ventola rimane in funzione per 30 secondi dopo aver arrestato il dispositivo dopo il riscaldamento). RISCALDAMENTO...
- Page 6 I T A L I A N O TEPORSPLIT RILEVAMENTO FINESTRE APERTE Rilevamento finestre aperte spia lampeggiante Il rilevamento delle finestre aperte può essere avviato solo quando il dispositivo è in modalità di riscaldamento (non quando è in funzione solo la ventola) o in modalità di impostazione della temperatura.
- Page 7 I T A L I A N O TEPORSPLIT 11:00 Checkpoint 2 di rilevamento temperatura (checkpoint rilevamento abbassamento lento temperatura). In questo punto, la temperatura è al valore di fine del ciclo in corso e inizio di quello successivo. Per 10 minuti intesi come ciclo, rilevare la temperatura in un ciclo ogni 5 minuti.
- Page 8 I T A L I A N O TEPORSPLIT TIMER SETTIMANALE Ora attuale Primo avvio Al primo avvio (avvio dopo uno spegnimento) è necessario impostare l’Ora attuale. Metodo di impostazione: Imposta giorno in una settimana: Il LED mostra 01 (lunedì), premere + o - per regolare il Giorno attuale da 01 a 07 (da lunedì...
- Page 9 I T A L I A N O TEPORSPLIT Modalità Premere , il LED mostra P6, premere OK, selezionare libera la modalità P6. (Se non viene premuto OK entro 10 s, il Timer settimanale non sarà impostato) Il LED mostra 1, premere + o - e impostare un valore tra 1 e 7, da lunedì...
- Page 10 I T A L I A N O TEPORSPLIT Nota: • Per ciascun giorno, è possibile impostare una sola Ora ciclo (dall’avvio all’arresto) • È possibile impostare solo le ore, non i minuti. • La modalità predefinita richiede l’impostazione sia dell’ora di avvio che di quella di arresto.
- Page 11 I T A L I A N O TEPORSPLIT Descrizione 1. Dopo l’impostazione, il LED mostrerà display la Temperatura ambiente; la spia del timer settimanale e l’indicatore di funzione corrispondente saranno accesi. 2. Modalità di riscaldamento (Riscaldamento basso o Riscaldamento alto, non Modalità...
- Page 12 I T A L I A N O TEPORSPLIT CANCELLA Ora attuale Cancella modalità di 1. Durante l’impostazione, premere impostazione cancellare. temperatura 2. Una volta completata l’impostazione della temperatura, premere prima e poi cancellare. 3. Se la temperatura è impostata su Riscaldamento basso, dopo la cancellazione ritornerà...
-
Page 13: Pulizia E Manutenzione
I T A L I A N O TEPORSPLIT 4. PULIZIA E MANUTENZIONE • Scollegare sempre il termoventilatore dalla presa di corrente elettrica e lasciarlo raffreddare prima di pulirlo. • Pulire l’esterno del termoventilatore strofinando con un panno umido e non abrasivo. -
Page 14: Technical Characteristics
E N G L I S H TEPORSPLIT TECHNICAL CHARACTERISTICS Wall convector heaters Model: TEPORSPLIT Rated power: 2000W Rated voltage: ac230V 50Hz • Cover in heat-resistant, shock-proof ABS. • PTC ceramic heater elements, high efficiency heating, quickly heating, noiseless, odor-free and non-polluting •... -
Page 15: Installation
E N G L I S H TEPORSPLIT • The battery must be removed from the appliance before it is scrapped • The battery is to be disposed of safely • The heater must be installed at least 2,0 m above the floor. -
Page 16: Operation
E N G L I S H TEPORSPLIT 3. OPERATION Please make sure the capacity should be 220-240V~, 50-60Hz. Put the plug in the wall socket. witch the appliance on by selecting the desired setting. “0” = “OFF”. “I”= “ON”. -
Page 17: Remote Control
E N G L I S H TEPORSPLIT REMOTE CONTROL POWER Press as follows: ON (Fan working), OFF (Fan keep working for 30 seconds when shutdown the appliance after heating). HEATING Press HEATING button to set Low heat, High heat, FAN working. -
Page 18: Open Window Detection
E N G L I S H TEPORSPLIT OPEN WINDOW DETECTION Open window detection : Light flickering Open window detection only can be start up when appliance in heating mode(can not start up when appliance is only fan working) or in set temperature mode. - Page 19 E N G L I S H TEPORSPLIT 11:00 Temperature detection check point 2(temperature slow down detection check point) Temperature at this point is end of this round and start of next round. Per 10 minutes as a round, in one round, detect the...
-
Page 20: Week Timer
E N G L I S H TEPORSPLIT WEEK TIMER Present time First time to First time to start up(start up after power cut off ), need start up to set Present time. Setting method: Set day in one week: LED display 01, is Monday, press + or - to adjust Present Day, 01-07, is from Monday to Sunday. - Page 21 E N G L I S H TEPORSPLIT Free mode Press , LED display P6, press OK, select P6 Mode. P6 is free mode. (Not press OK within 10s, Week timer setting is failure) LED display 1, press + or _, from 1 to 7, set from Monday to Sunday.
- Page 22 E N G L I S H TEPORSPLIT Note: • In per day, only can set one working time round(from start to stop) • Only can set hours, no minutes. • Pre-set Mode need to set start and stop time both.
-
Page 23: Mode Table
E N G L I S H TEPORSPLIT Display 1. LED display Environment temperature description after setting, week timer indicator light and corresponding function indicator light are on. 2. Heating mode(Low heat or High heat, not Set temperature Mode), when setting week timer, LED display... - Page 24 E N G L I S H TEPORSPLIT CANCEL Ora attuale Cancel temperature When in setting, press to cancel. mode After setting temperature completed, must press first then press to cancel. When set temperature mode on low heat, after cancel, return to low heat.When set temperature mode on high heat, after cancel, return to high heat.
- Page 25 E N G L I S H TEPORSPLIT 4. CLEANING AND STORING THE HEATER Don’t close with flame to avoid the heater change colors and distort. If you don’t use the heater for a long time, please wipe the surface. Wait for the machine being cool and pull out the plug, then clean it.
- Page 26 E N G L I S H TEPORSPLIT...
- Page 28 FANTINI COSMI S.p.A. Via Dell’Osio, 6 - 20090 Caleppio di Settala, Milano, Italia Tel. +39 02 956821 | Fax +39 02 95307006 | info@aspira.it SUPPORTO TECNICO supportotecnico@aspira.it www.aspira.it...
Need help?
Do you have a question about the TEPORSPLIT and is the answer not in the manual?
Questions and answers