Advertisement
![]()
IMPORTANT NOTICE
- Contact the place of purchase or a distributor for information on installation, adjustment, and replacement of the products which are not found in the user's manual. A dealer's manual for professional and experienced bicycle mechanics is available on our website (https://si.shimano.com).
- The Bluetooth® word mark and logos are registered trademarks owned by the Bluetooth SIG, Inc. and any use of such marks by SHIMANO INC. is under license.
Other trademarks and trade names are those of their respective owners.
For safety, be sure to read this "user's manual" thoroughly before use, follow it for correct use, and store it so that it can be referenced at any time.
Important Safety Information

- Use the dedicated charging cable when charging the battery. If any non-specified items are used, fire, overheating, leakage, or damage to the connected PC may occur.
- Do not get the charging cable wet and do not touch or hold it while it is wet or with wet hands. If this is not observed, problems with operation or electric shocks may occur.
- Use an AC adapter with a USB port with a voltage of 5.0 V DC and with a current equal to or higher than 0.5 A DC. If the one with a current lower than 0.5 A is used, the AC adapter may heat up, potentially causing a fire, smoke, heating, destruction, electric shock, or burns.
- Do not heat the battery or throw it into fire. If this is not observed, fire or bursting may occur.
- Do not use or leave the battery in hot and humid places such as where the battery is exposed to direct sunlight, in a closed vehicle on a hot day, or near a heater. If this is not observed, leakages, overheating or bursting may cause fire, burns or other injury to occur.
- Do not disassemble or modify the battery or apply solder directly to the battery terminals. If this is not observed, leakages, overheating or bursting may cause fire, burns or other injury to occur.
- Do not touch the metal terminals with metal items such as hairpins. If this is not observed, short-circuits, overheating, burns or other injuries may occur.
- If any liquid leaking from the battery gets into the eyes, immediately wash the affected area with clean water without rubbing the eyes, and then seek medical attention. If this is not done, blindness may occur.

- Do not disassemble or modify the product. This may cause the product to not operate correctly, and you may suddenly fall and be seriously injured.
- Check that there are no cracks in the crank arms before riding the bicycle. If there are any cracks, the crank arm may break and you may fall off the bicycle.
- Be careful not to let the cuffs of your clothes get caught in the chain while riding, otherwise you may fall off the bicycle.
- When connecting or disconnecting the charging cable, be sure to hold the plug of the cable. Failure to do so may cause a fire or electric shock.
- Do not leave this product in an extremely high temperature surrounding environment such as in a closed vehicle on a hot day, or near a heater. That can result in an explosion of the incorporated battery or the leakage of flammable liquid or gas from it.
- Do not subject this product to extremely low air pressure. That may result in an explosion of incorporated battery or the leakage of flammable liquid or gas from it. Transporting this product by air is not a problem.
- If the following symptoms are observed, stop using the device and contact a dealer. A fire or electric shock may be caused.
* If heat or acrid-smelling smoke is coming out from the power plug.
* There may be a bad connection inside the power plug. - If it thunders while charging with an AC adapter with a USB port, do not touch the device, bicycle, or the AC adapter. When lightning strikes, an electric shock may be caused.
- Do not use a USB hub when connecting the cable to a PC USB port. This may cause a charge error or fire due to heating.
- Be careful not to damage the charging cable. Do not damage, process, forcibly bend, twist or pull them, bring them near hot objects, place heavy objects on them or bundle them tightly together. If they are used while damaged, fire, electric shocks or short-circuits may occur.
- If the battery does not become fully charged after 4 hours of charging, stop charging. If this is not observed, fire, bursting or overheating may occur.
- Observe all federal, state and local environmental regulations when disposing of this product, because it incorporates a battery. Disposal of this product into fire or a hot oven, or mechanically crushing or cutting of it, that can result in an explosion of the incorporated battery.
- Do not place this product in fresh water or sea water, etc., and do not allow the terminals to get wet. If this is not observed, fire, bursting or overheating may occur.
- Do not use the battery outside its operating temperature ranges. If the battery is used or stored in temperatures which are outside these ranges, fire, injury or problems with operation may occur. The operating temperature ranges are given below.
- During discharge: –10°C - 50°C
- During charging: 0°C - 45°C
- Do not throw or subject this product to strong shocks. If this is not observed, bursting, overheating or problems with operation may occur.
- Do not use the battery if leakages, discoloration, deformation or any other abnormalities occur. If this is not observed, bursting, overheating or problems with operation may occur.
- If any leaked fluid gets on your skin or clothes, wash it off immediately with clean water. The leaked fluid may damage the skin.
- Keep magnetic cards, medical devices, electronic devices, precision instruments, etc., away from the magnet included with this product. Data loss or malfunctioning may result.

- Be careful not to touch the tips of the teeth on the chainrings. There is a danger of injury.
- Store in a safe place out of the reach of small children to avoid letting them swallow by mistake.
- This product contains a powerful magnet and should be handled with care.
There is a risk of your hand or fingers being caught and injured. - Do not let grease adhere to the metal terminals. A conduction failure may result.
- Do not leave the charging cable connected when performing maintenance.

- Use a neutral detergent to clean the crank arm and the bottom bracket. Using alkaline or acidic detergents may cause discoloration.
- In addition, if pedaling performance does not feel normal, check this once more.
- Do not wash the bottom bracket with high-pressure jets of water.
- You should periodically wash the chainrings in a neutral detergent. In addition, cleaning the chain with neutral detergent and lubricating it can be an effective way of extending the useful life of the chainrings and the chain.
- The cuffs of your clothing may get dirty from the chain while riding.
- This is a small waterproof connector. Do not repeat connecting and disconnecting it. It may impair the function.
- The components are designed to be fully waterproofed to withstand wet weather riding conditions; however, do not deliberately place them into water.
- Do not clean the bicycle in a high-pressure car wash. If water gets into any of the components, operating problems or rusting may result.
- Contact the place of purchase for updates of the product software. The most up-to-date information is available on the Shimano website.
- Do not use thinners or similar substances to clean the products. Such substances may damage the surfaces.
- Do not get the charging cable or connector wet when connecting them.
- 2.4 GHz digital wireless system
2.4 GHz-frequency digital wireless technology, which is the same technology used for wireless LAN.
However, in a very rare occasions, objects and places may generate strong electromagnetic, waves and interference, which may result in incorrect measurement.- Television, PC, radios, motors/engines, or in car and trains.
- Railroad crossings and near railway tracks, around television transmitting stations and radar bases.
- Other wireless computers or digitally controlled light.
- Do not use the charging cable while it is tied up.
- Do not connect the charger to PC when it is on standby. This may cause a failure of PC depending on its specifications.
- Do not apply excessive tension to the charging cable.
- Do not extend the charging cable using an extension cable etc. Extending the cable may disrupt charging.
- Do not ride the bicycle with the charging cable still connected to it.
- E-TUBE PROJECT cannot be used when the charging cable is connected.
- Charge the battery in indoor places to avoid exposure to rain or wind.
- Charging can be carried out at any time regardless of the amount of charge remaining. Always use the dedicated charging cable and charge the battery until it is fully charged.
- The battery is not fully charged at the time of purchase. Before riding, be sure to fully charge the battery.
- If the ambient temperature is low, the battery's usable time will be shorter.
- If the unit will not be used for an extended period, store it, after charging, in a cool indoor place (approx. 10 to 20°C) where the battery will not be exposed to direct sunlight or rain, and charge it every 6 months.
- Store the product, or bicycle installed with the product, in a cool indoor place (approx. 10 to 20°C) where it will not be exposed to direct sunlight or rain. If the storage temperature is low or high, the performance of the battery is reduced, and its available time will be shorter. When you use the battery after a long storage period, be sure to charge it before use.
- If the battery has become fully spent, charge it as soon as possible. If you leave the battery without charging it, it will cause the battery to deteriorate.
- The battery is a consumable item. The battery will gradually lose its capacity for charging after repeated use and after time has passed. If the length of time or the riding distance over which the battery can be used has become significantly reduced, consult the place of purchase.
- Keep away from magnetized objects. If this is not observed, the product may be damaged.
For products that have magnets attached, make sure to install the product, using the attached magnet, in the location that is specified. - Products are not guaranteed against natural wear and deterioration from normal use and aging.
- For maximum performance we highly recommend Shimano lubricants and maintenance products.
Regular inspections before riding the bicycle
Before riding the bicycle, check the following items. If any problems are found with the following items, contact the place of purchase or a bicycle dealer.
- Are there any cracks in the crank arms?
- Are the fastening sections fixed securely?
- Are the bearing sections fixed securely?
- Are there any abnormal noises?
- Is there sufficient charge remaining in the battery?
- Are power and cadence correctly displayed on the cycle computer?
- Is the outer cap fitted securely?
- Have you performed a zero offset calibration?
About wireless functions
Cycle computer connection
This product transmits the following information wirelessly to cycle computers or receivers that support ANT+TM or Bluetooth® LE connections.
- Power
- Left/right power balance
- Pedal smoothness*
- Cadence
- Torque effectiveness*
- Battery level information
* Not transmitted over Bluetooth® LE connections.
For information on which of the above types of information are displayed, refer to the manual for your cycle computer or receiver.
E-TUBE PROJECT connection
E-TUBE PROJECT for smartphones/tablets may be used if a Bluetooth LE connection is established with a smartphone/tablet.
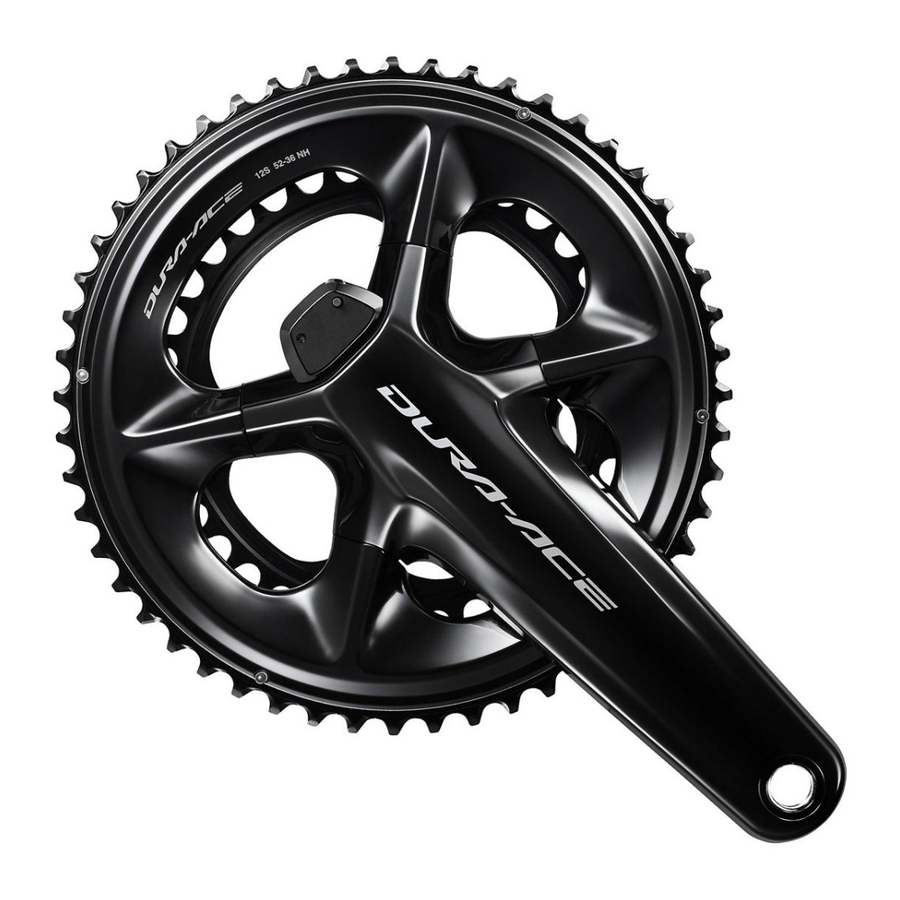
Included parts
The following parts are included in this product. Make sure that no parts are missing.

Names of parts

* The position of the control unit and shape of the charging cable connection port may differ depending on the model.
Operation
You cannot use the battery immediately after shipment.
Be sure to charge it before use.
Charging the battery
This product can be charged by using an AC adapter with a USB port or by connecting it to the USB connector of a PC.
Power may no longer be supplied to the battery if the PC enters a hibernation or sleep state while charging.
- Place your finger on the tab at the top of the control unit to open the cover.

- Connect the charging cable as shown in the illustration. (Match the shapes of the charging cable and charging port when connecting.)

- Once charging begins, the LED lights up blue. (Do not move the crank or cable during charging. There is a risk of the cable disconnecting. Reconnect the cable if it disconnects.)

- Once charging is complete, the LED turns off.
After charging, make sure to close the cover.


„ How to check battery level

- Press the button on the control unit.
- The LED is green or red.
If the LED is red, flashing, or does not turn ON, the battery level is low. Charge the battery.LED Battery level ![]()
Green 100% - 16% ![]()
Red 15% - 3% ![]()
Red (flashing) 2% - 1% ![]()
Off 0%


Note:
When the LED is lit up red, you will not be able to connect to E-TUBE PROJECT.
If you continue usage in this state and the LED flashes red, you will be unable to set zero offset.
Activating the product
Press the button on the control unit or rotate the crank 2 or more times.
„Confirming the product has activated
- Activation by pressing the button
Remaining battery charge displays. - Activation by rotating the crank (after connecting cycle computer)
Cadence and power display on the cycle computer when the product is active.
If this product does not detect motion for 5 minutes after activation, wireless transmission will terminate in order to save battery power. To re-enable the wireless connection, either press the button on the control unit or rotate the crank 2 or more times.
Connection procedure
„Cycle computer connection
To make a connection, the cycle computer needs to be in connection mode. For information on how to put the cycle computer into connection mode, refer to the manual for the cycle computer.
- Activate the product by pressing the button on the control unit or rotating the crank 2 or more times.
- Select the unit name displayed on the cycle computer screen. For an ANT+TM connection, you can also connect by entering the five digit ANT ID found on the inside of the right crank.

- This completes the connection process.

Check on the cycle computer to see if connection was successful.
If a connection cannot be made in the way described above, refer to the manual for your cycle computer.
„E-TUBE PROJECT connection
Before setting up a connection, turn on Bluetooth LE on the smartphone/ tablet.
- Open E-TUBE PROJECT and set it to listen for Bluetooth LE signals.
- Press the button on the control unit.
- Select the unit name displayed on screen.
* To disconnect, cancel the Bluetooth LE connection from the smartphone/ tablet. (The cycle computer will exit connection mode and return to regular operation mode.)
To restore the Bluetooth LE Name and Passkey to their default values, hold down the button on the control unit for at least 3 seconds during battery charging. The LED will flash blue.
(Bluetooth LE name: FCR9200P (example) Passkey: 000000)
Performing zero offset calibration
- Zero offset calibration can be performed using the control unit or the cycle computer.
When calibrating using the cycle computer, refer to the owner's manual for the cycle computer. - It is recommended to perform zero offset calibration before riding the bicycle.
- Place the bicycle on level ground.
(At this time, do not place your feet on the pedals or apply load to the crank. It may not be possible to perform calibration correctly.) - Position the crank arm so that it is perpendicular to the ground as in the illustration.
(Zero offset calibration is unaffected by whether the chain is positioned on the largest chainring or smallest chainring.)

- Press the button on the control unit until the LED lights up blue.

- When the LED lights up blue, release the button. The LED will begin blinking and zero offset calibration will complete.


When connected to a cycle computer via ANT+TM or connected to E-TUBE PROJECT, "5050" will be displayed on your cycle computer, smartphone, or tablet once zero offset configuration is complete.
If some other number is displayed even if you perform zero offset configuration again, contact the place of purchase or a bicycle dealer.
Specifications
| Operating temperature range | -10°C – 50°C | Continuous operation time | 300 or more hours (for given temperature of 25°C) | |
| Battery type | Lithium ion | |||
| Normal charging time | 2.5 hours | Wireless specification | ANT +TM/Bluetooth® LE | |
| Charging temperature | 0°C – 45°C | |||
| Frequency band | 2,402 – 2,480 MHz | |||
| Maximum radio-frequency power | +4 dBm | |||
| Firmware version | 4.0.3 – | |||
Troubleshooting
If you experience any trouble using this product, please refer to the following.
If none of the following are applicable, or the suggested solution does not resolve the issue, consult with the place of purchase or a bicycle dealer. If the power value has changed, it is possible to correct it. For details, consult the place of purchase.
Power does not display | The cycle computer may not be connected. Follow the steps in "Connection procedure" to make a connection. |
| The battery may be out of charge. Check remaining battery charge and charge the battery if the charge is low. | |
| The left crank connector may be detached. Remove the outer cap and check that the connector is connected. | |
Power value is abnormal | Zero offset calibration may not be correct. Perform zero offset calibration referring to the section "Performing zero offset calibration". |
Cadence does not display | The magnet may not be attached or may be positioned incorrectly. If it is not attached or it is positioned incorrectly, consult with the place of purchase or a bicycle dealer. |
Cadence value is abnormal | Another cadence sensor may be attached. If this is the case, either remove or disable it. |
LED blinks red during zero offset calibration | There may have been an issue during zero offset calibration. Confirm that the connector is connected and perform zero offset calibration again referring to the section "Performing zero offset calibration". |
Charging is not possible | A USB hub may be connected. Do not use a USB hub. |
| The charging cable may be damaged. If charging is not possible even after trying a different PC or USB adapter, replace the charging cable. | |
Connection cannot be made with cycle computer | The cycle computer in use may not be supported. Confirm with the owner's manual for the cycle computer. |
Interference may be affecting the wireless signals. Wireless signals may be susceptible to interference in the following locations and conditions, preventing successful connection.
|
About hardware reset
If an issue cannot be resolved even after referring to the troubleshooting section, perform a hardware reset.
- Hold down the button on the control unit for 15 seconds.
- The hardware reset completes when the button is released.
- When the hardware reset is complete, the LED will light up indicating remaining battery charge.
After the hardware reset is complete, check operation again and if the issue has not been resolved, consult with the place of purchase or a bicycle dealer.
SHIMANO NORTH AMERICA BICYCLE, INC.
One Holland, Irvine, California 92618, U.S.A. Phone: +1-949-951-5003
SHIMANO EUROPE B.V.
High Tech Campus 92, 5656 AG Eindhoven, The Netherlands Phone: +31-402-612222
MADISON (A DIVISION OF H. YOUNG (OPERATIONS) LTD)
Roebuck Way, Knowlhill, Milton Keynes, Buckinghamshire, MK5 8HL, United Kingdom
SHIMANO INC.
3-77 Oimatsu-cho, Sakai-ku, Sakai City, Osaka 590-8577, Japan
Please note:
specifications are subject to change for improvement without notice. (English)
© Feb. 2021 by SHIMANO INC. ITP


VideosShimano Power Meter (R9200P): Review Video
Documents / ResourcesDownload manual
Here you can download full pdf version of manual, it may contain additional safety instructions, warranty information, FCC rules, etc.
Download Shimano FC-R9200-P, FC-R8100-P - Dual-Sided Power Meter Manual
Advertisement


Need help?
Do you have a question about the FC-R9200-P and is the answer not in the manual?
Questions and answers