
Related Manuals for iOttie Velox Series


Summary of Contents for iOttie Velox Series
- Page 1 The Velox Series User Manual P 02 Velox Magnetic Wireless Charging Air Vent Mount P 44 Velox Magnetic Air Vent Mount...
- Page 2 Velox Magnetic Wireless Charging Air Vent Mount User Manual English French Italian German Spanish Japanese...
-
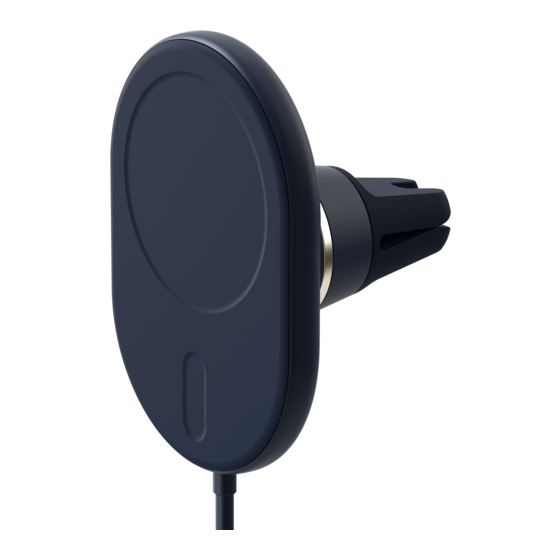
Page 3: Product Information
Index 01 Product Information At a Glance For optimal mounting and charging, please follow the detailed instructions within this manual when using the Velox Magnetic Wireless charging mount. Vent Clip Rotating Ball Joint Magnetic Mounting Head Product Information At a Glance Alignment Magnet Device Compatibility... -
Page 4: Device Compatibility
Output DC 5V ~ 3A DC 12V ~ 24V DC 9V ~ 2A DC 12V ~ 1.5A iPhone 13 Pro Max & 13 Pro iPhone 13 & 13 Mini iOttie is not liable for possible damages due to product misuse. -
Page 5: Connecting To Power
02 Installing the Magnetic Connecting to Power Wireless Charging Mount Plug the cable into your vehicle’s 12V power socket by using the included adaptor. Attaching the Air Vent Mount Alternatively, you may plug the cable into your Simply push the Velox mount onto the blade of vehicle’s USB-C outlet. -
Page 6: Informations Sur Le Produit
Indice 01 Informations sur le produit Aperçu Pour une fixation et une recharge optimales, veuillez suivre les instructions détaillées dans ce manuel lorsque vouse utiliisez le support de chargeur sans fil magnétique Velox. Serrage d’aération Articulation sphérique tournante Tête de fixation magnétique Informations sur le produit Aperçu... -
Page 7: Spécifications Du Produit
DC 5V ~ 3A DC 12V ~ 24V DC 9V ~ 2A DC 12V ~ 1.5A iPhone 13 Pro Max & 13 Pro iPhone 13 & 13 Mini iOttie n’est pas responsable des dommages éventuels causés par une mauvaise utilisation du produit. - Page 8 02 Assemblage du support de Connexion à l’alimentation charge magnétique sans fil Branchez le câble dans la prise de courant 12V de votre véhicule en utilisant l’adaptateur inclus. Fixation du support de la grille d’aération Vous pouvez également brancher le câble sur Il suffit de pousser le support Velox sur la lame la prise USB-C de votre véhicule.
-
Page 9: Informazioni Sul Prodotto
Indice 01 Informazioni sul prodotto A Prima vista Per un montaggio e ricarica ottimali, seguire le istruzioni dettagliate contenute en questo manuale per usare sopporte magnetico per la ricarica senza fili. Clip di sfiato Snodo Sferico Rotante Testa di montaggio magnetica Informazioni sul prodotto A Prima vista... -
Page 10: Specifiche Del Prodotto
DC 5V ~ 3A DC 12V ~ 24V DC 9V ~ 2A DC 12V ~ 1.5A iPhone 13 Pro Max & 13 Pro iPhone 13 & 13 Mini iOttie non è responsabile per evuantuali dnni causati da un uso impropio del prodotto. -
Page 11: Collegamento All'alimentazione
02 Installazione del supporto di Collegamento all’alimentazione ricarica wireless magnetico Inserisci il cavo nella presa di corrente da 12V del tuo veicolo utilizzando l’adattatore incluso. Fissare il supporto alla presa d’aria In alternativa, puoi collegare il cavo alla presa Basta spingere il supporto Velox sulla lama USB-C del tuo veicolo. -
Page 12: Auf Einen Blick
Index 01 Produktinformationen Auf einen blick Um eine optimale befestigung und afladung zu gewährlesisten, befolgen sie bitte die detaillierten anweisungen in diesem handbuch, wenn sie die Velox Magnetische Halterung für das kabellose Laden. Lüftungslklemme Drehkugelgelenk Magnetischer Befestigungskopf Produktinformationen Auf einen blick Ausrichtungsmagnet Gerätekompatibilität Produktspezifikationen... - Page 13 DC 5V ~ 3A DC 12V ~ 24V DC 9V ~ 2A DC 12V ~ 1.5A iPhone 13 Pro Max & 13 Pro iPhone 13 & 13 Mini iOttie haftet nicht fücht mögliche schäden, die auf grund einer unsachgemäßen verwendung des produkts entstehen.
-
Page 14: Anschließen An Die Stromversorgung
02 Installieren der Anschließen an die Stromversorgung magnetischen kabellosen Schließen Sie das Kabel mithilfe des mitgelieferten Adapters an die 12-V-Steckdose ladehalterung Ihres Fahrzeugs an. Alternativ können Sie Anbringen der Halterung an der Lüftung das Kabel auch an die USB-C-Buchse Ihres Drücken Sie die Velox-Halterung einfach auf das Gitter Fahrzeugs anschließen. -
Page 15: Información Del Producto
Índice 01 Información del producto De un vistazo Para un montaje y carga óptimos, siga las instrucciones detalladas en este manual cuando utilice el soporte magnético de carga inalámbrica Velox. Abrazadera de ventilación Rótula giratoria Cabezal de montaje Información del producto Magnético De un vistazo Imán de alineación... -
Page 16: Especificaciones Del Producto
DC 5V ~ 3A DC 12V ~ 24V DC 9V ~ 2A DC 12V ~ 1.5A iPhone 13 Pro Max & 13 Pro iPhone 13 & 13 Mini iOttie no es responsable por posibles daños debidos al uso incorrecto del producto. -
Page 17: Conexión A La Corriente
02 Instalación del Soporte Conexión a la corriente magnético de carga inalámbrica Conecte el cable a la toma de corriente de 12 V de su vehículo utilizando el adaptador incluido. Colocación del soporte en la ventila de aire Alternativamente, puede conectar el cable a la Simplemente coloque el soporte Velox en la toma USB-C de su vehículo. - Page 18 目次 製品情報 一目で 最適な取り付けと充電を行うには、 Velox Magnetic Wireless充電マウントを使用する際に、 このマニュアル に記載されている詳細な手順に従ってください。 ベントクリップ 回転ボールジョ イント 磁気取り付けヘッド 製品情報 一目で アライメントマグネ 機器の互換性 ット 製品仕様 磁気ワイヤレス充電マウント の取り付け エアコンの吹き出し口にホルダーを設置する 12V電源コンセ ントアダプター 電源に接続する 携帯電話を装着する USB-C電源ケー ブル...
- Page 19 マウントの高さ 3.58″ マウントウェイト 5 oz. マウントの高さ 入力電源 出力電源 DC 5V ~ 3A DC 12V ~ 24V DC 9V ~ 2A DC 12V ~ 1.5A iPhone 13 Pro Max & 13 Pro iPhone 13 & 13 Mini は、 製品の誤用による損害の可能性について責任を負い iOttie ません。...
- Page 20 磁気ワイヤレス充電マウント 電源に接続する の取り付け 同封のアダプターを使い、 ケー ブルを自家用車の12V電 源ソケットにつなぎます。 携帯電話をホルダーに当てる エアコンの吹き出し口にホルダーを設置します と、 マグネットで所定の位置に固定され、 自動的に充電 自家用車のエアコン吹き出し口のブレードにVeloxホル が始まります。 ダーを差し込むだけの簡単装着。 シリコン製の留め具 が、 デコボコ道を走行していてもホルダーが落ちるの を防いでくれます。 磁気ワイヤレス充電器にはオン/オフスイ ッチがありませ Velox ん。 ケーブルを差し込み、 自家用車のエンジンをかけると、 ホルダ ホルダーはエアコン吹き出しの平行なブレードでの使用にのみ ーの電源がオンになります。 対応するようデザインされています。 携帯電話を装着する 携帯電話をホルダーに当てると、 マグネットで所定の位 置に固定され、 自動的に充電が始まります。 これでドラ イブの準備が整いました。...
- Page 21 15 of the FCC Rules. These limits are designed to provide reasonable protection against harmful interference in a Declaration of Conformity: Hereby, iOttie, Inc. declares that residential installation. This equipment generates uses and the radio equipment type Velox Magnetic Wireless Charging...
- Page 22 Designed in New York City. 20 W 37th St, New York, NY 10018. is required. Incorrect reassembly may result in electric Made in China. U.S. Patent Pending ©2021 iOttie. All rights shock or fire. reserved. iOttie and Velox are registered trademarks owned by iOttie, Inc.
- Page 23 Velox Magnetic Air Vent Mount User Manual English French Italian German Spanish Japanese...
- Page 24 Index 01 Product Information For optimal mounting, please follow the detailed At a Glance instructions within this manual when using the Velox Magnetic Air Vent Mount. Rotating Ball Joint Product Information At a Glance Device Compatibility Vent Clip Product Specifications Installing the Magnetic Air Vent Mount Attaching the Air Vent Mount...
- Page 25 13 mini, iPhone 13 Pro, iPhone 13 Pro Max and Mount Width 2.3″ the iPhone 12 Series. Mount Height 2.31″ Mount Weight 1.85 oz. iOttie is not liable for possible damages due to product misuse. iPhone 13 Pro Max & 13 Pro iPhone 13 & 13 Mini...
- Page 26 02 Installing the Magnetic Air Mounting your phone Vent Mount Simply place your phone against the mount, and the magnets will hold it in place, charging Attaching the Air Vent Mount will start automatically. You are now ready to Simply push the Velox mount onto the blade of start driving.
- Page 27 Indice 01 Informations sur le produit Aperçu Pour une fixation optimale, veuillez suivre les instructions détaillées dans ce manuel lorsque vouse utiliisez le support de ventilation Velox. Articulation sphérique tournante Informations sur le produit Aperçu Compatibilité des appareils Serrage Spécifications du produit d’aération Assemblage du support de ventilation...
- Page 28 13 Pro Max, et la série iPhone 12. Hauteur de montage 2.31″ Poids de montage 1.85 oz. iOttie n’est pas responsable des dommages éventuels causés par une mauvaise utilisation du produit. iPhone 13 Pro Max & 13 Pro iPhone 13 & 13 Mini 54 FR...
- Page 29 02 Assemblage du support de Fixation de votre téléphone ventilation Il suffit de placer votre téléphone contre le support pour que les aimants le maintiennent Fixation du support de la grille d’aération en place et que la charge se déclenche Il suffit de pousser le support Velox sur la lame automatiquement.
- Page 30 Indice 01 Informazioni sul prodotto A Prima vista Per un montaggio ottimali, seguire le istruzioni dettagliate contenute en questo manuale per usare sopporte magnetico per la presa d’aria. Snodo Sferico Rotante Informazioni sul prodotto A Prima vista Compatibilità del dispositivo Clip di sfiato Specifiche del prodotto Installazione del supporto per la...
- Page 31 Larghezza di montaggio 2.31″ Larghezza di montaggio 1.85 oz. Altezza di montaggio iOttie non è responsabile per evuantuali dnni causati da un uso impropio del prodotto. iPhone 13 Pro Max & 13 Pro iPhone 13 & 13 Mini 60 IT...
- Page 32 02 Installazione del supporto per Montaggio del telefono la presa d’aria Basta posizionare il telefono contro il supporto e i magneti lo terranno in posizione, la ricarica Fissare il supporto alla presa d’aria inizierà automaticamente. Ora sei pronto per Basta spingere il supporto Velox sulla lama iniziare a guidare.
- Page 33 Index 01 Produktinformationen Auf einen blick Um eine optimale befestigung, gewährlesisten, befolgen sie bitte die detaillierten anweisungen in diesem handbuch, wenn sie die Velox Magnetische Belüftungshalterung. Drehkugelgelenk Produktinformationen Auf einen blick Gerätekompatibilität Lüftungslklemme Produktspezifikationen Installieren der Belüftungshalterung Anbringen der Halterung an der Lüftung Magnetischer Einsetzen Ihres Telefons Befestigungskopf...
- Page 34 13 Pro, iPhone 13 Pro Max, und iPhone 12 serie. Montagehöhe 2.31″ Montagegewicht 1.85 oz. iOttie haftet nicht fücht mögliche schäden, die auf grund einer unsachgemäßen verwendung des produkts entstehen. iPhone 13 Pro Max & 13 Pro iPhone 13 & 13 Mini 66 DE...
- Page 35 02 Installieren der Einsetzen Ihres Telefons Belüftungshalterung Platzieren Sie Ihr Telefon einfach an der Halterung und die Magnete sorgen dafür, dass Anbringen der Halterung an der Lüftung es an Ort undStelle bleibt. Der Ladevorgang Drücken Sie die Velox-Halterung einfach auf beginnt automatisch.
- Page 36 Índice 01 Información del producto De un vistazo Para un montaje óptimo, siga las instrucciones detalladas en este manual cuando utilice el soporte magnético Velox. Rótula giratoria Información del producto De un vistazo Compatibilidad de dispositivos Abrazadera de Especificaciones del producto ventilación Instalación del Soporte de ventilación de aire...
- Page 37 13 Pro Max, y iPhone serie 12. Altura de montaje 3.58″ Peso de montaje 5 oz. iOttie no es responsable por posibles daños debidos al uso incorrecto del producto. iPhone 13 Pro Max & 13 Pro iPhone 13 & 13 Mini 72 ES...
- Page 38 02 Instalación del Soporte de Montaje del teléfono ventilación de aire Simplemente coloque su teléfono contra el soporte, y los imanes lo mantendrán en su Colocación del soporte en la ventila de aire lugar y la carga comenzará automáticamente. Simplemente coloque el soporte Velox en la Ahora está...
- Page 39 目次 01 製品情報 一目で 磁気エアベントマウントを使用する場合は、 最適 Velox な取り付けを行うために、 このマニュアルの詳細な手順 に従ってください。 回転ボールジョ イント 製品情報 一目で 機器の互換性 製品仕様 ベントクリップ エアベントマウント の取り付け エアコンの吹き出し口にホルダーを設置する 磁気取り付け 携帯電話を装着する ヘッド...
- Page 40 13 iPhone 13 Mini iPhone 13 、 、 および シリーズ。 iPhone 13 Pro Max iphone12 マウント幅 2.3″ マウントの高さ 2.31″ マウントウェイト 1.85 oz. iOttieは、 製品の誤用による損害の可能性について責任を負い ません。 iPhone 13 Pro Max & 13 Pro iPhone 13 & 13 Mini 78 JP...
- Page 41 エアベントマウントの取り付け 携帯電話を装着する 携帯電話をホルダーに当てると、 マグネットで所定の位 エアコンの吹き出し口にホルダーを設置します 置に固定され、 自動的に充電が始まります。 これでドラ 自家用車のエアコン吹き出し口のブレードにVeloxホル イブの準備が整いました。 ダーを差し込むだけの簡単装着。 シリコン製の留め具 が、 デコボコ道を走行していてもホルダーが落ちるの を防いでくれます。 追加情報 ホルダーはエアコン吹き出しの平行なブレードでの使用に マウントはスマートフォンのキックスタンドとしても使用 のみ対応するようデザインされています。 できます。 80 JP...
- Page 42 The Velox Magnetic Wireless Charging Air Vent Mount & Velox Magnetic Air Vent Mount is backed by a 2 year warranty.
Need help?
Do you have a question about the Velox Series and is the answer not in the manual?
Questions and answers