Table of Contents
Advertisement
Quick Links
Advertisement
Table of Contents

Related Manuals for La Crosse Technology V42


Summary of Contents for La Crosse Technology V42
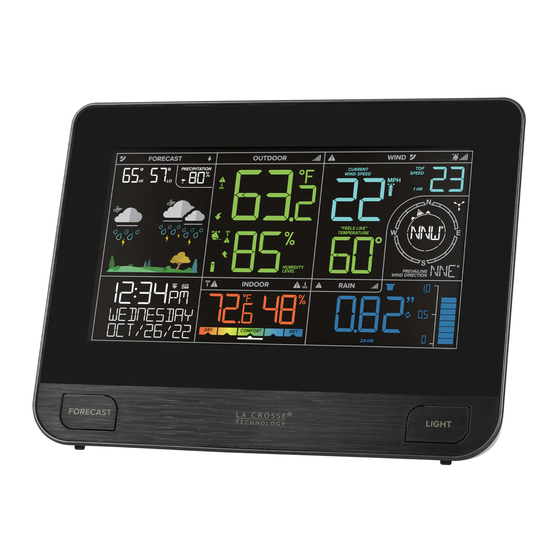
- Page 1 Wi-Fi PROFESSIONAL WEATHER STATION SET UP GUIDE MODEL NUMBER V42 (BP73736)
-
Page 2: Table Of Contents
Table of Contents SENSORS Initial Setup BASICS LA CROSSE VIEW FORECAST Installing the Wind Cups (if needed) Initial Setup 02-03 Connecting to the App Viewing Your Forecast Data Station Settings Connecting Your Station Viewing Extended Buttons Adding Your Sensors to Forecasts Data the App LCD Display Brightness... -
Page 3: Initial Setup
Wi-Fi connection. However, we recommend connecting during the initial setup, as it will save you time and allows access to some advanced features right away. Download the La Crosse View App Back of Station (V42) Power Jack Thermo-Hygro Sensor Bottom of Cyclone Sensor... - Page 4 LA CROSSE VIEW LA CROSSE VIEW Adding & Connecting Your Station to Wi-Fi Adding Your Sensors to the App 12 34 100% The La Crosse View app is required to connect the station to your Wi-Fi network. Download, install, Cancel Add Device Save Upon getting the station connected to your Wi-Fi network, the app will...
-
Page 5: Station Settings
BASICS BASICS Station Settings Buttons About 30 seconds after powering the station on, it will automatically enter the Settings Menu. Use the steps below to navigate the menu and get your station working the way you’d like. Navigating the Settings Menu Settings Menu Order •... -
Page 6: Auto-Dim Settings
BASICS BASICS LCD Display Brightness Time & Calendar Display 1. 12/24 HOUR TIME: Time will automatically update when Adjusting the LCD Display Brightness connected to Wi-Fi. Press and release the button on the front LIGHT 2. WI-FI ICON ( ): Indicates active Wi-Fi connection. -
Page 7: Forecast
FORECAST FORECAST Viewing Your Forecast Data Viewing Your Forecast Data When using as a standalone station, the display uses changes in barometric pressure to predict your Viewing Extended Forecast weather to come. This is represented by the 6 forecast scenes below. High and low temperatures will Press and release the FORECAST button to toggle through... - Page 8 WIND WIND Viewing Wind Data Wind Speed Records Viewing Wind Speed Records Press and release the WIND button on the top of the station to toggle through wind speed records with time and date stamps. This station measures high wind speed records for the past 24 hours, 7 days, 1 month, and 1 year. 24 Hour Record Example 1 Month Record Example 1 Year Record Example...
- Page 9 RAIN RAIN Viewing Rain Data Viewing Rain Data Rain Graph The Rain Graph has 10 segments which change based on rainfall totals. The scale values automatically adjust when over 1-inch (25.4 mm) of rain is measured. Note: If over 70 Inches (999 mm) is measured, the graph will Up to 1'' Example Over 1'' Example appear full.
-
Page 10: Viewing Temperature & Humidity Data
RAIN TEMPERATURE & HUMIDITY Rainfall Records Viewing Temperature & Humidity Data 1. LOW BATTERY INDICATOR ( Viewing Rainfall Records Indicates the batteries in the Thermo-Hygro Sensor Press and release the RAIN button on the top of the should be replaced soon. station to toggle through rainfall records with time and 2. -
Page 11: Temperature & Humidity Records
TEMPERATURE & HUMIDITY ALERTS Temperature & Humidity Records Customizable Alerts Viewing Temperature & Humidity Records Setting Custom Alerts Press and release the TEMP. button to toggle through Hold the ALERTS button to enter the Alert Settings Menu. indoor/outdoor records with time and date stamps. Use the buttons to activate/deactivate individual alerts, or press the... - Page 12 SENSORS SENSORS Sensor Placement & Mounting Cyclone Sensor Mounting For Accurate Thermo-Hygro Sensor Measurements Basic Installation Fence posts, poles, decks, and mailboxes are common mounting options due to their convenience. • Use the hole at the top to hang your sensor from the back using a nail. Many users prefer these types of locations as the data they provides is accurate from their ground Or, insert one mounting screw through the front of your sensor.
- Page 13 SENSORS SENSORS Cyclone Sensor Mounting Cleaning the Rain Sensor Flexible Installation Hand Screw Remove the Rain Funnel by firmly twisting Clear any leaves, insects, or other debris to the funnel counter-clockwise and lifting up. allow the Rain Tipper to rock freely. Check Install the Hand Screw to the bracket, then Secure This configuration allows you to attach the sensor and clear the Drainage Holes located on...
- Page 14 0 to 111 mph (0 to 178 kph) • Rainfall Range: 0 to 393.6 Inches (0 to 9999 mm) • Transmission Range: 400 feet (121 meters) open air STATION (V42/BP73736) • Power Requirements: 3 “AA” Batteries (not included) • Indoor Temperature Range: 32°F to 122°F...
- Page 15 APPENDIX APPENDIX Coin Cell Battery FCC Statement Replace the Coin Cell Battery This equipment has been tested and found to comply with the limits for a Class B digital device, pursuant to part 15 of the FCC WARNING Rules. These limits are designed to provide reasonable protection against harmful interference in a residential installation. Use a coin to turn the battery cover to the left to remove it.
-
Page 16: Support
Phone: 1.844.200.8752 • Representatives are available Monday-Friday, 8am-6pm CST Warranty Recycling & Disposal La Crosse Technology, Ltd. provides a 1-year limited time Please consider the environment when deciding to dispose of this product. Although household electronics are generally safe warranty (from date of purchase) on this product, relating to use on a daily basis, incorrect disposal can cause negative and to manufacturing defects in materials and workmanship.
Need help?
Do you have a question about the V42 and is the answer not in the manual?
Questions and answers