Table of Contents
Advertisement
Advertisement
Table of Contents

Related Manuals for Hanwha Techwin Wisenet SPD-152


Summary of Contents for Hanwha Techwin Wisenet SPD-152
- Page 1 NETWORK VIDEO DECODER User Manual SPD-152...
- Page 2 Warranty Hanwha Techwin shall repair a product free of charge if the product does not work properly when operating it under normal usage conditions. The warranty period for products is 3 years, except in the following events: ●...
- Page 3 overview ImpORTANT SAfETy INSTRUCTIONS Standards Approvals Read these operating instructions carefully before using the unit. Follow all the safety instructions listed below. Keep these operating instructions handy for future reference. ■ Read these instructions. Any changes or modifications in construction of this device which are not expressly approved by the party responsible for compliance could void the user's authority to operate the equipment.
-
Page 4: About User Manual
overview AbOUT USER mANUAl Warning This user manual provides information necessary to use the product, including a brief introduction, names of each part, battery functions, the connection method, and menu settings. Please read this manual carefully before using the product for proper use. -
Page 5: Table Of Contents
CONTENTS OVERVIEW Important Safety Instructions lIVE Screen Layout of the Live About User Manual Checking the System Status About Target Readers Checking the Camera List About Product Usage Live Screen Menu Warning Icons on the Live Screen Contents OSD Information Display Features Channel Information Display Checking Package Contents... - Page 6 overview SETUp lIVE VIEWER Screen Layout of the Setup Screen Layout of the Live Viewer Setting the Camera Checking User ID Channel setup Checking the Camera List Camera setup Checking the All Camera Status Live Status Profile setup Camera password setup Changing the Pattern of Split Screen Layout Setup Setting the Device...
-
Page 7: Features
fEATURES NAmES AND fUNCTIONS Of ThE pRODUCT This product monitors the video and sound of the network camera. The PC provides an environment where you can set up this product. ● Provides new UI 2.0 ● Plays Layout Sequence Supports thermal imaging cameras / PTZ linked cameras ●... -
Page 8: Mounting On The Monitor's Vesa Holes
installation 2. Fasten two M3 L6 screws to the base of the decoder. Please take note of the followings before using this product. ● Do not use the product outdoor. ● Do not spill water or liquid in the connection part of the product. ●... -
Page 9: Mounting With Stud Screws
Disconnecting the multi Adapter mounting on a pole Lift the decoder while pressing the multi adapter's metal spring. 1. Mount the multi adapter on the pole using a strap. Strap for poles 2. Fasten two M3 L6 screws on the base of the decoder, and mount the decoder to the multi adapter. mounting with Stud Screws If it is not possible to mount a decoder on the monitor because the monitor’s VESA holes are too close to the monitor's connecting terminal or stand. -
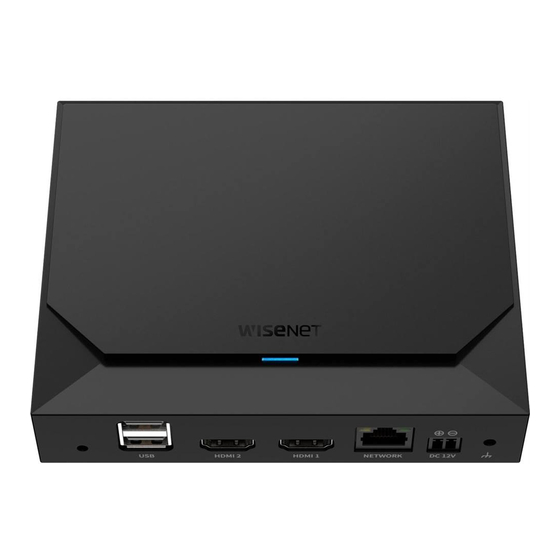
Page 10: Connecting 10 Connecting To An External Device
connecting CONNECTINg TO AN ExTERNAl DEVICE CONNECTINg TO pOWER When using a common ethernet cable, please connect to the power adapter for a power supply. Connect the (+,-) wires of the power adapter to the power input port of the network video decoder using a screwdriver. Network Microphone NETWORK... -
Page 11: Connecting To The Ground Wire
CONNECTINg TO ThE gROUND WIRE Connecting to a Network Using a Router Use a screwdriver on the FG screw on the right side of the power input port to connect it to the ground wire. Ground wire IP Router ■ The ground wire prevents the product from being struck by lightning. -
Page 12: Getting Started
getting started STARTINg ThE SySTEm lOgIN To use the decoder menu, you are required to login as a user that is authorized to access the menu. 1. Connect the power cable of the decoder. 1. Select <login> in the top right of the screen. 2. -
Page 13: Setting The System Operation Mode
getting started SETTINg ThE SySTEm OpERATION mODE INSTAllATION WIzARD As shown below, proceed through each step of the <Installation wizard>. If you have admin permissions, you can select operation mode to control the decoder. Installation Wizard can only be accessed at factory default status. If you do not want to proceed, click <Exit>. 1. - Page 14 3. Set the administrator password on the <Decoder ID/pW> screen and click the <Next>. 5. Set the date, time, time zone, and daylight saving time on the <Date & Time> screen, and then click <Next>. If you click < >, a basic guide for password setup is displayed. Refer to the password setup rules. ■...
- Page 15 getting started 7. On the <Camera register> screen, select a camera to register from the searched camera list and click <Register>. 9. Select an operation mode that can control the decoder from the<Operation mode> screen. Select a camera to register from the list and click <Change Ip>. After completing camera register click <Next>.
-
Page 16: Shutting Down The System
ShUTTINg DOWN ThE SySTEm 1. Select <Shutdown> in the top right of the screen. 2. The <Shutdown> confirmation pop-up window will appear. 3. Click < Ok > . The system will shut down. RESTARTINg ThE SySTEm 1. Select <Restart> at the top right of the screen. 2. -
Page 17: Screen Layout Of The Live
live You can check the video of cameras connected to the decoder. Also, you can adjust the camera and check the network Name Function Description transfer status. ■ Sets the split screen of the video window. You can check the following Live screen configuration when it is in <Standalone> operation mode. Removes all screens from the video window. -
Page 18: Checking The System Status
Checking the System Status Checking the Camera list The icon at the top of the screen indicates the status of the system. Displays the camera type, status, and name registered in the decoder. Name Function Description Channel information Displays channel information. (channel number, color indication on video window assignment). Displays a normal camera. -
Page 19: Live Screen Menu
live Check multichannel Cameras list live Screen menu For multichannel cameras registered with the Wisenet protocol, the channel information will be displayed under After selecting the desired channel on the split mode, roll the mouse cursor over the screen to see the live screen the model name of the multichannel camera. -
Page 20: Icons On The Live Screen
■ Icons on the live Screen The 'Live4NVR' profile is added automatically with network camera auto registration, and settings can be changed according to the user environment. ■ You can check the status or operation with the icons on the live screen. Depending on camera specification, you may not be able to add a profile or if you have the PLUGINFREE profile, you will not be able to add the Live4NVR profile. -
Page 21: Channel Information Display
live Channel Information Display Checking the Camera Status To check the channel information, click < > at the bottom of the screen. To check the status of all cameras connected to the decoder, click < > at the bottom of the screen. The information of the current video is displayed on the live video which is being monitored. -
Page 22: Channel Setting
CH10 CH10 CH11 CH11 CH12 CH12 CH13 CH13 CH10 CH11 CH12 CH10 CH13 CH14 CH13 CH14 CH15 CH11 CH12 CH15 CH16 CH16 Channel Setting Change Split mode CH10 CH13 CH14 You can display the channel in a desired area of a split screen. You can change the split mode of the screen. -
Page 23: Full Screen Mode
live full Screen mode lAyOUT SETUp You can change to full screen mode, which has no top/bottom/left/right areas of the live screen. This section outlines how to select a series of channels based on their purpose/accessibility and monitor them in a single layout. -
Page 24: Add Layout And Set Name
Add layout and Set Name Dynamic layout You can set the size and position of the video assigned to the layout as desired. 1. Click < > to add a layout. ■ 2. Click < > to set the name for the added layout. The dynamic layout function can only be set on the primary monitor. - Page 25 live zooming In and Out of Videos moving Videos You can zoom in or out of the video by dragging a corner or vertex of the video in the desired direction. To move the video, click the video and then drag and drop it in the desired location. If you double-click the corner or vertex of the zoomed in video area, the video will be zoomed out incrementally.
-
Page 26: Play Layout Sequence
play layout Sequence CAmERA VIDEO CONTROl You can automatically switch the layout list to a set time interval to view. By using the function icon of the video window, you can easily use the functions of capture, video zoom, PTZ camera, and thermal imaging camera. -
Page 27: Temperature Detection Mode
live Temperature Detection mode pTz mode For images that support the thermal imaging camera function, you can click the desired point to check the You can run PTZ control of the selected channel. temperature information. Select the desired channel and click < >. -
Page 28: Zoom In
zoom in Change Channel Aspect Ratio You can zoom in or out the video via digital zoom. You can change the aspect ratio of each channel. Select the desired channel and click < >. Select the desired channel and click < >. -
Page 29: Dewarping
PTZ driver (physical device). ■ It only supports a network camera with Hanwha Techwin's PTZ function and a camera registered in the ONVIF. pTz Control menu You can use a single camera to perform the Pan, Tilt, and Zoom operations to monitor multiple places, and configure the custom settings of the presets in the desired mode. -
Page 30: Using Digital Ptz (D-Ptz) Function
Using Digital pTz (D-pTz) function Name Functions Zoom out/ 1. Register a camera that supports the D-PTZ profile. Activate the Zoom operation of the PTZ camera. ■ Zoom in In cameras that support the D-PTZ profile, you can use the D-PTZ function. Near/Far You can adjust the focus manually. -
Page 31: Running Preset
live To delete a registered preset 1. Click < >. 2. Click < >. The "Delete preset" window will appear. 3. Click < > to select the preset to delete. 4. Click <Delete>. The selected preset will be deleted. Running preset 1. -
Page 32: Setup
setup SETTINg ThE CAmERA The camera, device, network and system can be set up. ■ You can access the channel setup, camera setup, profiles, and camera password-related settings. You can check the following setup screen configuration when it is in <Standalone> operation mode. Channel setup SCREEN lAyOUT Of ThE SETUp You can register a network camera for each channel and make connections between them. - Page 33 When changing the camera ID and password in the camera webviewer, if the camera is already registered on a decoder, you must change the ID – Wisenet Multi-Channel: You can register Hanwha Techwin's multi-directional cameras and multi-imager and password of the camera registered on the decoder as well.
- Page 34 To check the error details of camera registration ● Address type: Select the access address type of a camera. ■ The supported address type may differ depending on the type of the connected product. If you failed to register a camera, the reason for the failure will be displayed. Connection failed due to an unknown reason : This message appears if the camera has failed to be –...
-
Page 35: Camera Setup
setup Network Camera firmware Upgrade Camera setup You can set the camera while viewing the live video of the selected camera. Setup > Camera > Camera setup ● Channel: Displays channel information. Model: Displays the camera model information. ● ■ ●... -
Page 36: Profile Setup
profile setup ● SSNR: Reduce noise, even in dark places, and minimize the afterimage of the object to control brightness. ● Sens-up: Automatically adjusts the shutter speed according to the brightness of the current light. ● IRIS/Lens: Adjusts the brightness by automatically or manually adjusting the camera IRIS and lens. Setting the live profile ●... - Page 37 setup Setting the Remote profile Editing the profiles You can set the video profile transmitted to the network. You can change the video settings of a registered network camera for each channel. Setup > Camera > profile setup > Remote Setup >...
- Page 38 Dewarping Setup how to set WiseStream Press the <Dewarping> button at the bottom of the <Detailed profile configuration> window to go to the Function to analyze the complexity of the video and effectively reduce the data size while maintaining the distortion correction setup popup window for each channel.
-
Page 39: Camera Password Setup
setup Dynamic gOV/fpS setup Camera password setup Dynamic GOV is a function that automatically changes the length of GOV depending on the video situation. For You can change the passwords of all registered cameras at once. details, refer to the camera's help or the product's user guide. You can register the ID and password of the camera that you use. -
Page 40: Setting The Device
SETTINg ThE DEVICE Expansion monitor settings This function is only available for products that support the use of an extended monitor. Can make detailed settings related to the monitor. monitor You can set the information displayed on the monitor the information location as well as the video output method. -
Page 41: Setting The Network
setup Display position settings SETTINg ThE NETWORK On some monitors, depending on their status, the information of a decoder (camera name, icon) may not be The network settings of decoders can be set up. displayed. Then, you can change the display position of the data. Ip &... - Page 42 Connecting and Setting the Network Setting the DhCp Ip Address of the broadband Router ● Networking may differ from the connection method, check your environment before setting the connection 1. Enter the access address of the IP router in the internet browser of the local PC connected to the IP router to mode.
-
Page 43: Ip Filtering
setup Ip filtering hTTpS You can create a list of IPs to allow or deny access to a specific IP. You can choose a secure connection system or install a certificate. Setup > Network > Ip filtering Setup > Network > hTTpS ●... -
Page 44: 802.1X
802.1x SNmp When connecting the network, select whether to use the 802.1x protocol and install the certificate. The SNMP protocol allows system or network administrators to remotely monitor and configure the network devices. 802.1x is an authentication system between a server and a client, which prevents hacking, virus infection, and information leakage of transmitted and received network data. -
Page 45: Setting The System
setup SETTINg ThE SySTEm ● Holiday: A user can select specific dates as holidays according to their own preferences. Select a holiday from the calendar displayed by clicking <Setup>. You can set the date, language, authority, etc. displayed when using the system, and query system information or log information. -
Page 46: User
User User setting You can create user groups and set authorities for each group. You can manage user information such as You can manage users, such by adding or deleting users and granting different authority to each user. registering and deleting users in the created user group. Setting the Administrator Setup >... - Page 47 setup To register a user Setting permissions Set user's restricted access or network restriction. Items with restrictions will require logging in for use. Setup > System > User > Restriction settings 1. Click on the < > button to launch the user addition popup window. To add a user, click on <Ok>.
-
Page 48: System Management
If the user has restricted access System management If a general user selects a menu to which they do not have access, an access restriction confirmation window will You can check the current system version and update it to a new version, export data, reset settings, and more. be displayed. - Page 49 setup To upgrade the current software version managing setup information You can set the operation mode to control the decoder. In addition, you can apply the same settings in use to Setup > System > System management > product information other decoders or initialize the product.
-
Page 50: Log
System Log shows log and timestamp on every system start up, system shutdown, and changes on system settings. Setup > System > log ● Search date: You can use the calendar window which appears when using the calendar icon or the direction buttons to select the date to search the system log. -
Page 51: Starting Web Viewer
starting web viewer WhAT IS WEb VIEWER? CONNECTINg WEb VIEWER The web viewer is a software program that the operator can access remotely to change the decoder setup. 1. Open your web browser and type the IP address or URL of the decoder into the URL address box. 2. -
Page 52: Installation Wizard
INSTAllATION WIzARD 3. Set the network connection type and the connection environment on the <Network> screen, and then click the <Next> button. As shown below, proceed through each step of the <Installation wizard>. Installation Wizard can only be accessed at factory default status. If you do not want to proceed, click <Exit>. ■... - Page 53 starting web viewer 6. Select an operation mode that can control the decoder from the <Operation mode> screen. Standalone: Can control Live monitoring and the setting changes of the camera on a decoder. ● You can only change admin account information and operation mode in the web viewer. ●...
-
Page 54: Live Viewer
For channels in which cameras are not registered, < > is displayed at the center of the screen. The ID of the connected user is displayed. You will be directly connected to the Hanwha Techwin homepage (www.hanwha-security.com). Changes the color theme of Web Viewer. Menu title... -
Page 55: Checking The Camera List
live viewer ChECKINg ThE CAmERA lIST ChECKINg ThE All CAmERA STATUS Displays the camera type, status, and name registered in the decoder. You can check the status of all cameras connected to the decoder. live > list live Status Click < >. -
Page 56: Layout Setup
lAyOUT SETUp Changing layout Names This section outlines how to select a series of channels based on their purpose/accessibility and monitor them in a 1. Click < > after selecting the layout to change the name. single layout. 2. Click < >... -
Page 57: Setup Viewer
setup viewer SETTINg ThE CAmERA You can configure the decoder settings remotely on the network. ■ You can check the following set viewer screen configuration when it is in <WEB> operation mode. You can search and set the camera connected to the decoder. ■... -
Page 58: Profile Setup
When you click the <Camera webviewer> button, a new camera web browser window will be run. profile setup ● – This is not supported if the camera is connected to the RTSP protocol. You can set the profile for a network camera. –... -
Page 59: Camera Password Setup
setup viewer Camera password setup SETTINg ThE DEVICE You can change the passwords of all registered cameras at once. Can make detailed settings related to the monitor. For details, refer to the "Setup > Setting the Device" page in the table of contents. Setup >... -
Page 60: Setting The Network
SETTINg ThE NETWORK Ip filtering You can prepare a list of IP addresses to allow or deny access to a specific IP address. For details, refer to the "Setup > Setting the Network" page in the table of contents. Setup > Network > Ip filtering Ip &... -
Page 61: 802.1X
setup viewer 802.1x SETTINg ThE SySTEm When connecting to a network, you can select whether to use the 802.1x protocol and install a certificate. You can configure the various settings of the decoder system. For details, refer to the "Setup > Setting the System" page in the table of contents. Setup >... -
Page 62: User
User Restriction settings You can set the user's permission. You can manage users, such by adding or deleting users and granting different authority to each user. Setup > System > User Administrator You can change the admin ID or the password. System management You can check the current system version and update it to a new version, export data, reset settings, and more. -
Page 63: Log
setup viewer Settings You can set the operation mode to control the decoder. In addition, you can apply the settings in use to other decoders or initialize the product. Items in the <Exception> category are excluded from the initialization. You can check the log information related to the system. Setup >... -
Page 64: Appendix
appendix USINg VIRTUAl KEybOARD TROUblEShOOTINg (fAQ) Problem Action Live video is slow or cut off. ● The frame number set for multiple data transmissions that are set in a camera or network environment could differ from the actual rate of transmission. Click <... - Page 65 appendix Problem Action The time setup window will pop up. ● This message is displayed if there occurs a problem with the time setting of the internal clock or an error in the decoder internal clock. Contact the retailer or the service center for more information. I have connected an external storage device (USB Memory) to ●...
Need help?
Do you have a question about the Wisenet SPD-152 and is the answer not in the manual?
Questions and answers