Advertisement
Quick Links
Video Wall Controller Series
Manual
Table of Contents
1.
Warranty and RMA .......................................................................................................................... 5
2.
Safety Precautions ........................................................................................................................... 6
3.
Product Introduction ....................................................................................................................... 8
4.
Know Your Appliance ..................................................................................................................... 10
5.
Getting Started .............................................................................................................................. 12
6.
Setup .............................................................................................................................................. 14
7.
Support .......................................................................................................................................... 21
7.1
Frequently Asked Questions ................................................................................................... 22
Revision History
Version
Date
2.0
31/03/2020
3.0
25/11/2020
Notes
Advertisement

Related Manuals for Hanwha Techwin Video Wall Controller Series


Summary of Contents for Hanwha Techwin Video Wall Controller Series
-
Page 1: Table Of Contents
Video Wall Controller Series Manual Table of Contents Warranty and RMA .......................... 5 Safety Precautions ........................... 6 Product Introduction ........................8 Know Your Appliance ........................10 Getting Started ..........................12 Setup .............................. 14 Support ............................21 Frequently Asked Questions ....................22... - Page 2 Video Wall Controller Series Manual Preface Throughout the remainder of this document the product titles Eight1080, Six4K and Nano4K will be identified as the “appliance”. Please see product quick start guide for installation and basic setup guidance. Copyright BlueBox Video Limited claims copyright on this documentation. This publication, including all images, drawings and software, is protected under international copyright laws, with all rights reserved.
- Page 3 Video Wall Controller Series Manual Declaration of Conformity This section provides the FCC compliance statement for Class A devices and describes how to keep the system CE compliant. For EMC compliance, good quality shielded cables or adapters should be used for connection from the appliance to the display device.
-
Page 4: Warranty And Rma
Video Wall Controller Series Manual 1. Warranty and RMA Warranty Period Products will be free from defects in material and workmanship for 3 years, beginning on the date of purchase invoice. Return Merchandise Authorization (RMA) Customers must collect and detail all the information about the problems encountered and note anything abnormal or, print out any on-screen messages, and describe the problems to our repair team via email. -
Page 5: Safety Precautions
Video Wall Controller Series Manual 2. Safety Precautions WARNING: Read these instructions carefully! Follow all warnings and instructions specified within this document and/or on the equipment. All cautions should be noted. CAUTION: The unit will be powered on upon connecting a valid power supply source. Please make sure to properly shut- down the device’s operating system prior to removing power. - Page 6 Video Wall Controller Series Manual 15. The appliance should be installed by qualified personnel only (persons having the appropriate technical training and experience necessary for product installation). 16. Nano4K: The equipment should be installed in a FIXED (Wall/Monitor Mount) or DESKTOP configuration 17.
-
Page 7: Product Introduction
Video Wall Controller Series Manual 3. Product Introduction Overview The appliance platform provides a high definition, compact video wall with recording options for command and control surveillance environments. Equipped with up to 8 1080p/4k outputs, simplifying traditional video wall systems by reducing footprint to a powerful, single condensed 2U appliance. - Page 8 Video Wall Controller Series Manual Hardware Specifications Appliance Eight1080 Six4K Nano4K Platform Modular Embedded Modular Embedded Embedded SBC Motherboard Motherboard Processor 7th Gen Intel 7th Gen Intel 7th Gen Intel Graphics Intel NVidia Intel Memory 2 x 4GB Dual DDR4,...
-
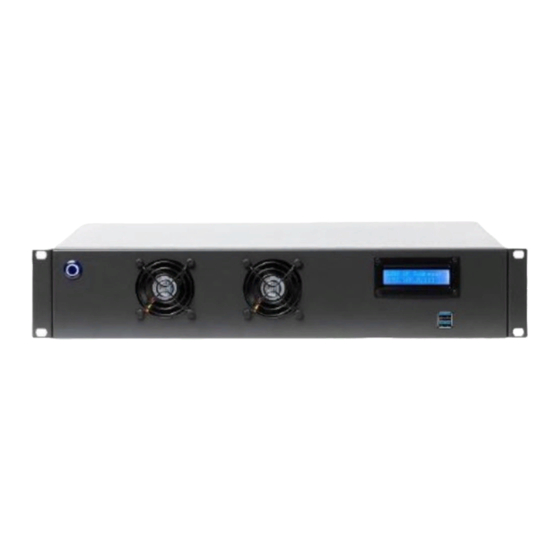
Page 9: Know Your Appliance
Video Wall Controller Series Manual 4. Know Your Appliance Eight1080 and Six4K Front Panel Power Button Power switch to power on/off the system. Display Appliance display shows import appliance metrics for easy inspection. USB 3.0 Ports Used to connect USB 3.0/2.0 devices. - Page 10 Video Wall Controller Series Manual Know Your Appliance Nano4K Front Panel Power Button and Power LED Power switch to power on/off the system and LED to show system powered. USB 3.0 Ports Used to connect USB 3.0/2.0 devices. USB 2.0 Ports Used to connect USB 2.0 devices.
-
Page 11: Getting Started
Video Wall Controller Series Manual Getting Started Port Guide Physical Installation The Eight1080 and Six4K are all 2U rack mountable systems. The appliance can either be desktop mounted or installed in a standard 19” rack enclosure. Use the enclosure mounting tabs to secure the unit within the rack. Supporting rails or a supporting shelf are always recommended to ensure a more stable installation. - Page 12 Video Wall Controller Series Manual It is recommended that if DisplayPort to HDMI adapters are required, only Active types are used. It is strongly advised against the use of passive adapters. Operation of the unit cannot be guaranteed with the use of passive adapters.
-
Page 13: Setup
Video Wall Controller Series Manual disconnect from wall outlet, and remove any built up dust from the side ventilation holes and fan grills using a soft dry cloth. Note: Failure to keep ventilation holes clear could result in damage to unit and invalidate the warranty. - Page 14 Video Wall Controller Series Manual Connect C13 power cable to AC input connector on appliance and mains socket.Power on the unit by pressing the power button, LED will illuminate to show the appliance is powered. Nano4K: Connect external power supply to mains socket and DC input connector on appliance. Power on the unit by pressing the power button, LED will illuminate to show the appliance is powered.
- Page 15 Video Wall Controller Series Manual Settings Page: The following settings are currently available: Display Setting: Allows user to configure display settings Network Settings: Allows user to configure network port settings including static and DHCP settings Global Settings: General hardware and software settings...
- Page 16 Video Wall Controller Series Manual Display Settings: The remote display settings page allows the user to arrange the display layout on the video wall appliance. The “Display Arrangement” drop-down contains the current available arrangements based on the connected and discovered outputs in addition to what resolutions the displays attached support.
- Page 17 Video Wall Controller Series Manual Once layout is correct use the “Apply” button to update the settings on the video wall appliance. If any displays are not detected it is recommended to press the “Redetect” button. Select the “Lock Displays” option to allow monitors to be turned off and on without Windows re-arranging the Desktop.
- Page 18 Video Wall Controller Series Manual Click “Apply Changes” to set the configuration. NOTE: when changing network settings on the appliance, you may be required to reload or refresh the AWP browser page. Adding Inputs: Inputs are sourced from supported video servers, ONVIF compatible devices or through manually adding inputs.
- Page 19 Video Wall Controller Series Manual ‘TARGET SERVER’ lists supported input servers. Select an integration type from the drop down list. Use the link at the bottom of the pop up windows to view the setup instructions and connection diagram for the selected integration.
-
Page 20: Support
Video Wall Controller Series Manual Video Capture Cards: Supported audio video capture cards are automatically enumerated by the appliance at startup and presented to the user in the ‘Layout’ page under the heading ‘Capture’. For further details, information and guides, see ‘Getting Started’ found in the AWP ‘Help’ page. -
Page 21: Frequently Asked Questions
Video Wall Controller Series Manual 7.1 Frequently Asked Questions Q: No signal is detected by my display monitor(s). A: Try the following actions: 1. Power Cycle Monitor 2. Try Disconnecting and Reconnecting cable 3. Restart System 4. Try a Shorter Cable... - Page 22 Video Wall Controller Series Manual...
Need help?
Do you have a question about the Video Wall Controller Series and is the answer not in the manual?
Questions and answers