Advertisement
2020-2022 Ford Super Duty OEM-Style Bed Lighting Kit
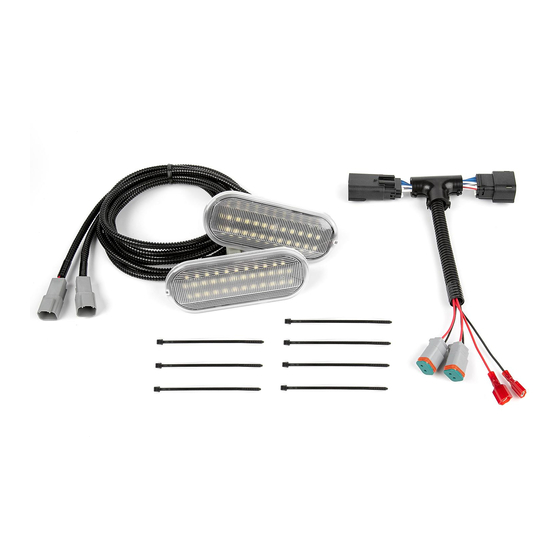
Parts List:
LED Lamp & Wiring
T-Adapter harness
Parts Bag PB-4580
Thank you for purchasing one of our products. Please familiarize yourself with the parts included as well
as the instructions before attempting installation. Please seek the help of a certified technician if you feel
unable to complete the installation safely and properly. Failure to read and follow the instructions below
may result in personal injury or damage to property. Starkey Products, Inc. and our retailers assume no
liability for failures to comply with guidelines and warnings outlined in this instruction manual.
How-To Determine if your Super Duty is pre-wired for Bed Lighting:
Some trucks come pre-wired. All trucks equipped with the Trailer Assist Lamp, as well as some trucks
with a factory-installed tow package are pre-wired. In order for this kit to work without any other
components, your truck must be pre-wired for the CLN06 Circuit in order for the T-Adapter to provide
power to your bed lighting. If your truck is not pre-wired, you will also need
Extension Wiring
which can be purchased separately.
To determine if your truck is pre-wired, check the C4003 inline connector. This
12-Pin connector is behind the rear bumper on the driver side of the truck. This
connector is Black and has a clip that keeps it attached to the truck. On the plug
shown below, the following wire should be present. This wire will be found on the
left side connector, as shown in picture 1. Scan the QR code for video instructions.
2020-2022 = Pin #7 (White with Brown Stripe)
Installing LED Lamps:
1. Remove the plastic oval plugs located in the bed lighting holes. If you have a spray in bed liner,
you may need to run a razor blade around the edge of the plug to prevent accidental removal of the
bed liner coating.
2. Install each LED lamp. First, run the wiring into the hole vacated by the plug you just removed.
There is a notch on the top side of the lamp that will face upward. There is a clip on the bottom
side of the LED lamp. This clip will face downward. Install the top (notch) side first, then push
bottom side in to clip. Repeat with the other LED lamp.
3. Locate the 12-Pin connector behind the bumper on the driver side of the truck. This connector is
black and has a clip that keeps it attached to the truck. See picture 1 below.
4. Unplug the connector by depressing the tab on the side and separating the 2 connectors. Be sure to
pull by the connector body, and not on the wiring.
5. Install the Starkey T-Adapter inline to connect the 2 factory connectors. Note: This connector is
keyed so you can't accidentally connect it to the wrong plug.
Quantity:
2
1
1
For additional tips and
tricks, watch the
installation video by
visiting our website or
scanning the QR code
with your smartphone!
Tool List:
Flat head screwdriver
13mm wrench
Pliers
Starkey #4572 Power
© 2022 Starkey Products, Inc.
Part Number: 6280
Scan the QR code with
your smartphone
Page 1
Version 1.0
Advertisement
Table of Contents

Related Manuals for Starkey 6280


Summary of Contents for Starkey 6280
- Page 1 Failure to read and follow the instructions below may result in personal injury or damage to property. Starkey Products, Inc. and our retailers assume no liability for failures to comply with guidelines and warnings outlined in this instruction manual.
- Page 2 8. If you have determined your truck is pre-wired, jump to the Final Installation on page 4. Otherwise proceed to the next step. Installing Starkey 4572 Power Extension for trucks that are NOT pre-wired: 1. Disconnect negative (black) battery cables from BOTH truck batteries. This is done by loosening the bolt located on the side of the battery cable terminal with a wrench.
- Page 3 Do not cut Wire! 14. Plug the red wire from the Starkey wiring extension into the back of the wire tap. See picture 6. 15. Re-connect the large black connector. Be certain to pull the white bar to the side to insure the connector snaps back into place.
- Page 4 If you would like to keep the lights on longer than the 25 second time out, you can press the button for the bed lights on the left side of the headlight switch to activate them for 10 minutes. Page 4 Version 1.0 © 2022 Starkey Products, Inc.
- Page 5 Inc. or its authorized dealers. Warranty is effective for five years from the date of purchase. Coverage terminates if you sell or transfer ownership of the product. Starkey Products will repair or replace the defective or malfunctioning product or any defective or malfunctioning part thereof at no charge. This warranty covers parts and labor only.
Need help?
Do you have a question about the 6280 and is the answer not in the manual?
Questions and answers