Advertisement
Quick Links
Atlas 1 User Manual
This document is distributed for Atlas 1 users that want the original user
manual. We suggest that you also look at the Atlas 2 documentation. While
some of the hardware capabilities are different, the Atlas 1 will receive many
of the same software features via continuing updates.
Welcome to the future of sailing. The Atlas is the culmination of years of work
and the cornerstone of a growing ecosystems of sensors and displays. This
guide covers the last version of the Atlas 1 firmware prior to the release of the
Atlas 2. New versions are released regularly with new features and
improvements—see Vakaros Connect, below, for more details.
Advertisement

Summary of Contents for Vakaros Atlas 1
- Page 1 Welcome to the future of sailing. The Atlas is the culmination of years of work and the cornerstone of a growing ecosystems of sensors and displays. This guide covers the last version of the Atlas 1 firmware prior to the release of the Atlas 2. New versions are released regularly with new features and...
-
Page 2: Display And Buttons
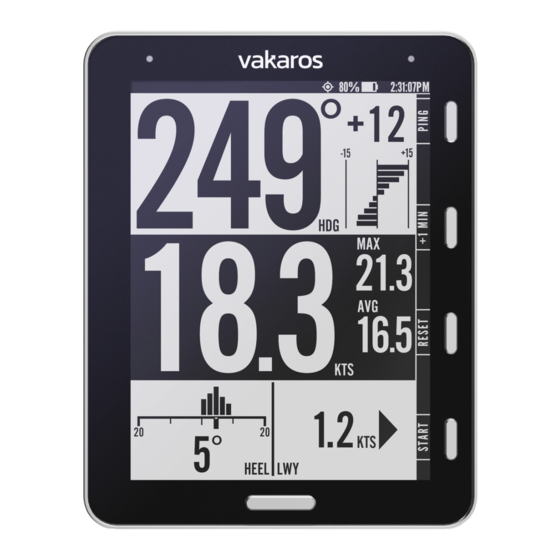
Power: Press and hold the Power/Menu button to turn the Atlas on or off. To charge the Atlas, connect the USB end of the included charging cable a USB charger. Then attach the magnetic end to the charging port on the Atlas. It is recommended to charge your Atlas to full capacity at least once every 3 months. - Page 3 displays show the current value in degrees and consistency bars, measuring how steady the boat has been in heel and trim. Other layouts are shown at right, including the starting screen, with the start timer and distance to line, as well as a graphical starting screen, which shows the position of the boat relative to the line.
- Page 5 Line Menu — Start line setup The Atlas is designed to help you get a great start to any race, showing a highly accurate measure of distance to line (DTL), as well as a start timer. To measure DTL, begin by pressing the LINE button to record the locations of the marks which define the starting line.
- Page 6 Angle Menu — Shift tracking and reference angles To set up shift tracking on the Atlas, press the ANGLE button to bring up the ANGLE Menu. There are two options for setting port and starboard reference angles, an automatic method and a manual method: 1.
- Page 7 allowing the crew to sail the boat normally, without needing to interact with the Atlas once the process is started. 2. Manual method You can also set the Port and Starboard reference angles by pressing the corresponding PORT and STBD buttons on the ANGLE screen to record the current heading.
- Page 8 Mounting: In order to mount the Atlas to your boat, you will need to attach the included Atlas Mount to the boat. The mount can be attached directly to a mast track, bulkhead, or any flat surface using the two provided 6-32 screws or by running a velcro strap through the hole in the side.
- Page 9 quick-release end of the mount until it clicks securely into place. To remove the Atlas, press the Atlas gently towards the mount, pull on the quick-release tab, tilt the Atlas away from the mount to remove it. For maximum mounting security, tie a safety line to the lanyard loop on the bottom left corner of the Atlas.
-
Page 10: Care Instructions
Don't leave the Atlas submerged in water for extended periods. Vakaros Connect App: Vakaros Connect is available in the iOS and Android app stores. Vakaros Connect links wirelessly with your Atlas to provide firmware updates and a live data view. Upcoming releases will add support for customizing settings and displays on the Atlas, as well as downloading your sailing data.
Need help?
Do you have a question about the Atlas 1 and is the answer not in the manual?
Questions and answers