LG PC389S Owner's Manual
Hide thumbs
Also See for PC389S:
- Simple manual (48 pages) ,
- User manual (45 pages) ,
- Simple manual (11 pages)

Related Manuals for LG PC389S


Summary of Contents for LG PC389S
- Page 1 Owner’s manual Please read this manual carefully before operating your device. MODEL: PC389P / PC389S You can print easily the photo via Bluetooth® The actual device may differ from the image.
-
Page 2: Safety Information
Safety information WARNING: TO PREVENT FIRE OR ELECTRIC SHOCK HAZARD, DO NOT EXPOSE THIS PRODUCT TO RAIN CAUTION OR MOISTURE. WARNING: Do not install this equipment in a confined RISK OF ELECTRIC SHOCK space such as a book case or similar unit. DO NOT OPEN CAUTION: Do not use high voltage products around CAUTION: TO REDUCE THE RISK OF ELECTRIC SHOCK... - Page 3 This device is equipped with a portable battery or CAUTION concerning the Power Cord accumulator. The Power Plug is the disconnecting device. In case How to Safely remove the batteries or the battery of an emergency, the Power Plug must remain readily pack from the equipment: To Remove the old batteries accessible.
- Page 4 WARNING: y Do not look through the view finder at the sun or other strong light. y The flash may turn on in dark places. y Do not wet your Pocket Photo or hold it with wet - Do not use a flash too close to a person’s eyes. hands.
- Page 5 CAUTION: y Place the product on a sturdy, level surface. y The apparatus should not be exposed to water y When used by children, adult care is required. (dripping or splashing) and objects filled with liquids, y Do not use during exercise, walking or driving. such as vases, shouldn’t be placed on the apparatus.
- Page 6 Note Device operating temperature When operating in cold weather, the device may not print. Bring it inside from the cold and give about 10 minutes to adjust to the specified operating temperature (5 °C - 35 °C (41 °F - 95 °F)). Then try printing again. (For the appropriate use, it is recommended not to operate it outdoors in winter.) >...
-
Page 7: Table Of Contents
Contents STEP 6 Printing Photo . . . . . . . . . . . . . . . . . . 19 Printing using Android phone . -
Page 8: Step 1 Getting Started
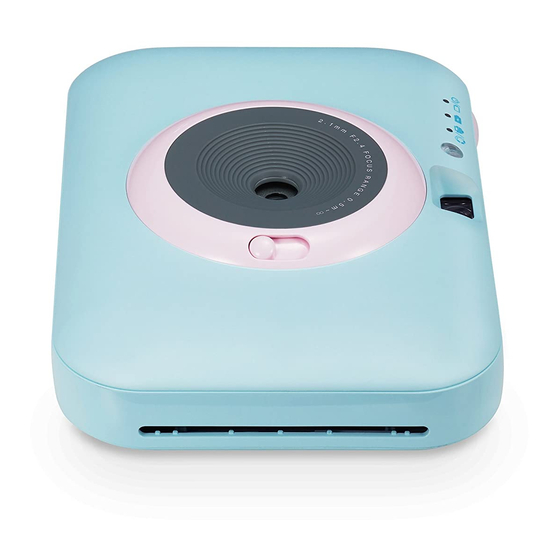
*Reset hole LED indicator Flash Shutter ( Power) button Simple manual LG Pocket Photo Printer (Reprint) button Paper exit slot Lens View finder *Reset hole: If you need to reset, press in the hole. USB cable (Type C) -
Page 9: Step 2 Inserting Photo Cartridge
STEP 2 Inserting Photo Insertion part of Photo cartridge Cartridge Strap hole 1. Slide the cover button sideways to open the bottom cover. Cover button 2. Unpack the photo cartridge you bought. - Page 10 As shown in the following 4. Press the cover to close it completely. picture, lightly knock the photo cartridge in the direction of the arrow 2 or 3 times to align the paper to the back and put it in the Pocket Photo.
-
Page 11: About Photo Cartridge
When opening the bottom cover to replace the photo cartridge, be careful not to touch the Use exclusive photo cartridge for LG Pocket Photo. inside of the Insertion part of Photo cartridge Otherwise, the print quality cannot be guaranteed, (print head) and its surroundings. - Page 12 Do not leave in a place where the temperature or humidity is too high or low. It may reduce Use exclusive Cartridge for LG Pocket Photo. the quality of the printed photo. y Using photo cartridge from other company...
-
Page 13: Step 3 Power On / Off
STEP 3 > Caution Power On / Off Moving a Pocket Photo from a cold place to a warm place can cause dew on the inside / outside and print quality may deteriorate. Allow the dew to dry sufficiently before using the device. Note y When turning the device on, LED indicator flashes for 3 seconds, then printing is... -
Page 14: Step 4 Checking Battery Status
STEP 4 While the unit is on, if the battery is low, the LED Checking battery indicators will blink quickly and turn off. status Charging Battery When you disconnect the Pocket Photo from the This device uses a built-in battery. Before using it, charging cable, you can check the battery charge status fully charge the battery using a USB cable (Type C) or via the LED indicators... - Page 15 0 % : Blinks quickly and turns off. y Avoid too high or low temperature or humidity. y LG Pocket Photo is always charged when connected y The high-speed charging is not supported, to the power supply except when printing.
-
Page 16: Step 5 Installing App
From Play Store (Android market) y The operating time on battery may vary depending on the battery status, operational Search for “LG Pocket Photo” . status and environment conditions. Using QR code y When the battery is discharged, printing is... -
Page 17: App Setting
y Bluetooth: When you turn on Bluetooth in the App Setting Pocket Photo app, the Bluetooth on your Android phone turns on. Bluetooth® Set the options in [ Setting ] [Print Connection Mode]. y Shake & Print: When you turn on Shake & Print mode, select the desired photo from the main screen of the Pocket Photo app and then shake your smartphone to print. -
Page 18: Installing App For Iphone
Installing App for iPhone From App Store Search for “LG Pocket Photo” . Using QR code You can enter the App Store by scanning the QR code on the product box. Setting Bluetooth of iPhone 1. On your iPhone’s home screen, touch [Settings]. -
Page 19: Step 6 Printing Photo
Bluetooth® Preparation: Turn the device on, and start printing with the LED indicator turning on. 1. Run LG Pocket Photo App on Android phone. 2. Select a photo to print, and touch [ ] (Print) on Pocket Photo App. 3. [Device Connection] window appears. Touch [CONNECT THE DEVICE], then it will start searching for Bluetooth devices. - Page 20 > Caution y Check the power of the Pocket Photo, when your device can not search for Bluetooth device. y A photo file of less than 10 MB can be printed in case of Android. y Setting screen may differ depending on the phone manufacturer.
- Page 21 Setting Pocket Photo App of Android phone You can change setting of printing method and Automatic device power off in [Print setting]. 1. Run LG Pocket Photo App on Android phone. y Printing Method: You can set the printing method of 2. Go to [ Setting] .
-
Page 22: Printing Using Iphone
LED indicator turning on. y It is recommended to keep the default settings of the device. 1. Run LG Pocket Photo App on iPhone. 2. Select a photo to print, and touch [ ] (Print) on Pocket Photo App. - Page 23 Setting iPhone Pocket Photo App You can check device condition, battery status, total printed photos, MAC address and firmware version. 1. Run LG Pocket Photo App on iPhone. (To check [Device information], set the iPhone Bluetooth to [On]). 2. You can check the device information by touching...
- Page 24 You can change the settings for the printing method Note and Automatic device power off in [Print setting]. y If you change the time of Automatic Device y Printing Method: You can set the printing method of Power Off, the maximum number of prints can photo.
-
Page 25: Using The Edit Mode
*ISO 24712 is the color standard regulated by ISO. y If there are more than one LG Pocket Photo device, check the MAC address on the label to choose the one you want to use. (Refer to “Checking Label”). - Page 26 > y The Bluetooth searching and transferring may fail Caution depending on its environment. Check the Bluetooth y Do not pull paper out by force during printing. condition on your phone and try again. y Do not open the cover during printing or do y If pairing multiple smartphones, re-pairing may occur.
-
Page 27: Checking Where To Buy Paper
Checking where to buy paper y The printing quality may differ depending on 1. To check where to buy paper, go to [ setting]. the original image (When too dark or dim). 2. After touching [Where to buy paper], select a Use the image after correcting it using Pocket country. -
Page 28: Updating The Device
Updating the device Note You can update the device by pairing smart phone to y During the device update procedure, do not the latest software to enhance the products operation turn off the power or press Reset button. and /or add new features. y This device cannot be updated to previous 1. -
Page 29: Step 7 Taking Photos And Instant Printing
STEP 7 3. Hold the Pocket Photo, confirm the desired Taking photos and composition of the final image by using view finder. (It is recommended that you use the viewfinder instant printing eyepiece within 10 mm. (0.39 inches)) Taking photos 1. - Page 30 Note on taking photo (Reprint) button y Be careful not to touch the lens surface when you take the photo. Shutter y Use a blower, cotton bud or soft cloth to remove dirt on the lens or view finder. y Do not interrupt the flash, lens or paper exit View finder slot with finger or strap.
- Page 31 Note Note y Only the last photo shot with the camera or y The subject will be out of focus if the distance the last printed image with the app can be is less than 0.5 m. (1.64 ft) reprinted. You can not use reprint function y Keep your eyes close to the viewfinder when when the power is turned off or reset.
-
Page 32: Printing Black-And-White Photo
> Printing black-and-white photo Caution If you switch your Pocket Photo to black-and-white y You can not switch to black-and-white shooting mode, you can print the photo in black and shooting mode, if you do not have a photo white when taking photos. cartridge in Pocket Photo. - Page 33 Note 3. Press Shutter button for 5 seconds. The will light up in white and switch to black-and-white y When printing via the Pocket Photo app, the shooting mode. camera prints in color even if it is set to black- and-white shooting mode.
-
Page 34: Using A Strap
Using a strap Wind (Attach) the strap as shown in the below image In case there are more than a LG Pocket Photo device, to prevent dropping the Pocket Photo when you are check MAC address on the product label to choose one carrying it or when taking a photo. -
Page 35: About Led Indicator
About LED Indicator The LED indicators shows the device condition. Product label. : LED On : LED Blinks 프린트 대기/ 켜짐 (흰색) : LED Off 전원을 켤때/ Section LED color Condition Description 깜박임 2. You can find the product label. (흰색) To print, turn 전원... - Page 36 인쇄 중 인쇄 준비 배터리 30% 업데이트 Section LED color Condition Description Section 이상(흰색)/ LED color Condition Description 프린트 대기/ 프로그램 5장 이상 출력 켜짐 읽는 중 배터리 30% 가능 (흰색) 프린트 대기/ 이상(흰색)/ Waits for 켜짐 Remaining 5장 이상 출력 인쇄...
- Page 37 용지 부족 커버 열림 용지 걸림 에러 Section LED color Condition Description Section LED color Condition Description 리프린트할 출력물 없음 Printing When you take (3회) black-and- 인쇄 준비 (While a photo, black 업데이트 white shooting 흑백모드 프로그램 continuous and white 리프린트할...
-
Page 38: Specifications
Specifications Section LED color Condition Description No paper, Insert the Paper jam/ photo cartridge 63 mm x 94 mm (2.5 inches x Paper size Blinks then try again. 3.7 inches) Turn down Image Sensor CMOS the lens cover Closed the lens Resolution switch when 310 dpi... - Page 39 Paper Feeding Power / Waiting / Bluetooth Automatic transmitting / Charging / Error LED indicator / Condition of printer/ Update / Flash Auto (White LED) Black-and-White shooting mode PNG, JPEG (Baseline) / less than setting Image file type/ 10 MB (Progressive JPEG is not size supported.) Communication...
-
Page 40: Troubleshooting
Troubleshooting y Your phone may be incompatible with the device depending on its manufacturer, environment or (Android or iOS) operating system. Symptom Cause / Solution y Design and specifications are subject to change No power The battery is discharged. without prior notice. Be sure the device is connected to charger or PC properly when y All other product and brand names are trademarks... - Page 41 The paper is The printed photo If there are foreign substance 1. Turn the device off and on jammed before has lines. or dust on the inside of again then the paper will be printing. ejected automatically. the Insertion part of Photo No or incomplete The paper is image is printed.
- Page 42 White space When print mode is set to Device does not Preheating is needed. Wait for appears at the edge [Image Full] , white space may print. about 2 minutes. of the paper. appear if the aspect ratio of Be sure there are photo papers the paper and your image is not in the device.
- Page 43 The printed The printed Take a photo with a distance of at Keep your eyes close to the photo is out of least 0.5 m (1.64 ft) between you photo is viewfinder when taking photos. focus by taking and your subject. different from Then confirm the desired photo.
-
Page 44: Paper Jam Solution
Paper Jam Solution Paper Jam Solution 1. Slide the cover button sideways to open the bottom Do not pull the paper out. Turn the device off and on cover and then remove the photo cartridge. again, the paper will be ejected automatically. y If there are foreign substance or dust on the inside of the Insertion part of Photo cartridge (print head), printed photo may has lines. - Page 45 2. Gently pull the remaining photo paper out of the Insertion part of Photo cartridge.
Need help?
Do you have a question about the PC389S and is the answer not in the manual?
Questions and answers