
Related Manuals for Darkly Labs Emblaser 2


Summary of Contents for Darkly Labs Emblaser 2
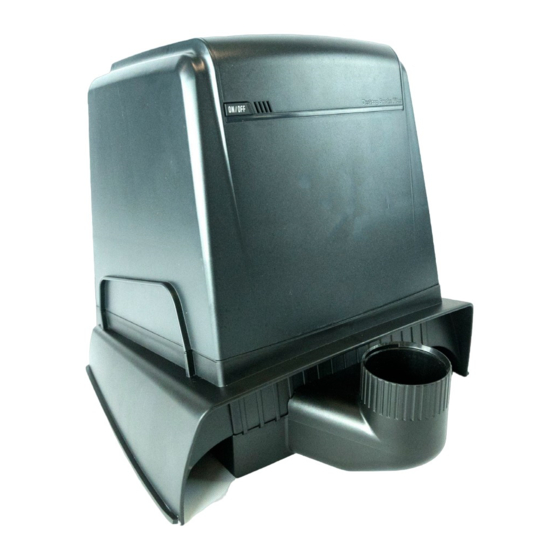
- Page 1 Darkly Labs FUME FILTRATION User Manual English Deutsch Emblaser 2 Fume Filtration User Manual 1.2...
-
Page 2: What's In The Box
1. INTRODUCTION The Fume Filtration System performs two key functions; It assists the Emblaser 2’s built in exhaust fan to evacuate fumes from the internal workspace as well as filtering the fumes to remove the majority of contaminants, significantly reducing air-born particles. -
Page 3: For Your Safety
The Filtration System is NOT designed to filter toxic fumes produced from materials such as PCV, Vinyl, ABS etc. Please refer to your Emblaser 2 User Manual for more details on materials that may produce harmful fumes. ALWAYS USE IN A WELL VENTILATED AREA Air vented from the fume filtration system is not safe to breathe, especially in high concentrations. -
Page 4: Installation
4. INSTALLATION Tilt the Filtration System over so that the opening on underside is visible. Insert the Pre-Filter and tuck the edges neatly under the lip of opening. Slide the Tray into place. Take note of the four clips that must engage If you experience difficulty installing the Tray, check to make sure the Pre-filter is not in the way. - Page 5 Attach the Hose Adaptor to the end of Emblaser 2 exhaust hose. Insert the Adaptor into the Tray. (This may require some force). Connect exhaust hose to Emblaser 2...
- Page 6 Insert supplied power lead. Turn the unit on by pressing the power button on the front. Note: Version 2 Filtration Systems allow for 3 fan speed settings. These are set by pressing the power button sequentially to increase the fan speed.
-
Page 7: Filter Replacement
5. FILTER REPLACEMENT The Fume filtration unit uses a carbon filter cartridge. With prolonged use this cartridge will become less efficient, we recommend replacing the filter every month or if filtering performance reduces. Tip: To prolong filter life, turn off Fume Filtration Unit when not in use. Carbon Filter Pre-Filter Unlatch the clasp at rear of the Fume Filtration Unit. - Page 8 Remove the old Carbon Filter Cartridge. (This can be disposed of in conventional waste bins). Place new Carbon Filter into base Orientate the edge with the scooped feature to face the rear of the Fume Filtration Unit.
- Page 9 Perform the following steps to correctly reassemble the top component to the base. Locate the metal hook at the front of the top component. Engage this first. Using the metal hook as a hinge; swing the rear of the top component down. Apply pressure to the rear corners of the top component to pop the edges into place.
- Page 10 Slide the Tray out. Take care not to damage the four clips retaining the tray. Remove old Pre-filter and replace with a new one. Be sure to tuck the edges of the new pre- filter neatly under the lip of the opening. Slide the Tray back into place.
-
Page 11: Technical Support
If you have trouble installing or operating your Fume Filtration Unit, please check our Knowledge Base or contact us through the Help Centre. Help Centre / Knowledge Base: https://darklylabs.com/start Darkly Labs 3/99-101 Western Avenue, Westmeadows, 3049 Australia info@darklylabs.com ● www.darklylabs.com Copyright © Darkly Digital Pty Ltd (Darkly Labs) 2014-2017.
Need help?
Do you have a question about the Emblaser 2 and is the answer not in the manual?
Questions and answers