
Related Manuals for ICU Medical Plum 360


Summary of Contents for ICU Medical Plum 360
- Page 1 Plum 360 ™ Infuser Technical Service Manual For use with all configurations Compatible with: of list number 30010 ™ ICU Medical MedNet IFU0000141 (02, 2021-08)
- Page 2 This page intentionally left blank. Plum 360 Infuser Technical Service Manual...
- Page 3 Change History Description of Change Part Number Initial Release IFU0000141 (01, 2020-05) Updated back page to add CE Mark note. IFU0000141 (02, 2021-08) Technical Service Manual Plum 360 Infuser...
- Page 4 CHANGE HISTORY This page intentionally left blank. Plum 360 Infuser Technical Service Manual...
-
Page 5: Table Of Contents
ETHERNET SETTINGS ....1-43 1.16.8.3 ICU MEDICAL MEDNET SETTINGS ..1-44 1.16.8.4 RESET NETWORK TO DEFAULT SETTINGS ..1-45 1.16.8.5... - Page 6 RUBBER FOOT PAD INSPECTION ... . . 5-48 5.5.10 POLE CLAMP INSPECTION AND TEST ... 5-48 Plum 360 Infuser Technical Service Manual...
- Page 7 ....7.2.5 AC (MAINS) POWER CORD, RETAINER, AND VELCRO STRAP REPLACEMENT ....Technical Service Manual Plum 360 Infuser...
- Page 8 DRAWINGS ......9-1 APPENDIX ..... A-1 Plum 360 Infuser Technical Service Manual...
- Page 9 Device Log Shows Software Installed Successfully ..1-26 Figure 1-21 Plum 360 Navigation Keys ..... 1-27 Figure 1-22 Preventive Maintenance Menu Selection .
-
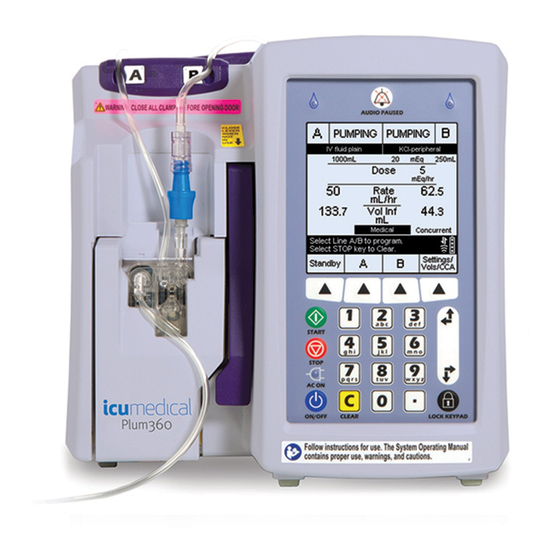
Page 10: Figure 1-1 Plum 360 Infuser Display And Alphanumeric Keypad
Preventing Air from Returning to the Pumping Chamber ..5-34 Figure 5-36 Plum 360 Infuser Labels ..... . 5-39 Figure 5-37 Plum 360 Power Cord, Retainer, and Velcro Strap . - Page 11 ......6-20 Figure 7-1 Bottom View Plum 360 Infuser ....Figure 7-2 Battery Assembly .
- Page 12 ....9-19 Figure 9-14 Minipole Assembly ......9-20 Plum 360 Infuser Technical Service Manual...
- Page 13 (60601-1-2 Edition 4 Compliance) ....A-8 Table A-7 Guidance and Manufacturer’s Declaration - Electromagnetic Immunity for Life-Supporting Equipment and Systems (60601-1-2 Edition 4 Compliance) . . . A-9 Technical Service Manual Plum 360 Infuser...
- Page 14 CONTENTS This page intentionally left blank. Plum 360 Infuser Technical Service Manual...
-
Page 15: Introduction
ICU Medical for technical assistance (see Section 6.1) Note: Servicing on the Plum 360 infuser is to be performed only by trained, authorized personnel. REPORTING SERIOUS INCIDENTS Serious incidents associated with the use of this product should be reported to: - ICU Medical using the “Contact Us”... -
Page 16: Conventions
Note: A note highlights information that helps explain a concept or procedure. Important: An Important message highlights information on the proper use of the product, user expectations, error situations, and actions related to these. Plum 360 Infuser 1 - 2 Technical Service Manual... -
Page 17: Illustrations, Screen Displays, And Software Messages
Illustrations and screen examples in this manual are graphic depictions, not exact representations of the product, and may not reflect the current configuration. LABELING SYMBOLS GLOSSARY This section describes the symbols used in the labeling for the Plum 360 infuser. Symbol Symbol... - Page 18 Dangerous Voltage ISO 7010 Ref no. W012 Federal (USA) law restricts this device FDA 21 CFR 801.109 to sale by or on the order of a doctor or other licensed practitioner Plum 360 Infuser 1 - 4 Technical Service Manual...
- Page 19 Africa (ICASA) Electronic No 36 of 2005 Communications Act, Act No 36 of 2005 National Communications Radio Wave Regulatory Articles Commission of Taiwan (NCC) 12 & 14 Wireless Registration Medical Device Technical Service Manual 1 - 5 Plum 360 Infuser...
-
Page 20: Component Designators
EEG Electroencephalogram EEPROM Electrically erasable programmable read-only memory EMC Electromagnetic compatibility EMG Electromyogram EMI Electromagnetic interference ESD Electrostatic discharge ETO Ethylene oxide FPGA Field programmable gate array FSR Force sensing resistor Plum 360 Infuser 1 - 6 Technical Service Manual... - Page 21 PWM Pulse width modulator RAM Random access memory rms Root-mean-square RTC Real-time clock SCC Serial communication controller SCP Serial communication port SLA Sealed lead acid SMT Surface mount technology SPI Serial peripheral interface Technical Service Manual 1 - 7 Plum 360 Infuser...
-
Page 22: User Qualification
Microsecond USER QUALIFICATION The Plum 360 infuser must be used at the direction of or under the supervision of licensed physicians or certified healthcare professionals who are trained in the use of the infuser and the administration of parenteral and enteral fluids and drugs, and whole blood or red blood cell components. -
Page 23: Electromagnetic Compatibility
1.9 ELECTROMAGNETIC COMPATIBILITY ELECTROMAGNETIC COMPATIBILITY Table 1-2 The Plum 360 infuser has been tested to the requirements of the standards in Table 1-2. Standards Applicability by Labeling Inventory Code Pump Labeling Inventory Code Standard 05/06 09/10 13/14 IEC/EN 60601-1-2:2007 Edition 3... - Page 24 WARNING: USE ONLY COMPONENTS AND ACCESSORIES SPECIFICALLY LABELED FOR USE WITH THE PLUM 360 INFUSER TO HELP ENSURE THE DEVICE OPERATES AS INTENDED. USE OF UNAUTHORIZED ACCESSORIES, CABLES, TRANSDUCERS AND EQUIPMENT MAY HAVE A RISK OF AFFECTING THE EMISSIONS AND IMMUNITY COMPLIANCE REQUIREMENTS OF THE PLUM 360 INFUSER.
-
Page 25: Fcc Information
Canada. To reduce potential radio interference to other users, the antenna type and its gain should be so chosen that the equivalent isotropically radiated power (e.i.r.p.) is not more than that necessary for successful communication. Technical Service Manual 1 - 11 Plum 360 Infuser... -
Page 26: Radio Equipment Directive
The full text of the EU declaration of conformity is available at the following internet address: http://www.icumed.com/about-us/qualityregulatory-certificates.aspx 1.12 ROHS ICU Medical, Inc., hereby declares that this Plum 360 infuser is in compliance with Directive 2011/65/EU on the restriction of the use of certain hazardous substances in electrical and electronic equipment (RoHS). 1.13 INSTRUMENT IMPLEMENTATION... -
Page 27: Unpacking
Do not pull on the power cord cable to unplug the device from the AC (mains) outlet. MANDATORY ACTION: INSPECT CORD AFTER USE. Note: Unplugging the power cord isolates the infuser from the electrical mains. Technical Service Manual 1 - 13 Plum 360 Infuser... -
Page 28: Keypads
Biomed mode. 1.13.4 KEYPADS This manual covers Plum 360 infusers with an alphanumeric keypad and Plum 360 infusers with numeric keypad. The screen examples used in this manual are representative of an infuser with an alphanumeric keypad. -
Page 29: Numeric Keypad
REGION IN PROGRESS Please stand by BATTERY SOFT KEY CHARGE LABEL INDICATOR REGION WIRELESS SIGNAL STRENGTH INDICATOR KEYPAD AC (MAINS) CONNECTED INDICATOR Figure 1-2. Plum 360 Infuser Display and Numeric Keypad Technical Service Manual 1 - 15 Plum 360 Infuser... -
Page 30: Self Test
Note: For software version 15.11 and later, if a Drug Library issue is identified during the System Self Test, the user will be advised to return the infuser to the hospital biomedical staff. Plum 360 Infuser 1 - 16 Technical Service Manual... -
Page 31: Connectivity Check
Note: If the wireless icon or Ethernet icon does not appear in the lower right hand (see Figure 1-8) corner of the display, or the green Activity Indicator LED on the CE module is not illuminated periodically, contact the local IT representative ICU Medical Technical Service Manual 1 - 17 Plum 360 Infuser... -
Page 32: Figure 1-6 Icu Medical Mednet Is Active Symbol
SECTION 1 INTRODUCTION 3. Check that the ICU Medical MedNet connectivity symbol is displayed above the wireless or Ethernet symbol. See Figure 1-6 Figure 1-6. ICU Medical MedNet is Active Symbol PUMPING Heparin 25,000 Units 250mL Dose units/kg/hr Rate mL/hr 499. -
Page 33: Biomed
AC (MAINS) CONNECTED p q r s t u v w x y z INDICATOR AC ON ON OFF CLEAR LOCK KEYPAD Figure 1-9. Plum 360 Infuser Display and Alphanumeric Keypad Technical Service Manual 1 - 19 Plum 360 Infuser... -
Page 34: Figure 1-10 Plum 360 Charge Indicator Light
LOCK KEYPAD ON/OFF Decimal button Figure 1-11. Plum 360 ON/OFF Button and Decimal Key Note: If the infuser has a numeric keypad (where the Decimal key is replaced with a Comma key), refer to Figure 1-2 The infuser performs a system self test. -
Page 35: Figure 1-12 System Self Test Screen
3. When the self test is complete, the Biomed Passcode screen appears. Passcode Enter Passcode for Biomed Passcode Use keypad then press Enter Enter Cancel Figure 1-13. Biomed Passcode Screen Technical Service Manual 1 - 21 Plum 360 Infuser... -
Page 36: Figure 1-14 Enter Passcode
SECTION 1 INTRODUCTION 4. Enter the Biomed Passcode and press Enter. Note: Authorized, trained personnel can contact ICU Medical for the Biomed Passcode, if needed. Passcode Enter Passcode for Biomed Passcode **** Use keypad then press Enter Enter Cancel Figure 1-14. Enter Passcode The main Biomed Settings menu screen appears. -
Page 37: Software Updates
1.16 BIOMED 1.16.2 SOFTWARE UPDATES When new versions of the Plum software are available, ICU Medical notifies the Biomed technician. The Biomed technician then updates the software in the Plum infuser via the ICU Medical MedNet connection. To update the Plum software with the latest version: (see Section 1.16.1) -
Page 38: Figure 1-17 Install Software Softkey
5. On the New Software Available screen, press Yes to install the new update or No to shutdown the device. New Software Available Install Now? Yes: Install No: Shutdown Figure 1-18. New Software Available Screen Plum 360 Infuser 1 - 24 Technical Service Manual... -
Page 39: Figure 1-19 New Software Installation In Progress
Turn on the infuser and access the Biomed mode. b. Select Display Logs on the Biomed Settings screen. c. Open Device Logs (see Section 1.16.6) d. Check the device log for the entry SWInstallSuccessful (Figure 1-20). Technical Service Manual 1 - 25 Plum 360 Infuser... -
Page 40: Figure 1-20 Device Log Shows Software Installed Successfully
Additionally, the updated version number displays on the opening screen. Note: The infuser should not be placed into service if the software update has not been verified. 7. After re-booting the infuser, make sure the ICU Medical MedNet and Ethernet (or (see Section 1.15) wireless) icons are displayed . -
Page 41: Preventive Maintenance
PREVENTIVE MAINTENANCE To set Preventive Maintenance notifications: 1. Use the navigation keys on the keypad to scroll to Preventive Maintenance in Biomed Settings and press Choose. Figure 1-21. Plum 360 Navigation Keys Biomed Settings Biomed Settings Serial Number: 17705238 Serial Number: 17705238... -
Page 42: Figure 1-23 Pm Due Notification Screen
Note: If the infusion is longer than one hour, the total delivery time is updated for individual infusions every hour the time is updated, so that the maximum error (due to a system crash) is the loss of one hour of time. Plum 360 Infuser 1 - 28 Technical Service Manual... -
Page 43: Figure 1-24 Change Battery Softkey
Figure 1-25. Clear Battery Warning Message 4. Press Yes to change the battery, and press No to retain the battery logs and return to the main menu. 5. Press Done to return to the main menu. Technical Service Manual 1 - 29 Plum 360 Infuser... -
Page 44: Set Time And Date
Note: Time zone offset is from Coordinated Universal Time UTC/GMT. Note: When the Time Zone offset is set with GMT, the time stamp in the Display Logs menu option displays the correct time of day for local time. Plum 360 Infuser 1 - 30 Technical Service Manual... -
Page 45: Manage Languages
Biomed only has to set the time zone field. If the device is not connected to ICU Medical MedNet, the Biomed only has to set the local time; the Time Zone field will be of no use. -
Page 46: Figure 1-30 Change Language Activate Softkey
Pending until the system reboots. After exiting the Biomed mode and powering off, the software changes to the selected language upon the next reboot for either Biomed or clinical mode. Plum 360 Infuser 1 - 32 Technical Service Manual... -
Page 47: Display Logs
AC (mains) power are removed for a short or extended amount of time. The log data is stored in non-volatile memory. For a complete list of alarm Section 6.2.1 Section 6.2.2 codes and error codes, see Technical Service Manual 1 - 33 Plum 360 Infuser... -
Page 48: Infuser Settings
Manage Network Manage Network Reset Settings Press Choose to Select Press Choose to Select Choose Choose Software Version 15.1 and earlier Software Version 15.11 and later Figure 1-35. Infuser Settings Menu Option Plum 360 Infuser 1 - 34 Technical Service Manual... -
Page 49: Infuser Defaults
Default End of Infusion: Choose KVO / Rate to change Press Done to save and return KVO/Rate Done Figure 1-37. Infuser Defaults Screen 2. Select an option and change the setting. Technical Service Manual 1 - 35 Plum 360 Infuser... -
Page 50: Display Defaults
“Backlight Intensity” used in Clinical mode. 1.16.7.2.1 Adjusting Display Defaults 1. Select Display Defaults to adjust any of the default display values (Optimal Contrast, Contrast Range, Contrast Offset or Minimum Brightness). Plum 360 Infuser 1 - 36 Technical Service Manual... -
Page 51: Figure 1-38 Display Defaults Screen
Minimum Brightness. The non-shaded area of the sliding graph represents the range of values that the brightness (Backlight Intensity) can be set to in Clinical mode. Technical Service Manual 1 - 37 Plum 360 Infuser... -
Page 52: Figure 1-39 Calibration Test Step 1 Of 2 Screen
Press Cancel to return to the main Display Defaults screen and follow the instructions in Section 1.16.7.2.1 Adjusting Display Defaults to re-adjust the Display Defaults. Plum 360 Infuser 1 - 38 Technical Service Manual... -
Page 53: Programming Options
Maximum Standby Time: 72 Hours Allow Delayed Start: Yes Use Keypad then press Done to save and return Done Figure 1-41. Programming Options Screen 2. Select an option and change the setting. Technical Service Manual 1 - 39 Plum 360 Infuser... -
Page 54: About Device
Note: The CE version will only display if the CE has connected to the infuser at least once. Note: CDL Certificate information may show even if the default drug library is the current library. Plum 360 Infuser 1 - 40 Technical Service Manual... -
Page 55: Manage Network
The Network Settings CE 3.0 screen opens to display the following options: Section 1.16.8.1 -Wireless Settings - -Ethernet Settings - Section 1.16.8.2 -ICU Medical MedNet Settings - Section 1.16.8.3 Section 1.16.8.4 -Reset Network to Default Settings - -Web config is disabled or Web config is enabled (available in software version 15.1 Section 1.16.8.5... -
Page 56: Wireless Settings
Previous Choose Screen Figure 1-44. Network Settings CE 3.0 Screen Note: The data displayed in the wireless, Ethernet, and ICU Medical MedNet Settings screens is sent from the CE (Connectivity Engine) as part of the communication protocol. 1.16.8.1 WIRELESS SETTINGS To view the wireless settings: 1. -
Page 57: Ethernet Settings
1. Scroll to the Ethernet Settings menu option. Network Settings CE version string Wireless Settings Ethernet Settings ICU Medical MedNet Settings Reset Network to Default Settings Web config is disabled Mobile Service Mode is disabled Select Choose to view settings... -
Page 58: Icu Medical Mednet Settings
Screen Figure 1-48. Ethernet Settings Screen 1.16.8.3 ICU MEDICAL MEDNET SETTINGS To view the ICU Medical MedNet settings: 1. Scroll to the ICU Medical MedNet Settings menu option. Network Settings CE version string Wireless Settings Ethernet Settings ICU Medical MedNet Settings... -
Page 59: Reset Network To Default Settings
1.16 BIOMED 2. Press Choose to view the current ICU Medical MedNet settings. ICU Medical MedNet Settings ICU Medical MedNet IP: 10.20.110.178 ICU Medical MedNet Mask: 255.255.248.0 SSL: Disabled Status: Connected Time Connected: 00 : 30 hr : min Network:... -
Page 60: Enable/Disable Web Config
1. Scroll to the Web config is disabled menu option. Network Settings CE version string Wireless Settings Ethernet Settings ICU Medical MedNet Settings Reset Network to Default Settings Web config is disabled Mobile Service Mode is disabled Press choose to select... -
Page 61: Enable/Disable Mobile Service Mode
1. Scroll to the Web config is enabled menu option. Network Settings CE version string Wireless Settings Ethernet Settings ICU Medical MedNet Settings Reset Network to Default Settings Web config is enabled Mobile Service Mode is disabled Press choose to select... -
Page 62: Shutdown Ce
1. Scroll to the Mobile Service Mode is enabled menu option. Network Settings CE version string Wireless Settings Ethernet Settings ICU Medical MedNet Settings Reset Network to Default Settings Web config is enabled Mobile Service Mode is enabled Press choose to select... - Page 63 Note: Wait at least five minutes for the CE module to power down and the microprocessor to save data before you remove the CE module. 4. Remove the CE module, if planning to replace it. For the replacement procedure, Section 7.2.6 Technical Service Manual 1 - 49 Plum 360 Infuser...
-
Page 64: Taiwan Ncc Warning Statement
These measures serve as the primary defense against tampering with a medical device. Contact ICU Medical to report the suspected cybersecurity event or threat. Plum 360 Infuser 1 - 50 Technical Service Manual... -
Page 65: Warranty
(whether such cause be based in contract, negligence, strict liability, other tort, or otherwise) exceed the price of such product, and in no event shall ICU Medical be liable for incidental, consequential, or special damages or losses or for lost business, revenues, or profits. - Page 66 SECTION 2 WARRANTY This page intentionally left blank. Plum 360 Infuser 2 - 2 Technical Service Manual...
-
Page 67: System Operating Manual
Section 3 SYSTEM OPERATING MANUAL A copy of the System Operating Manual is included with every Plum 360 infuser. If a copy contact ICU Medical (see Section 6.1) is not available, Technical Service Manual 3 - 1 Plum 360 Infuser... - Page 68 SECTION 3 SYSTEM OPERATING MANUAL This page intentionally left blank. Plum 360 Infuser 3 - 2 Technical Service Manual...
-
Page 69: Service Support
BATTERY The battery employed by the Plum 360 infuser is a sealed lead acid (SLA) type rated at 6 volts DC and a current capacity of at least 4.5 ampere-hours. The typical battery operating time with a new and fully charged battery is 7 hours when infusing at 25 mL/hr, and 4 hours at 999 mL/hr. - Page 70 IF THE DEVICE IS PLACED IN STORAGE FOR AN EXTENDED PERIOD OF TIME, REMOVE THE BATTERY FROM THE DEVICE TO PROTECT FROM BATTERY LEAKAGE. Note: To keep the battery fully charged while in storage, connect to AC (mains) power. Plum 360 Infuser 4 - 2 Technical Service Manual...
-
Page 71: Maintenance And Service Tests
WITH THIS WARNING COULD RESULT IN ELECTRICAL SHOCK. CLEANING AND DISINFECTION Clean and disinfect the infuser between each patient use. In addition, the Plum 360 infuser should be thoroughly cleaned and disinfected once a month or according to facility protocol. The following sections describe how to thoroughly clean and disinfect the infuser. -
Page 72: Cleaning
Enzymatic Detergent recommendations and instructions in ™ ASP Cidezyme this manual. Note: At the time of publication, ICU Medical recommends only the cleaning solution in Table 5-1 www.icumed.com . For updated listings of approved cleaners, visit Plum 360 Infuser 5 - 2... -
Page 73: Cleaning Supplies
Note: Administration sets must be removed by authorized personnel and disposed of per facility policy before cleaning the infuser. Section 7.2.12 Note: If the minipole is attached, see for instructions on removing the minipole assembly. Technical Service Manual 5 - 3 Plum 360 Infuser... -
Page 74: General Cleaning Instructions
Use a spiral pattern when wiping, moving from the inner to outer edges to avoid recontaminating the areas you just cleaned. • Do not allow cleaning fluid to run into the internal parts of the infuser. Plum 360 Infuser 5 - 4 Technical Service Manual... -
Page 75: Cleaning Exterior Surfaces
2. Use a brush to remove debris and then moist swabs to clean any openings or Figure 5-1 hard-to-reach areas highlighted in 3. Using lint-free cloths dampened in the approved cleaning solution (see Table 5-1) or wipes, wipe the bottom surface. Technical Service Manual 5 - 5 Plum 360 Infuser... - Page 76 Note: Do not allow fluid into any ports or vents on the CE Module or infuser. 5. Using a lint-free cloth dampened in the cleaning solution or wipes, wipe areas around the power cord outlet, the power cord, and the plug, including prongs. Plum 360 Infuser 5 - 6 Technical Service Manual...
-
Page 77: Cleaning The Cassette Receptacle
For this reason, the cassette receptacle (see Figure 5-5) should only be cleaned by personnel who are aware of how the infuser operates and can take proper precautions. Technical Service Manual 5 - 7 Plum 360 Infuser... - Page 78 To clean the cassette receptacle: 1. Open the cassette door, and press the yellow-marked door release tab as shown in Figure 5-4 2. Gently press the cassette door down until it opens completely. Plum 360 Infuser 5 - 8 Technical Service Manual...
- Page 79 Note: Do not allow fluid into the internal part of the infuser. 7. Use a brush to remove debris and then moist swabs to clean any openings or hard-to-reach areas. Technical Service Manual 5 - 9 Plum 360 Infuser...
-
Page 80: Cleaning The Power Cord Velcro Strap
3. When no moisture is detected, close the cassette door. Note: Allow to air dry completely before beginning disinfection. Note: After the cassette door receptacle is dry, close the cassette door to avoid damage when moving the infuser. Plum 360 Infuser 5 - 10 Technical Service Manual... -
Page 81: Cleaning Spills During The Course Of Patient Care
Dried, built-up residue from these type of fluids can damage the pumping mechanism. contact ICU Medical To obtain additional information on cleaning the infuser, Technical Service Manual 5 - 11 Plum 360 Infuser... -
Page 82: Disinfection
Germicidal Bleach Do not exceed 1 part bleach in 10 Household Bleach (8.25% concentration) parts water Note: At the time of publication, ICU Medical recommends only the disinfecting solutions Table 5-4 www.icumed.com . For updated listings of approved disinfectants, visit 5.3.2... -
Page 83: General Disinfection Instructions
Wiping: 15 minutes Rinsing with purified water (PURW): 3 minutes Brushing/swabbing, wiping and rinsing times are per infuser. Apply disinfectant as often as needed to keep surfaces visually moist/wet during disinfection. Technical Service Manual 5 - 13 Plum 360 Infuser... -
Page 84: Disinfecting Exterior Surfaces
13. Using lint-free cloths dampened in the disinfecting solution or wipes, wipe the cassette door and area above the door highlighted in red in Figure 5-3 14. Use brushes and swabs to disinfect the hard-to-reach areas (highlighted in Figure 5-4 Plum 360 Infuser 5 - 14 Technical Service Manual... -
Page 85: Disinfecting The Cassette Door And Receptacle
1. Disinfect all accessories using the general disinfecting instructions and supplies (see Section 5.3.4) 2. Remove and disinfect the strap from the syringe holder using the method used to disinfect the power cord strap. Technical Service Manual 5 - 15 Plum 360 Infuser... -
Page 86: Rinsing The Infuser
4. Return the infuser to service. Note: Make sure the power cord and plug are completely dry before plugging the infuser into AC (mains) power. To obtain additional information on disinfecting the infuser, contact ICU Medical Plum 360 Infuser 5 - 16 Technical Service Manual... -
Page 87: Preparation For Maintenance And Testing
• Run-in cassettes and secondary IV sets must be destroyed and discarded quarterly, unless there are signs of leakage, wear, or damage. Run-in cassettes and secondary IV sets should be labeled and dated as appropriate prior to use. Technical Service Manual 5 - 17 Plum 360 Infuser... -
Page 88: Test Setups
STOP p q r s t u v w x y z AC ON ON OFF CLEAR LOCK KEYPAD Figure 5-6. Basic Test Setup Plum 360 Infuser 5 - 18 Technical Service Manual... - Page 89 3. If using a glass IV container, open the filter vent cover above the drip chamber. If using a plastic IV container, ensure that the filter vent cover is closed (see Figure 5-8) OPEN CLOSED Figure 5-8. Filter Vent Cover Technical Service Manual 5 - 19 Plum 360 Infuser...
- Page 90 . Do not completely fill the drip chamber. Figure 5-10. Squeezing the Drip Chamber 8. Invert the cassette so that the secondary port is pointing down (see Figure 5-11) Figure 5-11. Secondary Port Plum 360 Infuser 5 - 20 Technical Service Manual...
- Page 91 Figure 5-14. Closing the Flow Regulator Note: If there is flow or leaks, close all clamps and replace the administration set. 12. Close all clamps on the proximal and distal lines. Technical Service Manual 5 - 21 Plum 360 Infuser...
- Page 92 1. Lift the lever to open the cassette door (see Figure 5-15) Figure 5-15. Opening the Cassette Door (see Figure 5-16) 2. Grasp the cassette by the finger grip FINGER GRIP Figure 5-16. Cassette Finger Grip Plum 360 Infuser 5 - 22 Technical Service Manual...
- Page 93 7. Ensure that the score mark on the drip chamber is 12 to 24 inches higher than the cassette. Section 5.4.2.1.4 8. Place the distal end of the tubing in the collection container. Go to to attach and prime the secondary line. Technical Service Manual 5 - 23 Plum 360 Infuser...
- Page 94 . Use a paper towel or beaker to collect any spills from the free end of the tube. TO OPEN OPEN CAIR CLAMP POSITION ROLLER ROLLER Figure 5-20. Opening the Roller Clamp Plum 360 Infuser 5 - 24 Technical Service Manual...
- Page 95 Discard the cap. Insert the end of the secondary line into the port and twist clockwise to secure the line to (see Figure 5-23) the port Figure 5-23. Capped Secondary Port Technical Service Manual 5 - 25 Plum 360 Infuser...
- Page 96 STOP p q r s t u v w x y z AC ON ON OFF CLEAR LOCK KEYPAD Figure 5-24. Complete Basic Test Setup Plum 360 Infuser 5 - 26 Technical Service Manual...
-
Page 97: Distal Occlusion Test Setup
• Three-way stopcock • Digital Pressure Meter (DPM) • Cloth or paper towel to catch drips. (Small amounts of water may be released from the stopcock during testing.) • Stopwatch (Optional) Technical Service Manual 5 - 27 Plum 360 Infuser... - Page 98 2. Attach the pressure sensor connector on the DPM to a compatible port (male or (see Figure 5-27) female) on the three-way stopcock 3-WAY STOPCOCK PORT DPM CONNECTOR Figure 5-27. Attaching the Three-Way Stopcock to the DPM Plum 360 Infuser 5 - 28 Technical Service Manual...
- Page 99 AC ON ON OFF CLEAR LOCK KEYPAD UNIVERSAL PRESSUREMETER 0.00 0 to 12” cmOFHO INCHESOFHO mmHg -13.5TO15 -13.5TO75 PRESSUREINPUT Figure 5-29. DPM Connector Height Technical Service Manual 5 - 29 Plum 360 Infuser...
-
Page 100: Proximal Air-In-Line Test Setup
Figure 5-30. Preparing the Proximal Run-In Cassette 2. Using the permanent marker, write “Proximal” and the date on the drip chamber. Section 5.4.2.5 3. Follow the instructions for priming a run-in cassette assembly in Plum 360 Infuser 5 - 30 Technical Service Manual... -
Page 101: Distal Air-In-Line Test Setup
Figure 5-31. Preparing the Distal Run-In Cassette 2. Using the permanent marker, write “Distal” and the date on the drip chamber. Section 5.4.2.5 3. Follow the instructions for priming a run-in cassette assembly in Technical Service Manual 5 - 31 Plum 360 Infuser... -
Page 102: Priming A Run-In Cassette Assembly
3. Remove the white cap on the run-in cassette, taking care not to spill any water into the infuser. The run-in cassette is now installed in the infuser with the white cap off. Plum 360 Infuser 5 - 32 Technical Service Manual... - Page 103 If there is any leakage, replace the run-in cassette. 4. Keeping the cassette upright, remove the white cap. (see Figure 5-33) 5. Pull out the flow regulator Figure 5-33. Pulling Out the Flow Regulator Technical Service Manual 5 - 33 Plum 360 Infuser...
- Page 104 8. Release the pumping chamber and flow regulator. 9. Repeat Steps 5 through 8 until all distal air is pumped out of the tubing. 10. Replace the cap. The run-in cassette is now ready for use. Plum 360 Infuser 5 - 34 Technical Service Manual...
-
Page 105: Preventive Maintenance
5.5 PREVENTIVE MAINTENANCE PREVENTIVE MAINTENANCE ICU Medical requires that preventive maintenance (PM) be performed at least once every 12 months. Replace components as required by visual inspection and test results. The Section 5.5.1 Preventive Maintenance Checklist is provided in Section 5.4.1 for a list of equipment required to perform preventive maintenance. - Page 106 Section 5.5.24 Nurse Call Test Section 5.5.25, Electrical Safety Test Section 5.5.26 Note: When all inspections and tests are complete, perform the steps in prepare the infuser to be returned to service. Plum 360 Infuser 5 - 36 Technical Service Manual...
-
Page 107: Preventive Maintenance Checklist
5.5.1 PREVENTIVE MAINTENANCE CHECKLIST Plum 360 Preventive Maintenance (PM) Checklist Note: The Preventive Maintenance process must be performed at least once every 12 months to ensure proper performance of the Plum infuser. When necessary, individual tests may be performed out of sequence. -
Page 108: Labels Inspection
- Tubing Guide Documents - (lower Labels (A/B Labels) - Switchport Label under keypad) 3. Inspect the labels for legibility and peeling. To replace a label, contact ICU Medical Plum 360 Infuser 5 - 38 Technical Service Manual... - Page 109 MAC ADDRESS LABELS (ETHERNET AND WIRELESS) BRAND LABEL (PAD-PRINTED) PRODUCT I.D. LABEL (DRIVER) FOLLOW SERVICE POWER CORD INSTRUCTIONS REVISION LEVEL LABEL FOR USE LABEL LABEL (DRIVER) Figure 5-36. Plum 360 Infuser Labels Technical Service Manual 5 - 39 Plum 360 Infuser...
-
Page 110: Ac (Mains) Power Cord, Retainer, And Velcro Strap Inspection
STEP 5 6-32 x 5/8 PAN HEAD SCREW AC (MAINS) POWER CORD STEP 4 RETAINER AC (MAINS) POWER CORD POWER CORD LABEL Figure 5-37. Plum 360 Power Cord, Retainer, and Velcro Strap Plum 360 Infuser 5 - 40 Technical Service Manual... -
Page 111: Front Enclosure, Rear Enclosure, Cassette Door, And Door Lever Inspection And Test
If the door does not open smoothly, check for debris or dried fluid buildup. Section 5.2 Clean the infusion mechanism as described in 3. Move the door lever to the CLOSED position. Confirm smooth operation as described in Step 2. Technical Service Manual 5 - 41 Plum 360 Infuser... - Page 112 SECTION 5 MAINTENANCE AND SERVICE TESTS REAR ENCLOSURE DOOR DOOR LEVER FRONT ENCLOSURE Figure 5-38. Front Enclosure, Rear Enclosure, Cassette Door, and Door Lever Plum 360 Infuser 5 - 42 Technical Service Manual...
-
Page 113: Door Roller Inspection And Test
Figure 5-39. Door Roller Inspection 5.5.6 FLUID SHIELD INSPECTION Visually inspect the Plum 360 infuser fluid shield at least once every 12 months. Equipment required for the fluid shield inspection is a 0.025 inch (0.65 mm) feeler gauge (plastic or metal). - Page 114 • If you are able to insert the gauge into the gaps between the infusion mechanism assembly and the fluid shield, the fluid shield must be cleaned or (see Section 7.2.13.8) replaced FEELER GAUGE Figure 5-41. Inspecting the Fluid Shield with Feeler Gauge Plum 360 Infuser 5 - 44 Technical Service Manual...
-
Page 115: Distal Pressure Pin Inspection
2. Release the door so that it lays flat. Press the door release tab to the right and open (see Figure 5-40) the cassette door all the way 3. Inspect the distal pressure pin to determine that it is not damaged or broken. Technical Service Manual 5 - 45 Plum 360 Infuser... -
Page 116: Proximal Pressure Pin Inspection
2. Release the door so that it lays flat. Press the door release tab to the right and open (see Figure 5-40) the cassette door all the way 3. Inspect the pin to determine that it is not damaged or broken. Plum 360 Infuser 5 - 46 Technical Service Manual... - Page 117 5.5 PREVENTIVE MAINTENANCE contact ICU Medical 4. To replace the pin if it is damaged or broken, Figure 5-44. Proximal Pressure Pin Technical Service Manual 5 - 47 Plum 360 Infuser...
-
Page 118: Rubber Foot Pad Inspection
Replace or install as described in Section 7.2.3 RUBBER FOOT PAD (5) Figure 5-45. Rubber Foot Pads on Plum 360 Infuser 5.5.10 POLE CLAMP INSPECTION AND TEST Visually inspect and test the pole clamp at least once every 12 months. - Page 119 5.5 PREVENTIVE MAINTENANCE CHECK FOR SECURE ATTACHMENT TO REAR ENCLOSURE Figure 5-46. Pole Clamp and Extrusion on Plum 360 Infuser RUBBER PAD THREADED INTERFACE SHAFT TIP Figure 5-47. Pole Clamp Assembly Technical Service Manual 5 - 49 Plum 360 Infuser...
-
Page 120: Keypad Inspection
INDICATOR AC ON ON OFF CLEAR LOCK KEYPAD Figure 5-48. Plum 360 Infuser Display and Alphanumeric Keypad Figure 1-2 Note: If the infuser has a numeric keypad, refer to Plum 360 Infuser 5 - 50 Technical Service Manual... -
Page 121: Battery Inspection And Replacement
Use only ICU Medical-approved replacement batteries. ICU Medical to obtain a replacement battery. If spare parts, other than ICU Medical approved spare parts, are used for battery replacement, the warranty on the Plum 360 infuser shall be void. WARNING: DISPOSE OF THE BATTERY AT THE END OF ITS SERVICE LIFE BY DELIVERING IT TO AN AUTHORIZED LEAD ACID BATTERY RECYCLER. - Page 122 14. Press to turn off the infuser. [ON/OFF] BATTERY WITH WIRE HARNESS ASSEMBLY BATTERY DOOR PAD SOFT PUSH ON RETAINING RING BATTERY DOOR SLOTTED HEX HEAD SCREW Figure 5-49. Removing the Battery Plum 360 Infuser 5 - 52 Technical Service Manual...
-
Page 123: Display And Indicators Inspection
INDICATOR AC ON ON OFF CLEAR LOCK KEYPAD Figure 5-50. Plum 360 Infuser Display and Indicators Figure 1-2 Note: If the infuser has a numeric keypad, refer to Technical Service Manual 5 - 53 Plum 360 Infuser... -
Page 124: Cassette Alarm Test
4. When the NEW PATIENT? message appears on the infuser display, press [YES]. 5. Press [A] to select Line A. 6. Enter a rate of 40 mL/hr and a VTBI of 50 mL. Plum 360 Infuser 5 - 54 Technical Service Manual... - Page 125 13. Press [SETTINGS/VOLS/CCA] to display the SETTINGS/VOLS/CCA screen. 14. Select [PRESSURE], and press [CHOOSE]; then highlight the Distal Pressure Limit and enter 6 (310). 15. Press [DONE]. 16. Press [PREVIOUS SCREEN]. Technical Service Manual 5 - 55 Plum 360 Infuser...
- Page 126 21. Press [SETTINGS/VOLS/CCA] to select the SETTINGS/VOLS/CCA screen. 22. Select PRESSURE and press [CHOOSE]. 23. Select Distal Pressure Limit. Enter 10 psi (517 mmHg), and press [DONE]. 24. Press [PREVIOUS SCREEN]. Plum 360 Infuser 5 - 56 Technical Service Manual...
- Page 127 30. Position the control arm of the three way stopcock over the DPM connector Figure 5-53) , then open and close the cassette door to clear the alarm. 31. Remove the distal tubing from the three-way stopcock and turn off the DPM. Technical Service Manual 5 - 57 Plum 360 Infuser...
-
Page 128: Unrestricted Flow Test
8. Press [PREVIOUS SCREEN] to return to the delivery screen. 5.5.18 KEYPAD VERIFICATION TEST Perform the keypad verification test at least once every 12 months. No special test setup is required to perform the keypad verification test. Plum 360 Infuser 5 - 58 Technical Service Manual... -
Page 129: Proximal Occlusion And Alarm Loudness Test
Perform the proximal occlusion and alarm loudness test at least once every 12 months. Section 5.4.2.1 To perform the proximal occlusion test, use the Basic test setup in proceed as follows: 1. Press [A] to select Line A. Technical Service Manual 5 - 59 Plum 360 Infuser... -
Page 130: Distal Air-In-Line Test
10. Unclamp the proximal line and press [START]. Verify that pumping resumes. 11. Press [STOP]. 12. Open the cassette door and remove the cassette. 5.5.20 DISTAL AIR-IN-LINE TEST Perform the Distal Air-in-Line test at least once every 12 months. Plum 360 Infuser 5 - 60 Technical Service Manual... -
Page 131: Proximal Air-In-Line Test
6. Before 1 mL of fluid is delivered, verify that pumping stops, the alarm sounds, and the Proximal AIR Line A! Backprime message is flashing on the display. See N231 or N232 in Section 6.2.1 7. Open the cassette door and remove the test cassette. Technical Service Manual 5 - 61 Plum 360 Infuser... -
Page 132: Delivery Accuracy Test
AC ON ON OFF CLEAR LOCK KEYPAD 25 mL GRADUATED CYLINDER Figure 5-58. Delivery Accuracy Test Setup 2. Turn on the infuser. Plum 360 Infuser 5 - 62 Technical Service Manual... -
Page 133: Connectivity Test
Section 5.4.2.1 The nurse call test requires the Basic test setup in , the nurse call test cable, and the digital multimeter (DMM). To perform the nurse call test, proceed as follows: Technical Service Manual 5 - 63 Plum 360 Infuser... - Page 134 DMM (approximately 1 Ω on a scale of 0 to 100 Ω). If the short circuit appears, the test is successful. 8. Press [STOP], and turn off the infuser. Plum 360 Infuser 5 - 64 Technical Service Manual...
-
Page 135: Electrical Safety Test
Enclosure/Chassis leakage current from ground post Open (Single Fault Condition) 500 μA Earth leakage current (Normal Condition) Closed 1000 μA Earth leakage current (Single Fault Condition) Open 0.2 Ω Chassis ground resistance (with cord connected) Technical Service Manual 5 - 65 Plum 360 Infuser... -
Page 136: End Of Preventive Maintenance
[ENTER]. 3. In response to the NEW PATIENT? prompt, press [YES]. 4. Remove the cassette and close the cassette door. 5. Turn off the infuser. 6. Return the infuser to service. Plum 360 Infuser 5 - 66 Technical Service Manual... -
Page 137: Performance Verification Test
Nurse Call Test (PVT) Section 5.6.12 Electrical Safety Test (PVT) Note: When all tests are complete, perform the steps in Section 5.6.13 to prepare the infuser to be returned to service. Technical Service Manual 5 - 67 Plum 360 Infuser... -
Page 138: Performance Verification Test Checklist
Earth leakage current (Single Fault) (not to exceed 1000 ____________ Ω Chassis ground resistance (with cord connected) (0.2 Ω ____________ TECHNICIAN INFUSER Signature: ________________________________ Model: ________________________________ Date: ____________________________________ Serial Number: __________________________ Plum 360 Infuser 5 - 68 Technical Service Manual... -
Page 139: Cassette Alarm Test (Pvt)
7. Position the control arm of the three way stopcock over the DPM connector (see Figure 5-60) CONTROL ARM DISTAL TUBING DPM CONNECTOR Figure 5-60. Positioning the Control Arm Over the DPM Connector Technical Service Manual 5 - 69 Plum 360 Infuser... - Page 140 Then verify that the pressure is at 6 psi ± 3 psi (310 mHg ± 155 mmHg) on the DPM. Confirm that the alarm message is flashing on the screen. See N186 in Section 6.2.1 Plum 360 Infuser 5 - 70 Technical Service Manual...
- Page 141 27. Verify that fluid is pumping from the open port on the stopcock, the message PUMPING is displayed in the Line A status bar, and the LED above Line A flashes. Technical Service Manual 5 - 71 Plum 360 Infuser...
-
Page 142: Unrestricted Flow Test (Pvt)
4. Open the cassette door and check the distal end of the tubing for fluid flow. Verify that no fluid is flowing or that fluid stops after a few drops (maximum) are released from the end of the distal tubing. 5. Close the cassette door. Plum 360 Infuser 5 - 72 Technical Service Manual... -
Page 143: Display Test (Pvt)
6. Press [DECREASE SETTING] and [INCREASE SETTING] to change display contrast. Verify that the display contrast decreases and increases. 7. Press [DONE] to save current settings. 8. Press [PREVIOUS SCREEN] to return to the delivery screen. Technical Service Manual 5 - 73 Plum 360 Infuser... - Page 144 INDICATOR AC ON ON OFF CLEAR LOCK KEYPAD Figure 5-65. Plum 360 Infuser Display and Indicators Note: If the infuser has a numeric keypad, refer to Figure 1-2 Plum 360 Infuser 5 - 74 Technical Service Manual...
-
Page 145: Keypad Verification Test (Pvt)
AC ON ON OFF CLEAR LOCK KEYPAD Figure 5-66. Keypad Verification Test Note: If the infuser has a numeric keypad, refer to Figure 1-2 Technical Service Manual 5 - 75 Plum 360 Infuser... -
Page 146: Proximal Occlusion And Alarm Loudness Test (Pvt)
9. Press [AUDIO PAUSED] and verify that the alarm stops while the message on the display continues to flash. 10. Unclamp the proximal line and press [START]. Verify that pumping resumes. 11. Press [STOP]. 12. Open the cassette door and remove the cassette. Plum 360 Infuser 5 - 76 Technical Service Manual... -
Page 147: Distal Air-In-Line Test (Pvt)
6. Before 1 mL of fluid is delivered, verify that pumping stops, the alarm sounds, and the Proximal AIR Line A! Backprime message is flashing on the display. See N231 or N232 in Section 6.2.1 7. Open the cassette door and remove the test cassette. Technical Service Manual 5 - 77 Plum 360 Infuser... -
Page 148: Delivery Accuracy Test (Pvt)
25 mL GRADUATED CYLINDER Figure 5-68. Delivery Accuracy Test Setup 2. Turn on the infuser. 3. If an Area Selection or CCA Selection screen appears, choose a care area and press [ENTER]. Plum 360 Infuser 5 - 78 Technical Service Manual... -
Page 149: Nurse Call Test (Pvt)
To perform the nurse call test, proceed as follows: 1. Attach the 2-prong lead on the nurse call test cable to the ports on the DMM that are marked for measuring resistance. Technical Service Manual 5 - 79 Plum 360 Infuser... - Page 150 DMM (approximately 1 Ω on a scale of 0 to 100 Ω). If the short circuit appears, the test is successful. 8. Press [STOP], and turn off the infuser. Plum 360 Infuser 5 - 80 Technical Service Manual...
-
Page 151: Electrical Safety Test (Pvt)
Enclosure/Chassis leakage current from ground post Open (Single Fault Condition) 500 μA Earth leakage current (Normal Condition) Closed 1000 μA Earth leakage current (Single Fault Condition) Open 0.2 Ω Chassis ground resistance (with cord connected) Technical Service Manual 5 - 81 Plum 360 Infuser... -
Page 152: End Of The Pvt
[ENTER]. 3. In response to the NEW PATIENT? prompt, press [YES]. 4. Remove the cassette and close the cassette door. 5. Turn off the infuser. 6. Return the infuser to service. Plum 360 Infuser 5 - 82 Technical Service Manual... -
Page 153: Troubleshooting
1-866-488-6088 or by email: canadapumpsupport@icumed.com To order parts, contact Spare Parts Customer Service: 1-866-488-6088 or by email: pumppartsservices@icumed.com All Other Countries For technical assistance, contact your local ICU Medical sales office. Technical Service Manual 6 - 1 Plum 360 Infuser... -
Page 154: Alarm Messages And Alarm Codes
[CANCEL] softkey. able to be put in standby, but has not selected a line (A, B or A&B) or selected Cancel to complete the action. Plum 360 Infuser 6 - 2 Technical Service Manual... - Page 155 [STANDBY]. (software version 15.11 Standby. and later) Yes: Start program No: Edit Note: Standby is intentionally not included in the instruction text. Technical Service Manual 6 - 3 Plum 360 Infuser...
- Page 156 No operator action for 2 minutes when Line B is not programmed, and Line A has been stopped by the user and is not cleared or restarted. Note: Will reassert if the condition persists. Plum 360 Infuser 6 - 4 Technical Service Manual...
- Page 157 N101. N103 Data was cleared. Corruption of retained Acknowledge the alarm. Re-enter all programming delivery parameters is detected. Autoclear of SEEP requires fresh delivery setup. Technical Service Manual 6 - 5 Plum 360 Infuser...
- Page 158 Clear the program prior CCA! Clear line B. that was programmed under on Line B. a different CCA is complete, Open the cassette door. and no delivery is programmed on Line A. Plum 360 Infuser 6 - 6 Technical Service Manual...
- Page 159 Proximal occlusion detected Resolve the occlusion. OCCLUSION A! on Line A during backprime Either backprime or open Resolve then Backprime (negative detection and close the cassette algorithm) door. Check the syringe size. Technical Service Manual 6 - 7 Plum 360 Infuser...
- Page 160 Line B (peak detection for kinks and correct any algorithm) during delivery found. Restart Line B. Note: The alarm can also be cleared by clearing the confirmed program or opening the cassette door. Plum 360 Infuser 6 - 8 Technical Service Manual...
- Page 161 Press START. exceeds the air detection threshold. N250 Door opened! Infusion The cassette door was Close cassette door stopped! Close Door. opened during a delivery. with cassette inserted. Technical Service Manual 6 - 9 Plum 360 Infuser...
- Page 162 Unrestricted flow 1. Remove infusion mechanism 2. Remove fluid shield 3. Visually inspect regulator closer 4. Verify regulator closer is completely engaged 5. Test If unrestricted flow persists, replace the infusion mechanism Plum 360 Infuser 6 - 10 Technical Service Manual...
-
Page 163: Alarm Codes Requiring Technical Service
Other hardware failure causing (see Section 7.2.13.1) excessive current draw. Replace CPU PWA. (see Section 7.2.13.4) Replace infusion mechanism assembly. (see Section 7.2.13.6) Reset time and date, if necessary. (see Section 1.16.4) Technical Service Manual 6 - 11 Plum 360 Infuser... - Page 164 AC (mains) power and placing it into Standby mode (see the Plum 360 Infuser Operating Manual). If the E321 error code does not reappear after the charging cycle, the infuser may be returned to service.
- Page 165 Reset time and date, if necessary. (see Section 1.16.4) E342 Power Off then On. Display Controller IC error Power off the infuser. Replace pump if Replace CPU PWA. alarm continues. (see Section 7.2.13.4) Technical Service Manual 6 - 13 Plum 360 Infuser...
- Page 166 (see Section 7.2.13.4) E380 Power Off then On. Generic plunger motor error Replace pump if Replace infusion mechanism alarm continues. assembly. (see Section 7.2.13.6) Reset time and date, if necessary. (see Section 1.16.4) Plum 360 Infuser 6 - 14 Technical Service Manual...
- Page 167 Reset time and date (see Section 1.16.4) E439 Power Off then On. Any key is held or activated for at Power off the infuser. Replace pump if least 2 consecutive minutes. alarm continues. Technical Service Manual 6 - 15 Plum 360 Infuser...
- Page 168 (see Section 7.2.13.4) Reset time and date, if necessary. (see Section 1.16.4) E451 Power Off then On. Volume infused and program Power off the infuser Replace pump if delivery rate mismatch alarm continues. Plum 360 Infuser 6 - 16 Technical Service Manual...
- Page 169 E325 E345 E379 E431 E447 Note: Some alarm codes include sub-ID codes. These sub-ID codes are intended for ICU Medical internal use only, and should be included when contacting ICU Medical. Technical Service Manual 6 - 17 Plum 360 Infuser...
-
Page 170: Troubleshooting Procedures
Replace infusion mechanism assembly (see Section 7.2.13.6) Display Test Defective display assembly Replace display assembly (Section 5.6.5) (see Section 7.2.13.3) Keypad Verification/ Defective keypad Replace keypad Functional Test (see Section 7.2.13.2) (Section 5.6.6) Plum 360 Infuser 6 - 18 Technical Service Manual... - Page 171 Replace cassette Defective infusion mechanism Replace infusion mechanism assembly assembly (see Section 7.2.13.6) Electrical Safety Test Defective AC (mains) power Replace AC (mains) power cord cord (Section 5.6.12) (see Section 7.2.5) Technical Service Manual 6 - 19 Plum 360 Infuser...
-
Page 172: Unrestricted Flow
3. If the regulator closer is not completely seated, discontinue use and contact ICU Medical 4. If the regulator closer is completely seated, reassemble the device and perform the Section 5.6 PVT in Figure 6-1. Regulator Closer Plum 360 Infuser 6 - 20 Technical Service Manual... -
Page 173: Resetting The Network Settings To Factory Defaults
Biomed. 5. Enter the Biomed Passcode when prompted, and press Enter. The Biomed Settings screen opens. Note: Authorized, trained personnel can contact ICU Medical for the Biomed Passcode, if needed. 6. Select Manage Network. -
Page 174: Resetting The Infuser Settings (Software Version 15.11 And Later)
4. Enter the Service Passcode when prompted, and press Enter. The Biomed Settings screen opens. Note: Authorized, trained personnel can contact ICU Medical for the Service Passcode, if needed. 5. Make sure the Manage Network option is present to indicate the CE is available for reset. - Page 175 9. Select Yes to confirm the choice; select No to cancel without performing the selected action. 10. Power the infuser off and on again. 11. If the serial number was re-entered, access the Biomed Settings screen to verify it has been entered correctly. Technical Service Manual 6 - 23 Plum 360 Infuser...
- Page 176 SECTION 6 TROUBLESHOOTING This page intentionally left blank. Plum 360 Infuser 6 - 24 Technical Service Manual...
-
Page 177: Replaceable Parts And Repairs
AC (MAINS) POWER BEFORE PERFORMING REPLACEMENT PROCEDURES. CAUTION: Use proper ESD grounding techniques when handling components. Wear an antistatic wrist strap and use an ESD-protected workstation. Store PWAs in antistatic bags before placing on any surface. Technical Service Manual 7 - 1 Plum 360 Infuser... -
Page 178: Required Tools And Materials
Replacement of a rubber foot pad is routine maintenance and no verification procedure is normally required. However, if there is a possibility the infuser may have been damaged Section 5.6 during these procedures, perform the PVT in Plum 360 Infuser 7 - 2 Technical Service Manual... -
Page 179: Battery, Wire Harness, Door, And Door Pad Replacement
DISPOSE OF THE BATTERY AT THE END OF ITS SERVICE LIFE BY DELIVERING IT TO AN AUTHORIZED LEAD ACID BATTERY RECYCLER. Note: Contact ICU Medical to obtain a replacement battery. If spare parts, other than ICU Medical approved spare parts, are used for battery replacement, the warranty on the Plum 360 Infuser shall be void. - Page 180 10. Replace the battery door using the screw that was removed in step 3. 11. Press with the infuser disconnected from AC (mains) power, and verify [ON/OFF] the front panel battery symbol illuminates. Plum 360 Infuser 7 - 4 Technical Service Manual...
- Page 181 PVT in BATTERY WITH WIRE HARNESS ASSEMBLY BATTERY DOOR PAD SOFT PUSH ON RETAINING RING BATTERY DOOR SLOTTED HEX HEAD SCREW Figure 7-2. Battery Assembly Technical Service Manual 7 - 5 Plum 360 Infuser...
-
Page 182: Ac (Mains) Power Cord, Retainer, And Velcro Strap Replacement
Replacement of the AC (mains) power cord, retainer, and Velcro strap is routine maintenance and no verification procedure is normally required. However, if there is a possibility the infuser may have been damaged during the procedure, perform the PVT in Section 5.6 Plum 360 Infuser 7 - 6 Technical Service Manual... -
Page 183: Ce Module Replacement
Shutdown CE instructions in Note: After disconnecting from AC (mains) power, wait at least five minutes for the CE to power down and the microprocessor to save data, then proceed to step 2. Technical Service Manual 7 - 7 Plum 360 Infuser... - Page 184 10. Perform the connectivity check in Section 5.6 11. Perform the PVT in to verify successful CE module replacement. CE MODULE 4-40 X 5/8 PAN HEAD SCREW WITH WASHER (2) Figure 7-4. CE Module Plum 360 Infuser 7 - 8 Technical Service Manual...
-
Page 185: Ce Module Component Replacement
PORT EQUIPOTENTIAL TERMINAL NURSE CALL INTERFACE PORT CE 3.0 MODULE AC (MAINS) POWER CORD Figure 7-5. Rear View ANTENNA ANTENNA COVER GASKET ANTENNA COVER CE MODULE HOUSING Figure 7-6. Antenna PWA Technical Service Manual 7 - 9 Plum 360 Infuser... -
Page 186: Volume Control Knob Replacement
4. Remove the CE module as described in 5. Using the Phillips screwdriver, remove the small screw from the antenna cover. Then, using the small flat blade screwdriver, remove the antenna cover starting at the bottom. Plum 360 Infuser 7 - 10 Technical Service Manual... -
Page 187: Ce Module Cover Replacement
6. Using a nutdriver, remove the nut that secures the volume potentiometer to the CE module cover. Remove the lock washer with needle nose pliers. 7. Using a T10 Torx wrench, remove the screw holding the I/O Cover. Remove the I/O Cover and the washer. Technical Service Manual 7 - 11 Plum 360 Infuser... -
Page 188: Separating The Front Enclosure, Rear Enclosure, And Main Chassis
7. Carefully place the infuser face down. 8. Using the flat blade screwdriver, press the flex tabs (see Figure 7-1) while lifting up the rear enclosure, and remove the enclosure. Plum 360 Infuser 7 - 12 Technical Service Manual... - Page 189 POWER CORD 4-40 X 7/16 RETAINER SCREW JACK EQUIPOTENTIAL TERMINAL 6-32 X 3 1/2 MAIN PHILLIPS CHASIS SCREW (2) FRONT ENCLOSURE Figure 7-7. Separating the Front Enclosure, Main Chassis, and Rear Enclosure Technical Service Manual 7 - 13 Plum 360 Infuser...
-
Page 190: Front Enclosure, Rear Enclosure, Or Main Chassis Replacement
10. Reinstall the battery and connect the infuser to AC (mains) power. Section 5.6 11. Perform the PVT in to verify successful front enclosure, rear enclosure, or main chassis replacement. Plum 360 Infuser 7 - 14 Technical Service Manual... -
Page 191: Front Enclosure Component Replacement
6. Join the front enclosure, rear enclosure, and main chassis in the exact reverse order of separation. 7. Reinstall the battery and connect the infuser to AC (mains) power. Section 5.6 8. Perform the PVT in to verify successful front/rear enclosure gasket replacement. Technical Service Manual 7 - 15 Plum 360 Infuser... - Page 192 SECTION 7 REPLACEABLE PARTS AND REPAIRS FRONT ENCLOSURE 4-40 X 1/4 PHILLIPS SCREW (2) PROXIMAL TUBING HOLDER FLUID SHIELD GASKET GASKET DISPLAY SEAL GASKET Figure 7-8. Front Enclosure Gaskets Plum 360 Infuser 7 - 16 Technical Service Manual...
-
Page 193: Rear Enclosure Component Replacement
ENCLOSURE ASSEMBLY HANDLE BRACKET POLE CLAMP BRACKET 10-32 X 1/2 ALLEN HEAD SCREW, BLACK (2) POLE CLAMP INSULATOR FRONT/REAR ENCLOSURE GASKET FOOT (2) POWER SUPPLY GASKET Figure 7-9. Rear Enclosure Components Technical Service Manual 7 - 17 Plum 360 Infuser... -
Page 194: Pole Clamp Assembly, Pole Clamp Bracket, Handle Bracket, And Insulator Replacement
8. Join the front enclosure, rear enclosure, and main chassis in the exact reverse order of separation. 9. Reinstall the battery and connect the infuser to AC (mains) power. Section 5.6 10. Perform the PVT in to verify successful pole clamp replacement. Plum 360 Infuser 7 - 18 Technical Service Manual... -
Page 195: Pole Clamp Shaft/Knob Assembly And Shaft Tip Replacement
2. Remove the battery as described in 3. Separate the front enclosure, rear enclosure, and main chassis as described Section 7.2.8 4. Remove the rear enclosure gasket from the rear enclosure. Remove the power supply gasket. Technical Service Manual 7 - 19 Plum 360 Infuser... -
Page 196: Minipole Assembly Replacement
Replacement of the minipole assembly is routine maintenance and no verification procedure is normally required. However, if there is a possibility the infuser may have Section 5.6 been damaged during the procedure perform the PVT as described in Plum 360 Infuser 7 - 20 Technical Service Manual... - Page 197 7.2 REPLACEMENT PROCEDURES CLUTCH HOUSING CLUTCH SPRING BAG HANGER POLE CLAMP EXTRUSION HAIRPIN CLIP Figure 7-10. Minipole Assembly Technical Service Manual 7 - 21 Plum 360 Infuser...
-
Page 198: Main Chassis Assembly Component Replacement
SCREW, 4-40 x 1/4 HEX HEAD SLOTTED, WITH WASHER MECHANISM CHASSIS BUMPER CPU/DRIVER CABLE MOTOR POWER 6-32 x 3/8 CABLE HEX HEAD SCREW WITH WASHER MECHANISM ASSEMBLY Figure 7-11. Main Chassis Assembly Components Plum 360 Infuser 7 - 22 Technical Service Manual... -
Page 199: Power Supply Pwa Replacement
8. Join the front enclosure, rear enclosure, and main chassis in the exact reverse order of separation. 9. Reinstall the battery and connect the infuser to AC (mains) power. Section 5.6 10. Perform the PVT in to verify successful power supply PWA replacement. Technical Service Manual 7 - 23 Plum 360 Infuser... -
Page 200: Keypad Replacement
11. Join the front enclosure, rear enclosure, and main chassis in the exact reverse order of separation. 12. Reinstall the battery and connect the infuser to AC (mains) power. Section 5.6 13. Perform the PVT in to verify successful keypad replacement. Plum 360 Infuser 7 - 24 Technical Service Manual... -
Page 201: Display Assembly Replacement
7. Join the front enclosure, rear enclosure, and main chassis in the exact reverse order of separation. 8. Reinstall the battery and connect the infuser to AC (mains) power. 9. Perform the PVT in Section 5.6 to verify successful display assembly replacement. Technical Service Manual 7 - 25 Plum 360 Infuser... - Page 202 GASKET CONDUCTIVE 0.20 X 0.18 X 1.65 LG (3) configuration with GASKET .20 X .28 X 3.75 LG washers KEYPAD Figure 7-12. Keypad, Display, CPU PWA, and Piezo Alarm Plum 360 Infuser 7 - 26 Technical Service Manual...
-
Page 203: Cpu Pwa Replacement
Note: The cable’s black or red edge (pin 1) should be pointed up. Figure 7-13. Front and Rear View of CPU/Driver Cable Routed Through Main Chassis Technical Service Manual 7 - 27 Plum 360 Infuser... - Page 204 Receptacle pins Figure 7-15. Male Receptacle Header Socket on the CPU PWA Note: Verify that the pins inside the male receptacle socket housing on the CPU PWA are not damaged or bent. Plum 360 Infuser 7 - 28 Technical Service Manual...
- Page 205 Figure 7-17. Side View of the CPU/Driver Cable Female Connector Firmly Seated and Locked to the CPU PWA Male Connector 12. Install the replacement CPU PWA. 13. Reinstall the display assembly. Technical Service Manual 7 - 29 Plum 360 Infuser...
- Page 206 Infusion mechanism Figure 7-20. CPU/Driver Cable Connected to the Infusion Mechanism Driver PWA 15. Slide the infusion mechanism onto the main chassis rails and into the main chassis. Plum 360 Infuser 7 - 30 Technical Service Manual...
- Page 207 Figure 7-22. Power Cable and Battery Cable Tie-wrapped 21. Connect the Piezo alarm cable. 22. Reinstall the power supply and display in the exact reverse order. 23. Install the front and rear enclosures. 24. Install the peripheral PWA. Technical Service Manual 7 - 31 Plum 360 Infuser...
- Page 208 26. Perform the PVT in Section 5.6 to verify successful CPU PWA replacement. MAIN CHASIS 4-40 x 1/4 SLOTTED HEX HEAD SCREW WITH WASHER (2) CPU INSULATOR CPU PWA Figure 7-23. CPU PWA Replacement Assembly Plum 360 Infuser 7 - 32 Technical Service Manual...
-
Page 209: Piezo Alarm Assembly Replacement
9. Join the front enclosure, rear enclosure, and main chassis in the exact reverse order of separation. 10. Reinstall the battery and connect the infuser to AC (mains) power. 11. Perform the PVT in Section 5.6 to verify successful piezo alarm assembly replacement. Technical Service Manual 7 - 33 Plum 360 Infuser... -
Page 210: Infusion Mechanism Assembly Replacement
Default Drug Library. If the pump had a Custom Drug Library (CDL) before the mechanism assembly was replaced, the pump will need to be reset to factory defaults and the CDL will need to be downloaded from ICU Medical MedNet. The recommended tools for this procedure are a medium size flat blade screwdriver, No. - Page 211 Reset the infuser to the factory default settings as described in CE 3.x Configuration Reconfigure the network configuration as described in the Guide Download the Custom Drug Library from ICU Medical MedNet as described in Chapter 8 of the ICU Medical Mednet Software User Guide Section 1.16.5 16.
-
Page 212: Infusion Mechanism Chassis Gasket Tape Installation
Note: Installation of gasket tape to cover the opening on the infusion mechanism chassis helps protect the Switch PWA from being exposed to fluid ingress. The required tool for this procedure is the ICU Medical alignment fixture (P/N 519-97225-001). The replacement part for this procedure is:... -
Page 213: Cassette Door And Fluid Shield Replacement
If the fluid shield tab is bent, contact ICU Medical for a fluid shield assembly replacement. Recommended tools for this procedure are a medium size flat-blade screwdriver and long needle nose pliers. - Page 214 CAUTION: Use extreme caution when installing or replacing the fluid shield. Ensure that the fluid shield is properly aligned with the infusion mechanism assembly pins. Plum 360 Infuser 7 - 38 Technical Service Manual...
- Page 215 If the regulator closer is not seated properly, discontinue use and ICU Medical for technical assistance. Normal Tab Bent Tab Figure 7-28. Close-up Views of Normal (Left) and Bent (Right) Fluid Shield Tab Technical Service Manual 7 - 39 Plum 360 Infuser...
- Page 216 A pump with an unseated regulator closer may pass the Unrestricted Flow Test. MECHANISM ASSEMBLY GASKET, .72 IN. (2) FLUID SHIELD GASKET, 1.09 IN. CASSETTE DOOR Figure 7-29. Fluid Shield Replacement Plum 360 Infuser 7 - 40 Technical Service Manual...
- Page 217 LEVER COVER MECHANISM ASSEMBLY CASSETTE DOOR DOOR HANDLE 3/32 PUSH-ON RETAINING RING 4-40 x 3/8 HEX HEAD SCREW DOOR PIVOT CAP WITH WASHER Figure 7-30. Cassette Door and Door Handle Replacement Technical Service Manual 7 - 41 Plum 360 Infuser...
-
Page 218: Door Handle Assembly Replacement
14. Join the front enclosure, rear enclosure, and main chassis in the exact reverse order of separation. 15. Reinstall the battery and connect the infuser to AC (mains) power. 16. Perform the PVT in Section 5.6 to verify successful door handle assembly replacement. Plum 360 Infuser 7 - 42 Technical Service Manual... -
Page 219: Specifications
Section 8 SPECIFICATIONS The following specifications apply to the Plum 360 Infuser. PHYSICAL: Dimensions: Approximately 8 H x 8 W x 6 D inches (20 cm H x 20 cm W x 15 cm D) (excluding pole clamp extrusion and power cord storage) Mass: Approximately 10 lbs (4.5 kilograms) with battery... - Page 220 Storage Temperature Refresh Charge Interval -15°C to 25°C 6 months 25°C to 40°C 2 months 40°C to 60°C 1 week Do not store above 40°C for more than 2 weeks. Plum 360 Infuser 8 - 2 Technical Service Manual...
- Page 221 Wireless LAN: Standards: IEEE 802.11 a/b/g/n Transmit Power: 802.11a + 16dBm (max), 802.11b + 15dBm (max), 802.11g + 15dBm (max), 802.11n + 14.5dBm @ 2.4GHz (max), 802.11n +16dBm @ 5.0 GHz (max) Technical Service Manual 8 - 3 Plum 360 Infuser...
- Page 222 Ethernet LAN: DHCP assigned IP address, Subnet Mask, Gateway, DNS1, and DNS2 RoHS: The infuser meets the requirements of Directive 2011/65/EU on the restriction of the use of certain hazardous substances in electrical and electronic equipment. Plum 360 Infuser 8 - 4 Technical Service Manual...
-
Page 223: Drawings
, and Section 9 Drawings in are provided as information only, and may not exactly reflect current product configuration. Note: PWA schematic drawings are available from ICU Medical upon request. Table 9-1. Drawings Figure Number Title Illustrated Parts Breakdown (3 Sheets) - Page 224 Tip, Shaft, Pole Clamp Section 7.2.11.2 Extrusion, with Rubber Pad, Pole Clamp Section 7.2.11.1 Retainer, AC Power Cord Section 7.2.5 Cordset, AC Power, Hospital Grade Section 7.2.5 Strap, Velcro Section 7.2.5 Plum 360 Infuser 9 - 2 Technical Service Manual...
- Page 225 Cap, Pivot, Door Section 7.2.13.8 Bumper, Mechanism Chassis Section 7.2.13.6 Tape, 3M 850, 1.9 MIL, .25 in. W, Clear As applicable Tape, 3M 4955, .08 in. Thk., .25 in. W, White As applicable Technical Service Manual 9 - 3 Plum 360 Infuser...
- Page 226 Screw, 4-40 x 3/8, Button Cap, Torx Head, T-8 As applicable Screw, 4-40 x 5/8, Pan Head, Phillips Section 7.2.6 Screw, Jack, 3/16 x 4-40 x 7/16 with Split Lock (IPB 85) Section 7.2.5 Plum 360 Infuser 9 - 4 Technical Service Manual...
- Page 227 As applicable Insulator, Secondary As applicable Gasket, Peripheral Housing Section 7.2.7.3 Lens, LED Section 7.2.7.3 Cover, USB Section 7.2.7.3 Seal, Round, Purple Section 7.2.7.3 Bolt, 4-40 x 1/4, Hex Head Not applicable Technical Service Manual 9 - 5 Plum 360 Infuser...
- Page 228 As applicable Screw, 6-32 x 1/4, Pan Head, Phillips, SS Not applicable Washer, Split Lock, #4 Section 7.2.6 Lever Cover Section 7.2.13.9 Splashguard Section 7.2.13.5 Washer, Flat, #4, Wide, SS Section 7.2.13.5 Plum 360 Infuser 9 - 6 Technical Service Manual...
- Page 229 Figure 9-1. Illustrated Parts Breakdown (Sheet 1 of 3) Technical Service Manual 9 - 7 Plum 360 Infuser...
- Page 230 SECTION 9 DRAWINGS Figure 9-2. Illustrated Parts Breakdown (Sheet 2 of 3) Plum 360 Infuser 9 - 8 Technical Service Manual...
- Page 231 Figure 9-3. Illustrated Parts Breakdown (Sheet 3 of 3) Technical Service Manual 9 - 9 Plum 360 Infuser...
- Page 232 SECTION 9 DRAWINGS Figure 9-4. Front Enclosure, Rear Enclosure, Main Chassis and CE Module Plum 360 Infuser 9 - 10 Technical Service Manual...
- Page 233 Figure 9-5. Front Enclosure Assembly Technical Service Manual 9 - 11 Plum 360 Infuser...
- Page 234 SECTION 9 DRAWINGS Figure 9-6. Rear Enclosure Assembly Plum 360 Infuser 9 - 12 Technical Service Manual...
- Page 235 Figure 9-7. CE Module Technical Service Manual 9 - 13 Plum 360 Infuser...
- Page 236 SECTION 9 DRAWINGS Upper image shows original piezo configuration with splashguard (127) Lower image shows alternate piezo configuration with washers (128) Figure 9-8. Main Chassis Assembly (Sheet 1 of 2) Plum 360 Infuser 9 - 14 Technical Service Manual...
- Page 237 Figure 9-9. Main Chassis Assembly (Sheet 2 of 2) Technical Service Manual 9 - 15 Plum 360 Infuser...
- Page 238 SECTION 9 DRAWINGS Figure 9-10. AC (Mains) Power Cord Assembly and Battery Assembly Plum 360 Infuser 9 - 16 Technical Service Manual...
- Page 239 Figure 9-11. Antenna PWA Technical Service Manual 9 - 17 Plum 360 Infuser...
- Page 240 SECTION 9 DRAWINGS Figure 9-12. CPU PWA and Main Chassis Plum 360 Infuser 9 - 18 Technical Service Manual...
- Page 241 Figure 9-13. Infusion Mechanism Assembly Technical Service Manual 9 - 19 Plum 360 Infuser...
- Page 242 SECTION 9 DRAWINGS Figure 9-14. Minipole Assembly Plum 360 Infuser 9 - 20 Technical Service Manual...
-
Page 243: Appendix
(60601-1-2 Edition 3 Compliance) The Plum 360 (List number 30010) is intended for use in the electromagnetic environment specified below. The customer or the user of the Plum 360 should assure that it is used in such an environment. Emissions... -
Page 244: Table A-2 Guidance And Manufacturer's Declaration - Electromagnetic Immunity
70% U (30% dip in U 70% U (30% dip in U IEC 61000-4-11 for 25 cycles for 25 cycles The Plum 360 includes an internal <5% U (>95% dip in U <5% U (>95% dip in U battery backup that... - Page 245 Note 2: Compliance levels for ESD testing (IEC 61000-4-2) shown above are mandated by IEC 60601-2-24 and exceed those in IEC 60601-1-2. The IEC 60601-1-2 levels are 6KV contact and 8KV air discharge. Technical Service Manual A - 3 Plum 360 Infuser...
-
Page 246: (60601-1-2 Edition 3 Compliance
Level Immunity Guidance WARNING: Portable and mobile communications equipment should be used no closer to any part of the Plum 360, including cables, than the recommended separation distance calculated from the equation applicable to the frequency of the transmitter Conducted RF... - Page 247 RF transmitters, an electromagnetic site survey should be considered. If the measured field strength in the location in which the Plum 360 is used exceeds the applicable RF compliance level above, the Plum 360 should be observed to verify normal operation.
-
Page 248: Table A-4 Recommended Separation Distances Between Portable And Mobile
COMMUNICATIONS EQUIPMENT (60601-1-2 EDITION 3 COMPLIANCE) The Plum 360 (List numbers 30010 and 30011) is intended for use in an electromagnetic environment in which radiated disturbances are controlled. The customer or user of the Plum 360 can help prevent electromagnetic interference by maintaining a minimum... -
Page 249: Table A-5 Guidance And Manufacturer's Declaration - Electromagnetic Emissions
Table A-5. Guidance and Manufacturer’s Declaration - Electromagnetic Emissions (60601-1-2 Edition 4 Compliance) The Plum 360 (List number 30010) is intended for use in the clinical professional healthcare electromagnetic environment specified below. The customer or the user of the Plum 360 should assure that it is used in such an environment. -
Page 250: Table A-6 Guidance And Manufacturer's Declaration - Electromagnetic Immunity
0% U for 250/300 cycles 0% U for 250/300 cycles environment. IEC 61000-4-11 Note 1 Note 1 The Plum 360 includes an internal battery backup that if properly charged will sustain the infuser during any voltage dips or interruptions likely to be found... -
Page 251: (60601-1-2 Edition 4 Compliance
RF transmitters, an electromagnetic site survey should be considered. If the measured field strength in the location in which the Plum 360 is used exceeds the applicable RF compliance level above, the Plum 360 should be observed to verify normal operation. - Page 252 For 60601-1-2 Edition 4 immunity related extended proximity field frequencies from wireless transmitters, wireless communications equipment, devices, and portable or mobile communications equipment should be used no closer to any part of Plum 360, including cables, than the higher of 30 cm or as determined from the following...
- Page 253 1-866-488-6088 or by email: pumppartsservices@icumed.com All Other Countries For technical assistance, contact your local ICU Medical sales office. WARNING: EXPLOSION HAZARD EXISTS IF THE INFUSER IS USED IN THE PRESENCE OF FLAMMABLE SUBSTANCES, INCLUDING ANESTHETICS. Technical Service Manual Plum 360 Infuser...
- Page 254 ICU Medical, Inc. EC REP 600 N. Field Drive Hofspoor 3, 3994 VZ Houten, Lake Forest, Illinois, 60045 The Netherlands Australian ICU Medical Australia Pty Limited Sponsor: Unit U, 10-16 South Street, Rydalmere, NSW 2116 Australia Plum 360 Infuser Technical Service Manual...
Need help?
Do you have a question about the Plum 360 and is the answer not in the manual?
Questions and answers
I have a 360 IV pump that is showing a "calibrate cassette" message. Is there something I can do, or do I have to have Bio Med look at it. This tech is over 200 miles from our facility