
Related Manuals for Shin-Nippon BR-7


Summary of Contents for Shin-Nippon BR-7
- Page 1 Refractor Model:BR-7 Operation Manual <Important> Read this manual thoroughly before use. Keep this manual on hand at all times. I-050707...
- Page 2 EU Representative FAUSTO GUZZETTI VIA SOLFERINO,5 21057 OLGIATE OLONA(VA), Italy Supplied by AJINOMOTO TRADING, INC. SHIN-NIPPON Medical & Ophthalmic Instruments Dept. EAST WING 7TH FLOOR, TFT BUILDING 3-1-22 ARIAKE, KOTO-KU, TOKYO 135-8071, JAPAN TEL: 813-3528-4416 FAX: 813-3528-4426 http//www.shin-nippon.jp Manufactured by TOWA MEDICAL INSTRUMENTS Co.,Ltd.
-
Page 3: Table Of Contents
CONTENTS Specification Page 2 Exterior Features Page 4 (1) Front-side Page 4 (2) Back-side Page 5 Usage Page 6 (1) Setting Page 6 (2) Spherical lens Page 6 (3) Astigmatic lens Page 7 (4) Accessory lens Page 7 (5) Auxiliary lens Page 8 (6) Cross cylinder Page 9... -
Page 4: Specification
1. Specification (1) Model: REFRACTOR BR-7 (2) Measuring range: Near sight: 0.00 ~ -19D, 0.25D interval Hypermetropia: 0.00 ~ +16.75D, 0.25D interval (It is possible to measure at 0.12D interval when using a built-in assistance lens.) Astigmatic: 0.00 ~ -6.00D, 0.25D interval (It is possible to measure up to -8.00D when using attachment lens -2D.) - Page 5 Characteristic of BR-7 1) Since the cross cylinder and the rotary prism keep a constant distance from the eyes by the double loupe (turret) method, it is possible to do precise measurement and it can be used easily. 2) Since the cross cylinder loupe is automatically connected with the astigmatic axis by the synchronic mechanism, it shows efficiency in the astigmatic precise measurement.
-
Page 6: Exterior Features
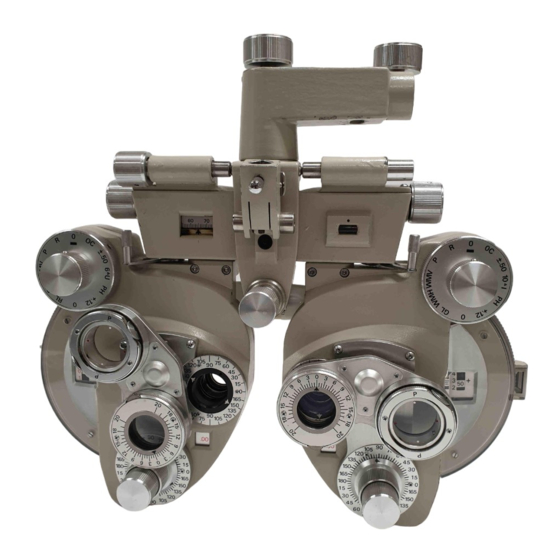
2. Exterior Features (See Figure 1) 【Front-side】 (1) Attachment mounts to the unit (2) Fixed knob for the mount (3) Rotation knob: Used to rotate the direction of the main body. (4) Horizontal control knob: Used for horizontal adjustment of the main body. (5) Level vial: Used as a target of adjusting the leveling. -
Page 7: Back-Side
【Back-side】 (21) Eye inspection window: This is a window to observe an examinee. Each displayed lens is set in this position. (23) Forehead support: Used to support the forehead of an examinee. (25) Cheek stopper attachment: Attachment to fix the associated cheek stopper. (29) Near point card: Accessory for inspecting near-point. -
Page 8: Usage
3. Usage (1) Setting (A) Installation to eye inspection stand (B) Horizontal control Turn the horizontal control knob (4) so that air bubble in the standard part (5) comes to the *mark. (C) Set of near point card Insert the card holder (30) in the tip of near point range finder. Since near point range finder is divided into tow at the middle point, set the display surfaces (inch displays) of them together. -
Page 9: Astigmatic Lens
(3). Astigmatic lens When astigmatic lens knob (15) is turned, 0.00-6.00D are set in the 0.25-D scale and the astigmatic degree (written as C below) is displayed in astigmatic scale (14). See (fig.10). Incidentally because the astigmatic lens of this instrument adopts a cloud fog expression regulation eye method (the P11 reference), all negatives are adopted. -
Page 10: Auxiliary Lens
(5). Auxiliary lens When assistance lens knob (10) is turned and a printed display symbol is adjusted to the index, the assistance lens to use is set in eye inspection window (21). See (fig.12) and (fig.13). (fig.12) (fig.13) O , O : The eye inspection window becomes transparent. -
Page 11: Cross Cylinder
(6). Cross cylinder Used for precise measurement of the astigmatic degree and the astigmatic axis, and presbyopia straightening and distance spherical surface degree. When setting crossing cylinder (18) at the regulation eye window, have and do the crossing cylinder. See (fig.15). (fig.14) (fig.15) The central axis of inversion knob shows axis (Axis), the letter of P shows degree (Power). -
Page 12: Cornea Sight Equipment
(8). Cornea sight equipment 」 (fig.20) (fig.21) When forehead support knob (22) is turned, forehead support (23) goes forward and backward. When peeping into the cornea sight window (24) about 30 cm before the window, while examinee place the forehead against forehead support (23), a sight and a scale are observed like (fig.21). Look into the examinee’s eyes (the cornea surface) while adjusting the sight and length of the scale. - Page 13 Example 3: When it is measured at distance on 6mm (3rd short line) from the length line, if the formula is S-14.00D, look at the part intersecting place of column -14.00D and column 6 in table 2, which shows 1.08D. Therefore, lens degree at 12cm from the eyes: (-14.00) + (+1.08) =-12D The astigmatic degree is:...
- Page 14 0.001 0.002 0.003 0.004 0.005 0.006 0.007 0.008 0.009 0.01 0.004 0.008 0.01 0.02 0.02 0.02 0.03 0.03 0.04 0.04 0.009 0.02 0.03 0.04 0.05 0.06 0.06 0.07 0.08 0.09 0.02 0.03 0.05 0.07 0.08 0.10 0.12 0.13 0.15 0.17 0.03 0.05 0.08...
-
Page 15: Near Point Card
(9). Near point card Measure a glass degree at the short distance in addition to the distant view for the person of the presbyopia of multi-focus lens wearing and so on. For the way of setting of the near point range finder, near point card (29), and card holder (30), refers to above-mentioned 3-(1)-(C) in page 5. -
Page 16: Eye Inspection Method
4. Eye inspection method The eye inspection method which is possible to do with this receptacle is explained. Before eye inspection with this receptacle, it is necessary to investigate in advance present eyesight and condition of examinee, record of eyes, P.D measurement, near point of being overcrowded and shelter test. -
Page 17: Eye Inspection By Cloud Fog Method
(2) Eye inspection by cloud fog method (A) Add degree S which is +3.00D bigger than the expected right eye. Since the present glass degree is -1.00D, put (-1.00) + (+3.00) =+2.00D.That is, make it 200 of the white figure. (B) The eyesight became much worse than the beginning such that it can almost see the index of 0.1 (To increase S by +3.00D than the expected degree is to fall the eyesight until it is possible to see index of 0.1 barely.) Then, to let out eyesight gradually is cloud fog method. -
Page 18: Precise Measurement Of Astigmatic Axis, Astigmatic Degree
(3) Precise measurement of astigmatic axis, astigmatic degree. (A) Set cross cylinder (18) in front of the right eye. When the outer frame of the cross cylinder is turned, the axis and the degree changes. (fig.29) Adjust the revolving axial direction in the astigmatic axial direction. - Page 19 (E) Measure precise astigmatic degree (C) next. Turn the outer frame of cross cylinder lens (18) and adjust letter P to the astigmatic axial direction. (fig.33) (fig.33) (F) Using (fig.30) as eyesight token like before, turn the cross cylinder (18) like (B) and make the examinee compare the look.
-
Page 20: Precise Measurement Of Spherical Degree (Red Green Test)
(4) Precise measurement of spherical degree (Red degree test) (A) Examinee precise S next. Use a red green view token as an eyesight table. Show (fig.36) or (fig.37) and confirm which of red view token can be seen well. The answer was “that the green one is a little better”. In this case, it means that nearsighted degree is slightly strong (a little weak in case of hypermetropia). -
Page 21: Way Of Using Polarization Filter/Rotating Prism
(5) Eye balance tests ( i ) Way of using polarization filter (A) First, set both eyes P by turning assistance lens knob (10). On the other hand, project eye balance view tokens (fig.38) of the chart projector as a view token. (B) Mr. - Page 22 (6) Inclination (long distance) measurement ( i ) Way of using polarization (long distance) measurement (A) Turn the assistance lens knob (10) to set both eyes P. On the other hand, project inclination view token (fig.40) with the chart projector or the trial eyesight table as a view token. (B) When an examinee has no inclination, four lines line up like a cross like (fig.40).
- Page 23 (fig.46) (B) Next, measure perpendicular (top and bottom) inclination. Adjust the assistance lens knob (10) of the right eye to RMV like in (fig.47). For the rotating prism (8) of the left eye, make 0 scale horizontal. Mr. A can see red side line with the right eye and luminous point with the left eye. Like in ( i ), turn the rotating prism knob (9) and make him give a sign when the red line and the luminous point agree.
-
Page 24: Sorting Of Measurement Result
(7) Sorting of measurement result Now, Mr. A’s eyesight measurement has ended. If there is much inclination (6) (A) and (6) (B), it is necessary to correct with glass, however, there is no necessity for Mr. A. Therefore, P.D.:64 Make a glass with: R: S-1.25D* C-0.50D A 100 degree L: S-1/50D* C-0.50D A 170 degree (8) Measurement of presbyopia... - Page 25 (9) Inclination at the short distance ( i ) Horizontal inclination Put the result of farsighted measurement in the eye inspection window of both eyes in case of a person who is not presbyopia. Put the result of farsighted measurement in the eye inspection window of both eyes in case of a person who is not presbyopia.
-
Page 26: Concentration And Dispersion/Perpendicular Dispersion
(10) Other measurement (i) Concentration and disperse Put a rotating prism in front of both eyes and place 0 scales above. To measure a concentration to far point (5m), turn the rotating prism of both eyes at the same time to the outside of the base, and read a value when the target of length letter in the eyesight table and so on can be seen in two for the first time (where double sight occurs for the first time).This shows the concentration ability for both eyes. -
Page 27: Degree Conversion
(11) Degree conversion This receptacle (M-AEI sight tester) is mainly designed for the eyesight measurement method by the cloud fog method. It doesn’t need a positive cylindrical lens, which is not even equipped. However, in case of hypermetropia astigmatic and so on, generally, with refractometer, in case of the spectacle lens and so on, a cylindrical lens is displayed in positive so that it is necessary to convert the degree. -
Page 28: Maintenance And Check
5. Maintenance and check (1) Daily maintenance (A) While not using, place dust COVER. (B) Avoid a place where there is much dust and so on for a storage place. (C) When the lens gets dirty, add a little of mix liquids of 4 ether 1 alcohol in worn cotton cloth and wipe out the dirt.
Need help?
Do you have a question about the BR-7 and is the answer not in the manual?
Questions and answers