Table of Contents
Advertisement
Advertisement
Table of Contents

Related Manuals for Shin-Nippon ACCUREF-K 9001


Summary of Contents for Shin-Nippon ACCUREF-K 9001
- Page 1 AUTO REFKERATOMETER ACCUREF-K 9001 Operations Manual RB-400-B02D...
-
Page 2: Introduction
SAFETY CONSIDERATION ACCUREF-K 9001 is a Class I, Type B medical instrument as well as LED Class 2 product. This instrument complies with Medical Device Directive 93/42/EEC. A great deal of consideration has gone into the design and manufacturing of this instrument with regard to its operational ease, the patient's safety and well-being as well as to the reliability of the product. - Page 3 CAUTION Always take great care when operating ACCUREF-K. Malfunction or damage to the instrument could occur. Cut the power immediately if malfunction occurs during operation. Damage to the equipment or personal injury will result. Consult your dealer, if repair work needs to be carried out. At no time attempt to remodel or disassemble ACCUREF-K.
-
Page 4: Table Of Contents
CONTENTS Introduction......................... 1 Safety Consideration ......................1 Accessories......................... 4 Parts Identification ....................... 5 Conveyance and Handling Procedure ................ 6 Installation Environment....................6 Safeguard Summary ....................7 Preparation ........................8 Setting ............................8 Applying Power .......................... 9 Standby ............................ 10 Switch Function ........................11 Measurement ...................... -
Page 5: Accessories
Accessories Model Eye: 1 Power Cord: 1 Printer Paper: 3 with a contact lens holder (2.5m) (width 57mm) A sticker indicating the Two packed and one installed diopter value is affixed. into the body Fuse: 2 Pack of Chin Rest Liners: 1 Chin Rest Liner Pin: 2 (T2A 250V) (1,000 sheets) -
Page 6: Parts Identification
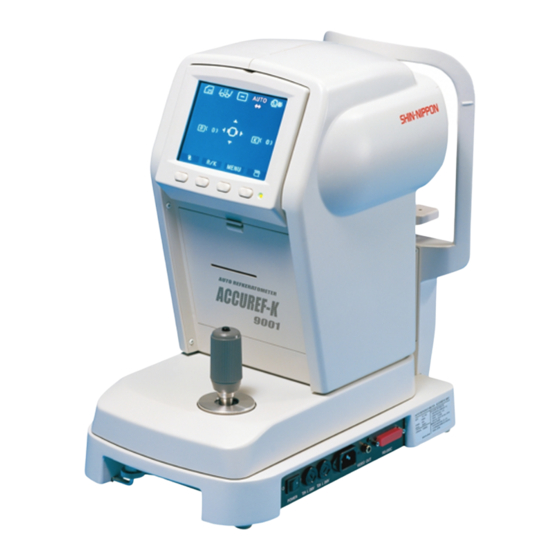
1. Parts Identification LCD Monitor Power Indicator IOL Switch Printer Measurement Mode Selection Switch Body Menu Switch AUTO REFKERATOMETER ACCUREF ‐ K Print Switch Base Anti-sliding lock Head Rest Eye Mark SHIN‑NIPPON View Window Measurement Chin Rest Start Switch Joystick Power Switch Nameplate External Interface Connector... -
Page 7: Conveyance And Handling Procedure
2. Conveyance and Handling Procedure When transporting the instrument, make sure that the body has been securely locked. Center the body onto the base so that their edges are aligned. Push up the lock while turning right until both body and base are firmly fixed to each other. 3. -
Page 8: Safeguard Summary
4. Safeguard Summary ACCUREF-K is a precision optical instrument. Always handle with care and avoid dropping it accidentally. Ensure that the instrument is properly grounded when connected to the power source. Do not touch the optical parts with fingers and be sure to avoid dust, as their measuring accuracy could be adversely affected and incorrect values may result. -
Page 9: Preparation
5. Preparation 5.1 Setting (1) Set a roll of printer paper in the printer. Refer to '10.1 Reloading Printer Paper' for the procedure. (2) Set and fix the chin rest liners with the chin rest liner pins on the chin rest. Refer to the figure on Chin Rest Liner Pins the right. -
Page 10: Applying Power
5.2 Applying Power (1) Confirm that the power is 'OFF' (○). POWER T 2A 250V (2) Insert the power cord into the instrument's power plug connector. Then insert the plug into a general purpose outlet. Always make sure that the cable is grounded. -
Page 11: Standby
5.3 Standby When the power is turned on, the screen as shown below appears on the LCD monitor, which is ready for take measurements. Vertex Distance Cylindrical Mark Increment of Eye Selection Indication Measurement Value − − − − Reticle Mark Number of Measurement ( 0 ) -
Page 12: Switch Function
5.4 Switch Function Operating switches under a LCD monitor corresponds to the icons displayed on the bottom of the screen. For normal measurement, each switch functions as below. R / K MENU IOL switch Menu switch Print switch Measurement mode Power indicator selection switch (Flashes when saving function is activated.) -
Page 13: Measurement
6. Measurement 6.1 Measurement Flow (1) Rotate an anti-sliding lock clockwise to release it. (2) Have the examinee place his/her chin on the chin rest and his/her forehead against the head rest. Then, have him/her see a target. Uncomfortable posture may cause fatigue to the examinee during measurement. Vertically adjust the optical table or the chair to avoid that. -
Page 14: Alignment
6.2 Alignment For more precise measurement, ACCUREF-K indicates an alignment mark to assist alignment and focus indicators to indicate the focus status on the monitor. 6.2.1 R/K, K, and P・ ・ ・ ・ K mode With this mode, you need to take two steps to measure with more precise work distance: focus detection and focusing. - Page 15 Change RED to BLUE (4) Move the joystick away from you (or toward you) so that the eye will be focused, and then, defocused. At this time, − − − − the focus indicators ( ) will move inward, and then, outward.
-
Page 16: R Mode
6.2.2 R mode Focus indicators will not be indicated on the screen for R mode. Alignment Mark Bring alignment mark ( ) into the center of reticle mark. − − − − Focus on the eye and press the measurement switch. (For auto measurement, measurement will start once the focus ( 0) K ( 0) -
Page 17: Print Out
-0.75 than three times) Refractive - 4.50 -0.75 PD = 64 Data - 4.50 -0.75 ---------------------------------------- SHIN-NIPPON - 4.50 -0.75 ACCUREF-K 9001 Left Eye Data <L> 7.59 44.50 Keratometry 7.57 44.50 7.58 44.50 Data 0.00 PD = 64 Pupil Distance... -
Page 18: Kerato-Peripheral Measurement
6.5 Kerato-Peripheral Measurement ACCUREF-K has a function to measure not only a center but also peripheries of a cornea. Operation (1) Press a measurement mode selection switch to switch over to P.K. mode. P.K. measurement screen will appear, and 'measurement guiding mark' (see NOTE below) which indicates the measurement position will appear on the top of the screen. - Page 19 (3) Start to measure the corneal periphery. Current measurement position (blue / blinking) Have the examinee look at the fixation target that is Position already measured turned on. A measurement position of the measurement (yellow / illumination) guiding mark turns blue and blinking at this time. Carry out alignment and press the measurement switch.
-
Page 20: Iol Measurement Function
6.6 IOL Measurement Function ACCUREF-K has the function to measure the IOL (intraocular lens) implanted eye. When measuring the IOL implanted eye, press IOL switch on the front panel of the body. Then, icon for IOL mode is indicated on the left side of the LCD monitor. IOL measurement mode indication −... -
Page 21: Menu Screen Setting
6.7 Menu Screen Setting Standard measurement mode is preset to be ready to use. However, you can easily alter the setting if you wish. To enter the menu screen, press a menu switch below the LCD monitor. 【Menu Screen】 STEP 0.25 0.12 SAVE(min.) -
Page 22: Each Item Description
6.7.1 Each Item Description 【The First Screen】 STEP Selects the increment for refractive measurement. VD(mm) Selects corneal vertex distance. Selects the sign for astigmatism. START Selects how to start measurement. Refer to '6.8 Auto Start Function' for detail. MANUAL: begins measurement every time a measurement switch is pressed. - Page 23 W-D (cm) Sets near work distance. When measurement is taken with this item set, near pupil distance is automatically computed to indicate it on the screen and the printout. This function becomes valid when refractive measurement is taken. NOTE TARGET LIGHT Sets brightness of the target.
- Page 24 DATE Sets and corrects date. TIME Sets and corrects time. If you wish to correct date or time, move the cursor to the number you wish to change. Month Year Date 1999/11/30 14:30:22 Hour Second Minute witch Functions will change in this item as below. NOTE : Increases the number.
-
Page 25: Optional Functions
6.7.2 Optional Functions When you select the function you wish to set from 'OPTION' of menu screen, you can enter each option screen. 【Each Option Screen and Description】 I. Message Input Function With this function, you can print out registered messages in the area of 22 characters / line ×... - Page 26 II. No. Function You can set or change the examinee's number, and select whether the number is displayed on the screen and whether the number is printed out. When you select this menu, the screen below will appear and function of each switch will change as following.
- Page 27 III. RS232C Setting Function With this function, you can send the measurement data to BAUDRATE 9600 BAUDRATE 9600 an external computer through an interface. The data is CHARACTER 8 PARITY NONE sent using ASCII CODE. STOP BIT 1 When you select this menu, the screen on the left will appear and function of each switch will change as shown.
- Page 28 BAUDRATE 9600 (1) Move the cursor to the item you wish to set/change with CHARACTER 8 PARITY EVEN PARITY NONE switch and execute with switch. STOP BIT 1 (3) When the setting is completed, press switch to go back to the menu screen. 【Connector Pin Layout and Connection】...
-
Page 29: Auto Start Function
6.8 Auto Start Function ACCUREF-K has Auto Start function. This function starts measuring automatically when alignment meets the measurement requirement, and also prints out automatically when the measurement of both eyes completes. When Auto Start Function is activated, measurement is always taken continuously for three times regardless of REF setting in the menu screen. -
Page 30: Data Screen Function
Data Screen Function Data screen function allows you to check measurement results saved in the memory on the screen. When displaying measurement data on the screen (1) Select 'ON' in 'DATA SCREEN' field of the menu STEP 0.25 0.12 screen. VD(mm) 0 10 12 13.5 15 −... -
Page 31: Power Saving Function
6.10 Power Saving Function Power saving function will start operating when switch operation is suspended with the power on. (The switchover time (in minute) can be selected at 'SAVE' on the mode selection screen. ) To return to the measurement mode, press any switch (any switch on the front panel or the measurement start switch). -
Page 32: Tips For Effective Measurement
7. Tips for Effective Measurement (1) Do not allow external light to directly penetrate the room. (2) Fluctuation of values during measurement may occur if the examinee looks something other than the target. Urge the examinee to concentrate on the target set in front. (3) Talk to the examinee in a relaxed and friendly manner, so as to allay any fear or doubt they may have. -
Page 33: Error Messages
8. Error Messages ACCUREF-K automatically evaluates measurement condition or result and indicates error messages if it is invalid. Error messages also appear when abnormality is detected in its operational system. When any error message appears, always check the system with a supplied model eye. If it appears when no abnormality in system is detected, check the measured eye for eye disease or problem. -
Page 34: Contact Lens: Base Curve Measurement
9. Contact Lens: Base Curve Measurement You can measure a base curve of a hard contact lens with ACCUREF-K. To do so, attach a contact lens onto a contact lens holder of the model eye as following. (1) Put a small amount of water on a concave side of the contact lens holder. (2) Place the contact lens so that its convex side faces the holder. -
Page 35: Storage And Maintenance
10. Storage and Maintenance 10.1 Reloading Printer Paper Remove a printer cover and take a printer paper shaft out. Printer Cutter Part Lift a printer cutter part and pull up a head-up lever. Printer Cutter Part Set a roll of printer paper, paying attention to direction of the paper rolled up. -
Page 36: Fuse Replacement
10.2 Fuse Replacement When a fuse is blown, remove a fuse holder at the side of a main unit for replacement. Pushing the fuse holder, rotate it in the direction of the arrow below and you can remove it. Always use the specified fuse (T2A 250V). NOTE Fuse Holder Fuse... -
Page 37: Confirmation Of Measurement Accuracy
10.4 Confirmation of Measurement Accuracy It is extremely important to check operation and accuracy of the instrument using a supplied model eye. We recommend you to check accuracy periodically. When the measurement result of the model eye falls anywhere within the tolerance listed below, measurement should be considered reliable and accurate. -
Page 38: Specification
11. Specification Sphere (S) (step: 0.12/0.25D) -25〜+25D Refractive Measurement Range Cylinder (C) 0〜±10D (step: 0.12/0.25D) Axis (A) 0〜180º (step: 1°) Sphere between −10〜+10D: ±0.25D Measurement Accuracy beyond ±10 : ±0.5D Cylinder ±0.25D Radius of 5.0〜10.0mm (step: 0.01mm) Corneal Curvature (step: 0.12/0.25D) Corneal 33.75〜67.5D (a refractive index of cornea:... - Page 39 Konwa building 12-22 Tsukiji 1-chome, Chuo-ku Tokyo 104-0045, JAPAN TEL:(03)3542-4714 FAX:(03)3545-0507 Distributed by RB-400-B02D...
Need help?
Do you have a question about the ACCUREF-K 9001 and is the answer not in the manual?
Questions and answers