Table of Contents
Advertisement
Quick Links
Advertisement
Table of Contents

Related Manuals for Dupla MultiControl


Summary of Contents for Dupla MultiControl
- Page 1 MultiControl Directions for Use...
-
Page 2: Table Of Contents
Table of Contents 1. Introduction ..............4 1.1 Safety instructions . -
Page 3: Introduction
Introduction 1.1 Safety instructions All electronic components of the aquarium computer must only be operated in sound condition. If the feeder is damaged please have this replaced by a technician or send us the equipment for repair. Continued operation may cause a fatal electric shock. Ensure that the controller (1) and power unit (12) do not come into contact with water. It is good practice to disconnect all electrical equipment from the mains before placing your hands in the aquarium. Hint: It is recommended to use a separate or dedicated, safety-switch protected supply which disconnects the mains from the aquarium equipment in the event of an electrical fault. 1.2 Installation Controller The controller (1) has a mounting recess or slot (2) on the back, which mates with the mounting rail (3), and may therefore be mounted using the screw set, (4) to a wall or the... -
Page 4: Controller And Power Switching Unit
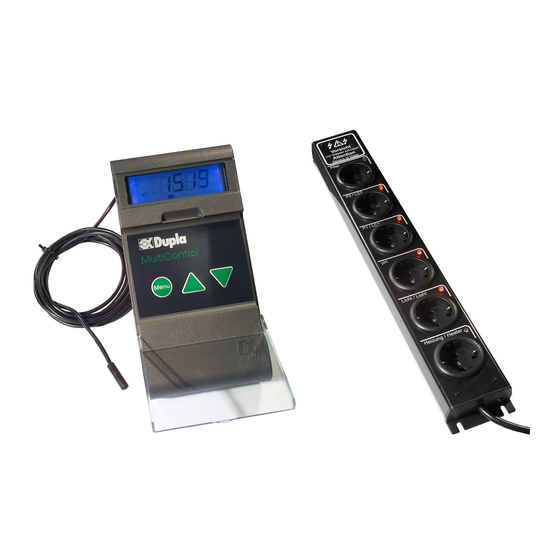
1.3 Controller and Power Unit (1) Controller (2) Mounting Slot (3) Mounting Bar (4) Screw Set (5) Display Cover (6) Display (7) Keypad Cover (8) “Menu” Key (9) ▲ Key (10) ▼ Key (11) Temperature Sensor (12) Power Unit (13) Power Unit Interval Timer 1, 2, 3 (14) CO Control Channel (15) Water Temperature Channel (16) Substrate Temperature / Cooling Channel (17) LED... -
Page 5: Display
Display = Animation effect, appears in association with display of the CO symbol = Symbol for CO channel - control of a heating device magnetic valve / appears when program- ming and displaying CO channel values = Symbol for heating channel - control of a heating device / appears when programming and displaying water temperature values = Symbol for substrate temperature channel or alternatively, cooling channel - control of a substrate heater or a cooling device / appears when programming and displaying substrate temperature / cooling values HEAT = heating / heating function - indicates the “horizontal waves” channel is operating with a second heating device COOL = cooling / heating function - indicates the “horizontal waves” channel is operating with a cooling device = Symbol of the 1 time-controlled channel / appears when programming and displaying the values of the 1 time-controlled channel = Symbol of the 2 time-controlled channel / appears when programming and displaying the values of the 2 time-controlled channel = Symbol of the 3 time-controlled channel / appears when programming and displaying the values of the 3 time-controlled channel = Appears when programming and displaying the value of the pH alarm, temperature alarm or the calibration memory function On / Off = Displays the timer status when programming and in operation / displays the activation or deac- tivation of the pH alarm, the temperature alarm or the calibration memory function Mo-Su = Display of programmable circuit times / single days Mo-Su, Mo-Fr, Sa-Su / Display of week days in English Cal = Appears during calibration Set... -
Page 6: Basic Functions
28.0° C due to the summer temperature, cooling is activated. Hint: If it is decided to use the cooling mode of the Multicontrol, it is suggested to retain the significant bene- fits of substrate heating (see 3.1), a heating cable is controlled instead by the water temperature channel. -
Page 7: Temperature Alarm
CAUTION: If no pH electrode is connected to the MultiControl, so that the BNC socket is open, inevitably, ficti- tious pH values will be displayed in individual as well as toggle mode (where the displayed values change from one to the next in a 2 second cycle). -
Page 8: Quick Start Guide To Programming
4. Quick Start Guide to Programming Switch display lighting ‘on’ or ‘off’: Press and hold the ▼ key = on/off. Toggle mode: Temperature and time of day are displayed alternately in a 2 second rhythm (factory preset). Single mode: Optionally either pH value, temperature or time of day are displayed continuously (by pressing the ▲ and ▼ key). Hint: Shall the pH value be displayed in the toggle and single mode, please select “on” when programming the pH set-point in the menu item. -
Page 9: Programming Instructions
5. Programming Instructions First tap “Menu“ key to start the programming mode. Hint: The symbol ”Menu” indicates you are in the programming mode. By holding down “Menu” it is possible to quit the programming mode at any time. Control of Water Temperature When pressing the “Menu“ key, “25.0” flashes on the display. Set the required value with the ▲ or ▼ key. Acknowledge with “Menu” key, “0” will flash. Set the required value with the ▲ or ▼ key. Acknowledge with the ”Menu“ key to return to the main menu. -
Page 10: Setting Temperature Alarm
Setting Temperature Alarm Press “Menu” key, “3.0” will flash. Set the required value with the ▲ or ▼ key. Acknowledge with “Menu”, “Off” will flash. To activate the temperature alarm, set display to “On” with the ▲ or ▼ key. Acknowledge with ”Menu“ to return to the main menu. Scroll to the next menu item with the ▲ key. Setting Switching Times Press the “Menu” key, “1” flashes. Press the “Menu” key to set the switch-on time of the slot, “00:” will flash. Set the desired hour switching-on time with the ▲ or ▼ key. Acknowledge with “Menu” key, “:00” will flash. Set the desired minutes switching-on time with the ▲ or ▼ key. Acknowledge with the “Menu” key, “Off” will flash. Now set switching-off time of slot . Set the desired hour switching-off time with the ▲ or ▼ key. Acknowledge with “Menu”, “:00” will flash. Set the desired minutes switching-off time with the ▲ or ▼ key. Acknowledge with “Menu”, “Off” will flash. Set the day or days with the ▲ or ▼ key. Acknowledge with “Menu”, “1” will flash. If you want to set (up to 7) other switching on/off times of the slot , press ▲ and program in the same way. In order to quit sublevels of switching times of , hold down „Menu“ to return to the main menu. Scroll through to the next menu item 11 with ▲. -
Page 11: Programming Ph Set Point
Setting pH Alarm Press the “Menu” key, “0.5” flashes. Set the required value with the ▲ or ▼ key. Acknowledge with “Menu” - “Off” flashes. Set to “On” if a pH electrode is connected. Otherwise set to “Off” , to avoid a meaningless pH value being displayed in normal or toggle mode if no electrode is connected and the pH BNC socket is open. To activate the pH alarm, set the display to “On” with the ▲ or ▼ key. Acknowledge with the “Menu” key to return to the main menu. Scroll through to the next menu item with the ▲ key. Calibrating pH Electrode 1. Connect the pH electrode to the MultiControl and remove the protective cap from electrode tip. 2. Rinse electrode tip briefly with Dupladest. 3. Press the “Menu” key - “7” appears at the top-left of the display. 4. Dip the electrode into the pH 7 solution. When the displayed measurement has settled, press and hold the “Menu” key (until beep) to accept value; “4” appears at top-left of display. 5. Rinse electrode tip briefly with Dupladest. 6. Dip the electrodes into the pH 4 solution. When the displayed measurement settled, press and hold the ”Menu” key (until beep) to accept value; this will bring you back to the main menu. 7. Rinse electrode tip briefly with Dupladest. 8. Fix electrode in the aquarium with suction cups. 9. Scroll through to the next menu item with the ▲ key. -
Page 12: Setting Calibration Memory
Set the current time in hours with the ▲ or ▼ key. Acknowledge with “Menu”, “:00” flashes. Set the current time in minutes with the ▲ or ▼ key. Acknowledge with “Menu”, “Mo” flashes. Set the current week day with the ▲ or ▼ key. Acknowledge with “Menu” to return to the main menu. Scroll through to the next menu item with the ▲ key. To finish programming, hold ”Menu“ key down until display changes. 6. Factory Setting / Reset Target temperature water heating: 25.0° C Target temperature substrate heating: 25.1° C Difference heating / cooling differential: 3.0° C Temperature Alarm: 3° C (off) Target pH control: pH Alarm: 0.5 (off) Calibration memory function: Time switch position 1: Time switch position 2: Off Time switch position 3: Should your aquarium computer not be working correctly, please carry out a reset as follows: 1. Switch off power to MultiControl. 2. Turn power back on again while holding down the “Menu” key. 3. Release “Menu” key. Caution: Activating the reset function will result in a loss of all programmed settings. -
Page 13: Source Of Fault
7. Source of Fault In the case of a problem, first reset to the factory settings. If this does not solve the problem, please search for the fault in the following table: Fault Possible cause Solution Temperature control is not Immersion heater thermostat Set heater thermostat 3-4° C higher working overriding MultiControl than the MultiControl Display E01 Temperature sensor cable break / Replace or connect temperature Temperature sensor not connected sensor Display E02 Temperature sensor hot-wired Replace temperature sensor Alarm cannot be Temperature sensor defect Replace temperature sensor deactivated External devices are not Time setting inactive... -
Page 14: Technical Specifications
8. Technical Specifications Operating voltage: 230 V / 50 Hz Operating temperature: 0-60° C Power Unit total load capacity: 1,500 W Power Unit total fuse rating: 6.3 A/T Data storage: power failure safe with E-Prom parameter memory pH Control pH control range: 4.0 - 9.9 Control accuracy: +/- 0.1 (reference value) Alarm window: 0.5-4 Switching hysteresis: 0.1 pH Connection power: 1,000 W Calibration memory: Six-week Water Temperature Temperature control range: 15 – 35.9° C Control accuracy: +/- 0.1 °C Alarm window: 1.0 – 5.0° C Switching: adjustable contact-less electronic triac Switching hysteresis: 0.1° C Connection power 1,000 W Substrate Temperature / Cooling Differential to water temperature:... - Page 15 Connector plan of recommended Dupla products Dupla Therm Set 100 W Art. Nr. 80685 150 W Art. Nr. 80686 200 W Art. Nr. 80687 250 W Art. Nr. 80688 Dupla Armatur Alpha Dupla Electra II Art. Nr. 80203 Dupla CO Armatur Delta Art.
- Page 16 DOHSE AQUARISTIK KG Otto-Hahn-Str. 9 • D-53501 Gelsdorf Telefon: 0049-(0)22 25 - 94 15-0 Fax: 0049-(0)22 25 - 94 64 94 info@dohse-aquaristik.de www.dohse-aquaristik.de...
Need help?
Do you have a question about the MultiControl and is the answer not in the manual?
Questions and answers