
Related Manuals for Chefman Fry Guy RJ07-15-SS


Summary of Contents for Chefman Fry Guy RJ07-15-SS
- Page 1 ® 1.6-Quart FRY GUY USER GUIDE • Safety Instructions • Features • Operating Instructions • Deep Frying Tips • Frying Chart • Cleaning and Maintenance • Notes • Terms and Conditions • Warranty Registration RJ07-15-SS...
- Page 2 COOKING FORWARD™ Welcome! Whether this is your first Chefman appliance or you’re already a part of our family, ® we’re happy to be in the kitchen with you! With your new Fry Guy deep fryer, you can fry up french fries, doughnuts, chicken wings, and much more to golden perfection.
-
Page 3: Table Of Contents
CONTENTS Safety Instructions Features Operating Instructions Deep Frying Tips Frying Chart Cleaning and Maintenance Notes Terms and Conditions Warranty Registration... - Page 4 6. Do not operate any appliance with a damaged cord or plug or after the appliance malfunctions, or has been damaged in any manner. Should this occur, please contact Chefman Customer Support. 7. The use of accessory attachments not recommended by Chefman may cause injuries. 8. Do not use outdoors.
- Page 5 SAFETY INSTRUCTIONS IMPORTANT SAFEGUARDS 11. Extreme caution must be used when moving an appliance containing hot oil or other hot liquids. 12. Always attach the plug to the appliance first, then plug the cord in the wall outlet. To disconnect, turn any control to “off,” then remove the plug from the wall outlet. 13.
-
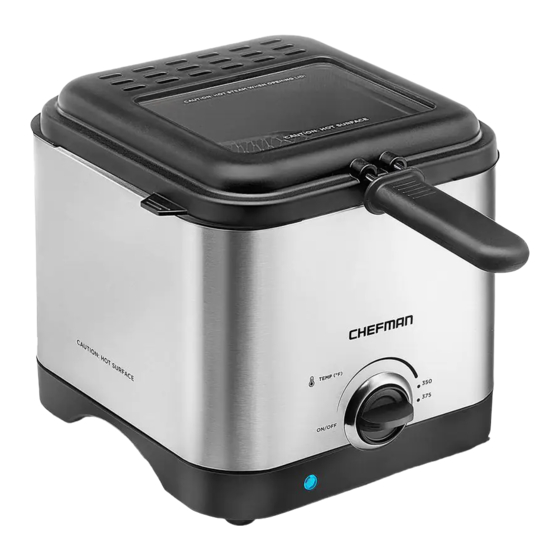
Page 6: Features
FEATURES 2. Glass Window 3. Filter 4. Wire Fry Basket with Draining Hook 5. Detachable, Cool-Touch Basket Handle 6. 1.6-Quart Nonstick Tank 7. Brushed Stainless-Steel Housing 8. Temperature Control Knob 9. Power Indicator Light 10. Side Handles 11. Magnetic Breakaway Power Cord (not shown) -
Page 7: Operating Instructions
OPERATING INSTRUCTIONS BEFORE FIRST USE With hardly any assembly required, you can be frying in no time! Carefully unpack the Fry Guy and all parts. Read and remove all stickers, except for the rating label on the bottom of the unit, which should remain on. 2. - Page 8 OPERATING INSTRUCTIONS HOW TO USE YOUR DEEP FRYER Few foods are more satisfying than crisp fried fare, and with your 1.6-Quart Fry Guy, frying is easy to do without a lot of oil or mess. Follow the directions below for best results. Place your deep fryer on a clean, dry, level, stable, and heat-resistant surface, away from the countertop edge.
-
Page 9: Deep Frying Tips
OPERATING INSTRUCTIONS 8. Fry food according to your recipe or to desired doneness. NOTE: When food is placed in the deep fryer, it will cool the oil, making the indicator light turn back on. This is normal. The fryer will regulate the heat, and the light will turn off when the set temperature is reached. - Page 10 OPERATING INSTRUCTIONS • Use only good-quality cooking oil for deep frying. Deep frying foods in butter, margarine, olive oil, or animal fat is not recommended because those fats begin to smoke at a lower temperature. • Consider reusing frying oil. Unless there are many burned food particles, frying oil can generally be used more than once.
-
Page 11: Frying Chart
FRYING CHART Use this chart as a guide for deep frying some popular foods. Always follow current food safety guidelines when checking for doneness. Food Amount Temperature ( ˚ F) Cooking Time (mins) Chicken Wings 8 wings Doughnuts 1 doughnut 2-4 (flip once) Fish Sticks 4 sticks... -
Page 12: Cleaning And Maintenance
CLEANING AND MAINTENANCE This appliance requires little maintenance. It contains no user serviceable parts. Do not try to repair it yourself. If the unit needs repairs, please contact Chefman Customer Support. Before cleaning, unplug from the outlet, detach the cord from the unit, and allow the oil and unit to cool completely. -
Page 13: Notes
NOTES... - Page 14 NOTES...
- Page 15 NOTES...
-
Page 16: Terms And Conditions
This Warranty is void without proof of purchase within the United States and Canada. Please be aware that this Warranty supersedes all other warranties and constitutes the entire agreement between the consumer and Chefman . Any changes to the ®... - Page 17 ® and workmanship, under normal household use, for a period of 1 year from the date of purchase when used in accordance with the directions listed in the Chefman User ® Guide. If your product does not work as it should, please contact Customer Support at support@chefman.com so that we may assist you.
- Page 18 AC ONLY/ AC SEULEMENT NOTE: Label depicted here is an example. How do I register my product? All you need to do is fill out a simple Chefman registration form. You can easily ® access the form in one of the two ways listed below: Visit chefman.com/register.
- Page 19 WARRANTY REGISTRATION ® For product information, visit chefman.com EXCEPT WHERE SUCH LIABILITY IS REQUIRED BY LAW, THIS WARRANTY DOES NOT COVER, AND CHEFMAN SHALL NOT BE ® LIABLE FOR, INCIDENTAL, INDIRECT, SPECIAL, OR CONSEQUENTIAL DAMAGES, INCLUDING WITHOUT LIMITATION, DAMAGE TO, OR LOSS OF USE OF THE PRODUCT, OR LOST SALES OR PROFITS OR DELAY OR FAILURE TO PERFORM THIS WARRANTY OBLIGATION.
- Page 20 ® ©CHEFMAN 2021...
Need help?
Do you have a question about the Fry Guy RJ07-15-SS and is the answer not in the manual?
Questions and answers