Table of Contents
Advertisement
Quick Links
PAW GmbH & Co. KG
Böcklerstr. 11, 31789 Hameln, Germany
Phone: +49-5151-9856-0, Fax: +49-5151-9856-98
E-mail: info@paw.eu, Web: www.paw.eu
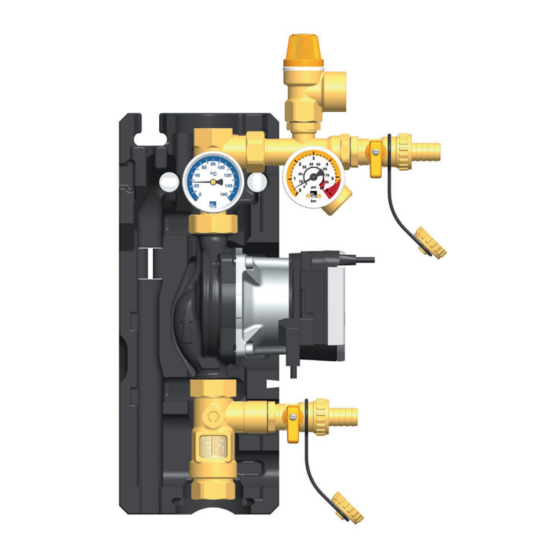
Installation and Commissioning Instructions
Solar return stations
SolarBloC
midi Basic - DN 20
®
SolarBloC
maxi Basic - DN 25
®
SolarBloC
maxi
®
SolarBloC
midi
®
DN 25
DN 20
2020/09
9976x0210x-mub-en – V01
1
Advertisement
Table of Contents

Related Manuals for PAW SolarBloC midi Basic DN 20


Summary of Contents for PAW SolarBloC midi Basic DN 20
- Page 1 PAW GmbH & Co. KG Böcklerstr. 11, 31789 Hameln, Germany Phone: +49-5151-9856-0, Fax: +49-5151-9856-98 E-mail: info@paw.eu, Web: www.paw.eu Installation and Commissioning Instructions Solar return stations SolarBloC midi Basic - DN 20 ® SolarBloC maxi Basic - DN 25 ® SolarBloC maxi ®...
-
Page 2: Table Of Contents
Translation of the original instructions PAW GmbH & Co. KG We reserve the right to make technical changes without notice! Böcklerstraße 11 Printed in Germany – Copyright by PAW GmbH & Co. KG D-31789 Hameln, Germany 9976x0210x-mub-en – V01 2020/09... -
Page 3: General Information
1 General Information 1 General Information Carefully read these instructions before installation and commissioning. Save these instructions in the vicinity of the installation for future reference. About these instructions These instructions describe the function, installation and commissioning of the solar return stations SolarBloC midi Basic DN 20 and SolarBloC maxi Basic DN 25. -
Page 4: Designated Use
Due to its design, the station may only be installed and operated as described in this manual! Only use PAW accessories with the solar station. Improper usage excludes any liability claims. -
Page 5: Safety Instructions
2 Safety instructions 2 Safety instructions The installation and commissioning as well as the connection of electrical components require technical knowledge commensurate with a recognised vocational qualification as a fitter for plumbing, heating and air conditioning technology, or a profession requiring a comparable level of knowledge [specialist]. - Page 6 2 Safety instructions ATTENTION Material damage due to mineral oils! Mineral oil products cause lasting damage to seals made of EPDM, whereby the sealant properties are lost. We do not assume liability nor provide warranty for damage to property resulting from sealants damaged in this way. ...
-
Page 7: Mounting And Installation [Specialist]
3 Mounting and installation [specialist] 3 Mounting and installation [specialist] Accessories: compression fitting 1. Push the union nut ② and the cutting ring ③ onto the copper pipe ①. The pipe must protrude at least 3 mm from the cutting ring in order to ensure the force transmission and the sealing. - Page 8 3 Mounting and installation [specialist] 3. Copy the dimension of the mounting holes of the solar station on the mounting surface (see arrows). 4. Drill the holes and mount the solar station to the wall with appropriate wall plugs and screws. 5.
-
Page 9: Commissioning [Specialist]
4 Commissioning [specialist] 4 Commissioning [specialist] Please observe the following safety instructions regarding the commissioning of the station: WARNING Risk of burning and scalding! The valves and fittings may heat up to more than 100 °C. Therefore, do not clean or fill the system when the collectors are hot (intense sunshine). - Page 10 4 Commissioning [specialist] The fill and drain valves necessary to flush and fill the installation are integrated in the solar station. To flush the dirt particles out of the installation, only use flush and fill stations with fine filters. Ball valve with integrated check valve (Flow direction in the figure: upwards) 0°...
-
Page 11: Preparations Before Flushing
4 Commissioning [specialist] Preparations before flushing The solar circuit is flushed in the direction of flow. 1. Disconnect the expansion tank from the solar system. Please observe the instructions of the expansion tank manufacturer on this topic! 2. Close the return ball valve [1.2] (90°, see page 10). - Page 12 4 Commissioning [specialist] 4. Slowly open the return ball valve [1.2] to vent the pump section. 5. Close the drain valve [3.2] while the filling pump is running and increase the system pressure to about 5 bars. The system pressure is displayed on the pressure gauge.
-
Page 13: Setting The Solar Installation
4 Commissioning [specialist] 11. Connect the additionally required controller to the mains and set the solar circuit pump to ON in the manual mode (see the controller instructions). 12. Remove the hoses of the flush and fill station and screw the sealing caps on the fill and drain valves. -
Page 14: Maintenance [Specialist]
5 Maintenance [specialist] 5 Maintenance [specialist] Draining the solar system 1. Switch off the controller and secure it against being switched on again. 2. Open the check valve in the return ball valve [1.2] by turning the ball valve into position 45° (see page 10). -
Page 15: Spare Parts [Specialist]
6 Spare parts [specialist] 6 Spare parts [specialist] NOTICE Complaints and requests/orders of spare parts will only be processed with information on the serial number! The serial number is placed on the safety group of the solar station. In case of a complaint, please send us the entirely completed commissioning report on page 22. - Page 16 6 Spare parts [specialist] Position Spare part Item number Return ball valve DN 20, N00290 ¾" int. thread x F ¾" x ¾" ext. thread on the right, solar check valve Solar pressure relief valve ½" x ¾", MSV 6 bars N00300 Pressure gauge 0-6 bars / 0-90 psi, N00301...
-
Page 17: Solarbloc ® Maxi Basic Dn 25
6 Spare parts [specialist] SolarBloC maxi Basic DN 25 ® 2020/09 9976x0210x-mub-en – V01... - Page 18 6 Spare parts [specialist] Position Spare part Item number Solar ball valve DN 25 return, F 1" x 1" int. thread, N00306 snap-in assembly, with check valve 200 mm wc Solar pressure relief valve ½" x ¾", MSV 6 bars N00300 Pressure gauge 0-6 bars / 0-90 psi, with automatic isolation N00301...
-
Page 19: Technical Data And Pressure Drop Characteristic Curve
7 Technical data and pressure drop characteristic curve 7 Technical data and pressure drop characteristic curve Dimensions SolarBloC midi DN 20 SolarBloC maxi DN 25 ® ® 383 mm 474 mm Height (with pressure relief valve) Width (with fill and drain valve) 256 mm 258 mm Depth (with insulation) - Page 20 7 Technical data and pressure drop characteristic curve SolarBloC midi Basic DN 20 ® SolarBloC® maxi Basic DN 25 9976x0210x-mub-en – V01 2020/09...
-
Page 21: Pressure Drop And Pump Characteristic Curve Solarbloc ® Midi Basic Dn 20
7 Technical data and pressure drop characteristic curve Pressure drop and pump characteristic curve SolarBloC midi Basic DN 20 ® Flow rate [l/h] Pressure drop and pump characteristic curve SolarBloC maxi Basic DN 25 ® Flow rate [l/h] 2020/09 9976x0210x-mub-en – V01... -
Page 22: Commissioning Report
8 Commissioning report 8 Commissioning report System operator Location of installation Collectors (number / type) Collector surface m² (Height difference between System height the station and the collector field) Pipeline ⌀ Venting (collector field) ⃞ Manual vent valve ⃞ Automatic vent valve ⃞... -
Page 23: Disposal
9 Disposal 9 Disposal NOTICE Electrical and electronic devices must not be disposed of in the household waste. For the return of these devices, there are free collection points for electrical appliances in your area and possibly additional collection points for the reuse of the devices. - Page 24 PAW GmbH & Co.KG www.paw.eu Böcklerstraße 11 Phone: +49 5151 9856 - 0 D-31789 Hameln, Germany Fax: +49 5151 9856 - 98 9976x0210x-mub-en – V01 2020/09...
Need help?
Do you have a question about the SolarBloC midi Basic DN 20 and is the answer not in the manual?
Questions and answers