Table of Contents
Advertisement
Advertisement
Table of Contents

Subscribe to Our Youtube Channel
Related Manuals for GUSTARD DAC-X20


Summary of Contents for GUSTARD DAC-X20
- Page 1 Gustard DAC-X20 HD D/A converter with DSD 使用说明书...
- Page 2 目录 前面板介绍· · · · · · · · · · · · · · · · · · · · · · · · · · · · · · · · · · · · · · · · · · · · · · · · · · · · · ·2 后面板介绍·...
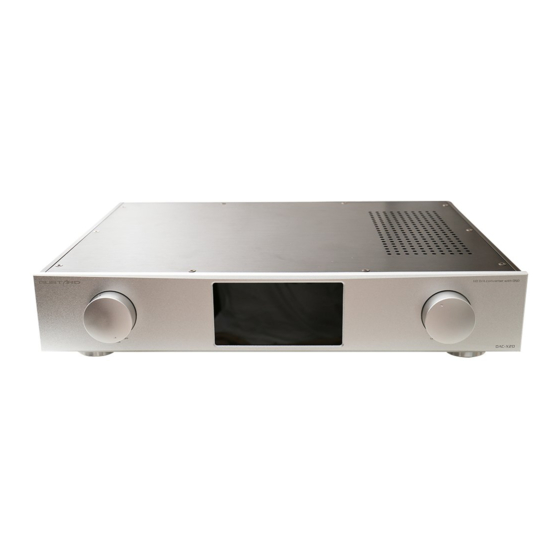
- Page 3 前面板 1. 电源开关为旋转开关,顺时针旋转到 ON 为开机,逆时针旋转到 OFF 则关机。 2. 显示屏显示输入选择,编码格式,数字滤波,采样率,音量等状态。 3. 多功能旋钮可通过顺/逆时针旋转以及按压,进行全部的功能操作。 后面板 - 2 -...
- Page 4 1. DAC-X20 使用大尺寸 TFT 液晶显示屏,实时状态显示以及功能操作。以下图形为屏幕主页面显 示状态。 2. 主屏自动亮度及操作响应激活: 当连续 30 秒以上无任何操作,DAC-X20 的屏幕就会回到主页显示,同时亮度会切换至用户预 设置的级别。一共有 5 档亮度,以下会有操作介绍。进入自动亮度后可通过按压/旋转多功能 旋钮以及操作遥控来激活最大亮度,需激活后才会对用户的功能操作进行响应。 3. 音量调节(Volume) : 当屏幕为主页显示画面且屏幕激活的状态下, 对多功能旋钮进行旋转可以直接对 DAC-X20 的输 出音量进行调节,逆时针旋转为减小音量,顺时针旋转为增大音量。音量可从-99dB~0dB,总 共 100 级调节。同时,按住多功能旋钮并保持 3 秒以上可使 DAC-X20 进入静音状态,再次按住 3 秒以上解除静音。 4. 多功能旋钮按压菜单: 在主屏幕激活状态,按压一次多功能旋钮便可进入菜单操作,再按一次进入下一个功能调节, 左右旋转则用于调节功能的选项。菜单通过光标的切换,依次为“输入通道选择——数字滤波 ——主时钟模式——屏幕亮度——模拟输出相位——模拟电路增益” 。当到达菜单末尾时再按 下多功能旋钮将返回主屏幕。 5. 菜单功能介绍: 当主屏幕激活状态时按压多功能旋钮进入菜单,除主屏显示的选项之外,还有几项子菜单,下...
- Page 5 图示为子菜单[ d.Backlight(屏幕亮度)]显示的画面,子菜单会在同一行轮流切换显示,左 右旋转多功能旋钮即可对当前显示的子菜单进行操作。 d.Backlight(屏幕亮度) : 当 DAC-X20 的显示屏进入自动亮度状态时,屏幕亮度会切换为该功能设置的亮度,用多功能旋 钮可以在 5 级亮度中选择合适的亮度。当屏幕处于激活状态,亮度会自动转变为最大亮度。 e.Phase(模拟输出相位) : DAC-X20 在 RCA 输出默认为正相位时,XLR 平衡输出为美标极性输出,即 1 地、2 热、3 冷。输 出相位有 NORMAL(正常—美标)及 INVERT(反转—欧标)可选。当在两种相位选项之间进行 调整时,请于调整后等待 5 秒以上,然后进行一次正常的开关机操作(断开交流电源) ,重新 启动 DAC-X20 后设置的相位才会被应用。 f.GAIN(模拟电路增益) : DAC-X20 的高性能全平衡模拟电路具备 3 档增益调节功能, 以配合不同输入灵敏度的后端器材, 达到最佳的信号匹配性能,进入该菜单后旋转多功能旋钮可在 0dB、+6dB、+12dB 之间切换。...
- Page 6 ① 输入选择按钮:按一下此按钮 DAC-X20 的输入通道将切换到下一个,输入通道依次按 COAX— —BNC——AES——USB——IIS 的顺序循环 ② 菜单按钮:按一下此按钮进入 DAC-X20 的功能设置菜单。 ③ 四维方向按钮:当进入 DAC-X20 的菜单时,使用四维方向键的上/下来切换要调节的功能,通 过左/右来调节选项。 ④ 返回按钮:返回到主屏幕显示。 ⑤ 音量减按钮:当 DAC-X20 处于主屏幕显示时通过此键可以减小输出的音量。 ⑥ 音量加按钮:当 DAC-X20 处于主屏幕显示时通过此键可以增大输出的音量。 ⑦ 静音按钮: 按一下此按钮 DAC-X20 将进入静音状态, 当处于静音状态时按一下此按钮解除静音。 注意:●操作距离根据角度而变化 ●如果遥控器和传感器之间存在物品,可能无法正常操作 ●如果长时间(一个月或更长时间) 将不使用遥控器,请取下电池 ●如果电池漏液,请彻底清洁电池舱内的所有残留物并安装新电池 ●当使用由红外线控制的其他 设备时,使用此遥控器可能误操作这些设备 - 5 -...
- Page 7 产品参数 数字输入: COAX 输入格式支持:PCM 16-24bit/44.1-192kHz;DSD DOP64 BNC 输入格式支持:PCM 16-24bit/44.1-192kHz;DSD DOP64 AES 输入格式支持:PCM 16-24bit/44.1-192kHz;DSD DOP64 OPT 输入格式支持:PCM 16-24bit/44.1-192kHz;DSD DOP64 USB 输入格式支持:PCM 16-32bit/44.1-384kHz;DSD DOP64/DOP128 DSD512(native) IIS 输入格式支持:PCM 16-32bit/44.1-384kHz;DSD DOP64/DOP128 DSD64-DSD512 *USB 输入操作系统支持:WIN XP/WIN7/WIN8 32-64bit;Mac OSX;Linux 模拟输出: 频率响应:20-20kHz /-0.1dB 信噪比:>128dB 声道串扰:-138dB @ 1kHz THD+N:<0.0005% IMD:<0.0005% RCA 输出电平:2.8Vrms @ GAIN=+0dB...
- Page 8 售后服务 非常感谢您选购 GUSTARD 品牌的 HIFI 产品。为了保障您的权益,请您认真阅读以下保修条款, 以便您能及时获取 GUSTARD 为您提供的完善售后服务。 1.产品保修期限: GUSTARD 承诺旗下 DAC-X20 产品自购买之日算起享受 2 年的免费保修服务,终身维护。 购买之日起 15 日内给予返厂换新服务(机身无划痕) ,1 个月内完全免费保修,厂家负责来回运 费。1 个月-2 年各自承担发货运费保修。 *厂家仅承担中国大陆运费,海外部分运费及产生的税务由用户与商家协商解决。 2.何种情况下享受免费保修服务: GUSTARD DAC-X20 在售出日起的免费保修期内,用户在正常使用该产品的情况下,产品出现因元 件质量或制造问题导致的故障。 3.属于下列情况之一的 DAC-X20 将不享受保修服务: a. 产品从购买日起算已超过规定质保期限,产品不再享受保修服务。 b. 产品实物与保修卡上产品型号、条形码和购买日期不相符。 c. 未经 GUSTARD 技术人员授权,擅自对电路或元器件改装或自行维修过的产品。...
- Page 9 ◆ Windows 系统下 USB 驱动的安装 *本机附件中包含一张光盘, 内含 XMOS USB 驱动程序。 同时也可登录官网 http://www.gustard.cn 下载 *Windows 10 用户安装驱动前需禁用驱动数字签名,否则可能安装不成功。 1. 使用台式机连接解码器的用户,强烈建议使用机箱后面的接口。因后面接口直接连接主板, 而机箱前面的接口还多一截转接线,对高速信号有一定的负面效果。 2. 使用 USB 线将 DAC-X20 与电脑连接后打开 DAC-X20 的电源,电脑会提示发现新硬件并尝试安 装驱动,如没提示,请尝试其他 USB 接口或者重新开关 DAC-X20。 3. 打开光盘,双击运行 XMOS-Stereo-USB-Audio-Class2-Driver-3033_v2.26.0.exe 程序 - 8 -...
- Page 10 4. 按提示依次点击 next 或 install 即可。 5. 检测设备,如有红色文字提示:Setup requires that the device is...,请重启 DAC-X20 或者重新拔插 USB 线。 - 9 -...
- Page 11 6. 如果出现安全警告,不用理会,请点击“始终安装此驱动程序软件(I)” ,然后完成驱动安装。 7. 成功安装驱动的画面,点击 Finish 完成安装。 - 10 -...
- Page 12 ◆ 将系统的默认播放设备设置为 DAC-X20(XMOS XS1-U8 MFA) 1. 在系统桌面的右下角,用鼠标右键点击小喇 图标,然后左键选择“播放设备” 。 2. 选择“XMOS XS1-U8 FMA(ST)” ,并点击下方“设为默认值” 。同时将系统音量调到最高。 - 11 -...
- Page 13 ◆ 将 DAC-X20 设置为常用播放器的输出设备 foobar2000 的设置 ● 1. 点击 文件(File)—> 参数选项(Preferences)。 2. 点击展开 播放(Playback)—>输出(Output),在右侧的设备(Device)下拉菜单中选择 “ASIO:XMOS USB Audio 2.0 ST 3033” 。 - 12 -...
- Page 14 ◆ 常用播放软件实现 DSD 硬解的设置 foobar2000 的设置 ● 1. 打开文件夹 ASIO Proxy for Foobar2000 ,双击运行 ASIOProxyInstall -0.7.1.2.exe,点 击 next 或者 install 完成安装。 2. 在参数选项(Preference)界面(从 foobar2000 主界面按 Ctrl+P 进入), 点击 播放 (playback) —>输出(Output)—>ASIO,双击右侧 ASIO drivers 中的“foo_dsd_asio” 。 - 13 -...
- Page 15 3. 在弹出的小窗口“foo_dsd_asio v0.7.1.2”中。第一行 ASIO Driver 的下拉菜单中选择 “XMOS USB Audio 2.0 ST 3033” 。第二行 DSD Playback Method 的下拉菜单中选择 “DoP Marker 0x05/0xFA” 。其他按图中设置 4. 点击 播放(Playback)—>输出(Output),在右侧的设备(Device)下拉菜单中选择 “ASIO:foo_dsd_asio” 。 - 14 -...
- Page 16 5. 点击工具(Tools)—>SACD,在右侧 Output Mode 的下拉菜单中选择“DSD” 。 最后点击下方“确定” ,完成设置。 6. 在回放 DSD 文件时请务必将系统中 XMOS 设备的音量级别开到 100%,否则会无法出声。 - 15 -...
- Page 17 ◆ 未能正常回放 DSD 的解决办法 foobar2000 篇 ● 1. 为何我的 foobar2000 参数选项的 播放(Playback)—>输出(Output)中没有 ASIO? 因为没有安装 ASIO 组件。将 foobar2000 Components 文件夹中的 foo_out_asio.fb2k-component 文件拖曳到 foobar2000 组件选项右侧的框内空白处,然后 点击右下角“应用”按钮,在弹出的重启 foobar2000 对话框中点确定,重启 foobar2000 后 即可找到 ASIO 选项。 - 16 -...
- Page 18 2. 为何我的 foobar2000 参数选项的 工具(Tools)中没有 SACD? 因为没有安装 SACD 组件。将 foobar2000 Components 文件夹中的 foo_input_sacd.fb2k-component 文件拖曳到 foobar2000 组件选项右侧的框内空白处,然后 点击右下角“应用”按钮,在弹出的重启 foobar2000 对话框中点确定,重启 foobar2000 后 即可找到 SACD 选项。 - 17 -...
- Page 19 3. 为何播放 DSD64 / DSD128 文件的时候无声,机器显示 176.4K / 352.8K? 因为系统中 XMOS USB AUDIO 设备的音量没有设置到 100%,系统音量控制功能破坏了 DoP 载波 中的 DSD 识别码。 在系统桌面的右下角,用鼠标右键点击小喇 图标,然后左键选择“播放设备” 。在弹出的 “声音”对话框中双击“XMOS XS1-U8 MFA (ST)”设备,在弹出的“属性”对话框中选择“级 别” ,然后将扬声器的音量条拉到 100 的位置。 4. 为何以上设置都正确了,播放 DSD 文件时却报告一个如下图的错误 - 18 -...
- Page 20 正确 因为 ASIOProxy 的版本与 SACD 解码组件的版本冲突。 的版本配套如下图, 都为 0.7.X..有些用户使用的是老版本的 foobar2000,其 SACD 解码组件使用的还是 0.6.X 版本,如果安装 了 ASIOProxyInstall-0.7.1.2.exe 程序, 那么 foo_dsd_asio 这个小窗的版本就是 0.7.1.2 了, 与 SACD 解码组件产生冲突。 解决方法有二,其一是更新 SACD 组件的版本,安装方法如之上的[问题 2]。但是一些版本的 foobar2000 组件被锁死无法替换,请重新安装新版本官方原版可很好解决问题。其二,若是 不愿意重装 foobar2000,可以安装旧版本的如 ASIOProxyInstall-0.6.5.exe。百度谷歌搜索 均可下载到,也可解决冲突。 - 19 -...
- Page 21 Gustard DAC-X20 HD D/A converter with DSD User's Guide - 20 -...
-
Page 22: Table Of Contents
Table of Contents Front Panel....................................- 22 - Real Panel ....................................- 22 - LCD Display and Main Menu ..............................- 23 - LCD Display..................................- 23 - Screen Brightness and Display Activation.........................- 23 - Volume Control..................................- 23 - Multifunction Knob ................................- 24 - Menu Item Introduction ..............................- 24 - Remote Controller ..................................- 26 - Input Button. -
Page 23: Front Panel
Front Panel 1. The power switch is a rotary switch. Clockwise direction powers ON while counterclockwise powers OFF. 2. The display shows the main menu, which contents the items: encoding formats, digital filtering, sampling rate, volume control and etc.. 3. Multifunction knob can be rotated and pressed. It executes all the functions. Real Panel - 22 -... -
Page 24: Lcd Display And Main Menu
The following figure shows the main menu. Screen Brightness and Machine Activation When there is no operation more than 30 seconds, LCD of DAC-X20 will return to main menu, while the brightness will automatically switch to the pre-set user defined level. -
Page 25: Multifunction Knob
There are six items in the main menu, and they are: a. Source Input DAC-X20 has five input sources in total and they are COAX, BNC, AES, USB and IIS. Turning the multipurpose knob clockwise will explored in turn, and vice versa. For instance, when using the coaxial interface for input, the “Source Input”... - Page 26 *Under the “Auto” mode, the quality of the master clock of DAC-X20 will be more or less depended by the quality of the superior clock. This mode is recommended to be used only for the clock of the front-end audio equipment in good condition.
-
Page 27: Remote Controller
DAC-X20 main menu is shown by pressing this button. Four Directions Button. In DAC-X20 main menu,different item can be explored by UP and DOWN buttons, and different options in an item can be selected by LEFT and RIGHT buttons. Return Button. -
Page 28: Volume Decrease Button
Volume Increase Button. It can increase volume only when DAC-X20 shows the main menu on the screen. Mute Button. DAC-X20 will be muted when this button is pressed, and mute will be released after another pressing. Note 1) Operating distance of the remoter varies depending on the angle. -
Page 29: Analog Output
W380mm * H65mm * D260mm(Excluding protruding part) Weight: 6.5Kg(With packaging) Services Thank you very much to buy GUSTARD hi-fi products. To protect your rights, please read the following warranties carefully, so you can access to the right services from GUSTARD in time. Product Warranty: You will enjoy the 2-year free warranty and lifetime maintenance after the date purchasing GUSTARD’s DAC-X20 product. -
Page 30: Free Warranty Service
Free Warranty Service GUSTARD DAC-X20 from the purchasing date in the free warranty period, the user uses the product in normal, and the product fails due to component quality or manufacturing problems. -
Page 31: Usb Driver Installation Under Windows
9. Connecting DAC-X20 to a computer by a USB cable, and then powering on. The computer will prompt the discovery of new hardware and attempt to install the driver. If nothing happens, please try another USB port or re-power DAC-X20. - Page 32 11. Following the prompts, then click next to install. 12. Checking system status. If showing red text prompts “Setup requires that the device - 31 -...
- Page 33 DAC-X20 or reconnect the USB cable. 13. If a security warning pops up, you can just ignore it by clicking "Install this driver software anyway", and then complete the driver installation. 14. Here shows the screen of a successful driver installation. Clicking “Finish”...
- Page 34 ◆ Setting DAC-X20 (XMOS XS1-U8 MFA) as the default system playback device 3. Finding the speaker icon at the lower right corner of the windows desktop, right-clicking, and then clicking the menu item "Playback Devices". - 33 -...
- Page 35 4. Selecting "XMOS XS1-U8 FMA (ST)", and clicking on the bottom "Set to the Default Value", and setting the maximum system volume。 ◆ Setting DAC-X20 as Common Output Playback Device - 34 -...
- Page 36 Configuration in foobar2000 ● 3. Clicking File->Preferences 4. Clicking Playback->Output, selecting“ASIO:XMOS USB Audio 2.0 ST 3033” on the drop-down menu from “Device”. ◆ Archiving DSD hardware decoding by most common play-back application Setting in foobar2000 ● 7. Opening folder “ASIO Proxy for Foobar2000” ,double clicking “ASIOProxyInstall - 35 -...
- Page 37 -0.7.1.2.exe” icon,and clicking “next” for finishing installation. 8. Pressing combination keys “Ctrl+P” under the main screen of foorbar2000. Showing “Preferences” dialog box. Finding “foo_dsd_asio” clicking “Playback->Output->ASIO” from the left panel in turn. 9. Double clicking ““foo_dsd_asio”, showing “foo_dsd_asio v0.7.1.2” dialog box. - 36 -...
- Page 38 From “ASIO Driver” drop-down menu, selecting “XMOS USB Audio 2.0 ST 3033”; From “DSD Playback Method” drop-down menu, selecting “DoP Marker 0x05/0xFA”. Leaving all the others unchanged. 10. Clicking Playback->Output. From “Device”drop-down menu, selecting “ASIO:foo_dsd_asio”. 11. Clicking Tools->SACD. From “Output Mode” drop-down menu, selecting “DSD”. - 37 -...
- Page 39 Clicking “OK” for finishing all settings. 12. Making sure the playback volume of XMOS is the maximum value, otherwise, nothing can be heard. Problem and Solution for DSD playback For using foobar2000 application ● 5. Why there is no “ASIO” under the path “Playback->Output” in “Preferences” dialog - 38 -...
- Page 40 box? Solution: The main reason is no ASIO component installation. Opening folder “foobar2000 Components” and dragging file “foo_out_asio.fb2k-component” to the right place in the “Preferences: Components” dialog box as depicting by the following figure. Clicking “Apply” button afterwards, and restarting foobar2000. After restarting, you can find “ASIO”.
- Page 41 Components” and dragging file “foo_input_sacd.fb2k-component” to the right place in the “Preferences: Components” dialog box as showing in the following figure. Clicking “Apply” button afterwards, and restarting foobar2000. After restarting, you can find “SACD”. 7. Why there is no sound when playing DSD64/DSD128 music file, but the LCD still displays “176.4K/352.8K”...
- Page 42 "XMOS XS1-U8 FMA (ST)", and popping up a “Speaking Properties” dialog box. Setting the speaker volume to the maximum level. 8. Why all the above settings are correct, but still getting the error as shown by the following figure when playing back DSD file? Because the version conflict between ASIOProxy and SACD decoder component.
- Page 43 Some users are using an older version of foobar2000, its SACD decoding component ID is starts from 0.6.X. If you install ASIOProxyInstall-0.7.1.2.exe program, then foo_dsd_asio version is 0.7.1.2, and components conflict happens. Solutions: To solve the above problem, there are two solutions in totals. The first solution is to update the SACD component, as the methods described in Question 2.
Need help?
Do you have a question about the DAC-X20 and is the answer not in the manual?
Questions and answers