Table of Contents
Advertisement
Quick Links
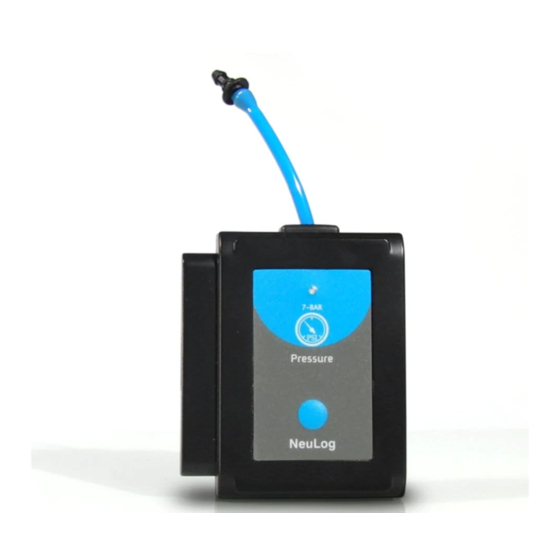
NeuLog pressure logger sensor
NUL-210
The NeuLog pressure sensor can be used for any science experiment which requires
an accurate pressure measurement such as in the fields of Physics, Biology,
Physiology, Microbiology, Botany, Weather Science, etc.
The sensor comes pre-calibrated so you can start experimentation right out of the box
using this guide.
Both the pressure and barometer sensors measure pressure however, the pressure
sensor is much easier to connect to labware such as syringes, beakers and test tubes,
whereas the barometer sensor is ideal for testing atmospheric pressure in the open or
in large containers. The sensor's probe and the additional hose are designed to allow
easy connections to various openings.
Among hundreds of possible experiments that can be performed with the NUL-210
sensor are: Boyle's Law, Gay-Lussac's Law for ideal gases, weather phenomena,
yeast and microbe fermentation, chemical reactions, and many more.
The pressure sensor is capable of measuring in four different units of measure:
Kilopascal (kPa): The SI unit of pressure
Atmospheres (atm): A pressure unit equal to one earth atmosphere at sea
level (101.325 kPa)
Pounds per square inch (psi): The unit of pressure which measures the
amount of force (in pounds) a gas or liquid exerts across one square inch
Bar: A non-SI unit equal to exactly 100 kPa
Quick start procedure:
PC or Mac Computer
Materials needed:
NUL-210 Pressure Sensor
USB-200 USB Module
USB to mini USB cable (included with the USB-200 module)
NEULOG PRESSURE LOGGER SENSOR GUIDE
Your pressure sensor needs to be connected to a USB-200 module. The USB-200
module then connects to a computer via a USB to mini-USB cable. Please note that
you cannot plug the pressure sensor directly into the computer.
The browser based application can be downloaded for free at
well as a full application user guide.
Choose "Downloads" on the main menu and then choose "Software and Application".
Procedure:
1.
Install the NeuLog application.
2.
Connect the USB-200 module to the PC or Mac
3.
Connect the pressure sensor to the USB-200 module (they directly plug
together). Please note that no calibration is required for this sensor.
4.
Open the NeuLog application by clicking on the shortcut on the screen.
5.
Once a pressure sensor module box appears on the left side of the screen, the
probe has been automatically identified and you can begin experimentation.
If the pressure sensor is not automatically identified then click the "Search for
6.
sensors" icon to find the sensor.
Click the "On-line experiment" icon; this will open a graph below.
7.
Click on the "Module setup" button located in the pressure sensor module box to
8.
change the sensor settings if need be.
9.
Click on the "Experiment setup" icon to change the experiment settings if need
be (experiment duration for example).
10.
The pressure sensor will give a live reading in its module box to the left of the
screen while plugged in.
To run an experiment and collect data click the "Run experiment" icon.
11.
To end data collection early, click the "Stop experiment" icon.
12.
Tablet, smart phone device
Materials needed:
NUL-210 Pressure Sensor
WIFI-201 WiFi Module
BAT-200 Battery
Your pressure sensor needs to be connected to a WIFI-201 module. The WIFI-201
module will create a closed NeuLog WiFi network which will stream the NeuLog data
to a device of your choosing. Once your device is wirelessly connected to the NeuLog
network you can run experiments and collect data through a browser of your choosing.
www.NeuLog.com
as
Advertisement
Table of Contents

Related Manuals for NeuLog NUL-210


Summary of Contents for NeuLog NUL-210
- Page 1 USB to mini USB cable (included with the USB-200 module) to a device of your choosing. Once your device is wirelessly connected to the NeuLog network you can run experiments and collect data through a browser of your choosing.
- Page 2 Off-line experiments Take your tablet or smart phone, go to the WiFi settings and select the NeuLog network (NeuLog0184 for example) which matches the ID found on the back of (Off-line experiments are when you do not have a sensor connected directly to a the WIFI-201 module (0184 for example).
- Page 3 0 to 100 0 to 700 0 to 7 operation modes in each plastic NeuLog body. This technology allows the sensor to collect and then ADC resolution 16 bit store the digital data in the correct scientific units ( F, Lux, %, ppm, for example).
- Page 4 Thank you for using NeuLog! a voltage that depends on its absolute pressure. Maintenance and storage: Never submerge the NeuLog plastic body in any liquid. Do not allow liquid into the NeuLog plastic body. Flexible, simple, fast, forward thinking.
Need help?
Do you have a question about the NUL-210 and is the answer not in the manual?
Questions and answers