Ryobi OWS1880 Manual
Hide thumbs
Also See for OWS1880:
- Original instructions manual (24 pages) ,
- Original instructions manual (177 pages) ,
- Manual (20 pages)
Table of Contents
Advertisement
Quick Links
Advertisement
Table of Contents

Subscribe to Our Youtube Channel
Related Manuals for Ryobi OWS1880


Summary of Contents for Ryobi OWS1880
- Page 1 FRONT PAGE OWS1880...
-
Page 2: Intended Use
cord suitable for outdoor use reduces the risk of electric IMPORTANT! shock. It is essential that you read the instructions in this manual ■ If operating a power tool in a damp location is before assembling, operating, and maintaining the unavoidable, use a residual current device (RCD) product. - Page 3 Power tools are dangerous in the hands of untrained CORDLESS WEED SPRAYER SAFETY WARNINGS users. ■ Always check for and repair leaks before using the Maintain power tools and accessories. Check for product. ■ misalignment or binding of moving parts, breakage ■...
-
Page 4: Maintenance
■ Avoid contact with chemicals. Immediately change NOTE: Drain all of the spray materials from the spray clothing that is contaminated with plant control tank into a container approved for chemicals. Do not store chemicals. chemicals in the spray tank. ■... -
Page 5: Symbols On The Product
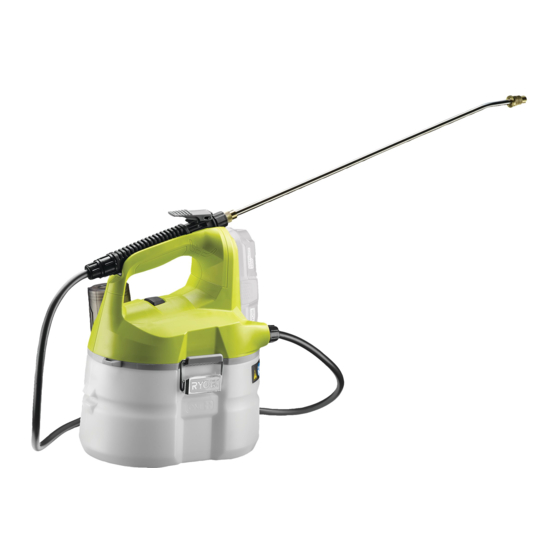
SYMBOLS ON THE PRODUCT SYMBOLS IN THIS MANUAL Safety alert Stop the product. Read and understand all instructions before operating the product. Follow all Lock warnings and safety instructions. Wear eye protection. Unlock Wear a mask. Parts or accessories sold separately Wear non-slip, liquid-resistant gloves. - Page 6 OWS1880 Nozzle Spray wand Spray trigger with lock-on Spray wand handle R18SPR12 On/off button Tank cap/ measuring cup Battery port Motor housing Tank latch (x2) Hose Tank Operator’s manual Battery Charger RWS1880S13 R18SPR12 Know your product...
- Page 7 Always wear safety goggles or safety Insert the spray wand into the handle. Insert the hose end into the opening on glasses with side shields, a dust mask, Slide the o-ring towards the handle. Install the threaded coupler. Slide the nut over non-slip, heavy-duty protective gloves, the threaded coupler onto the handle and the hose and threaded coupler, and hand...
- Page 8 Operating the Cleaning the p.11 product product Cleaning the Storing the product p.14 p.15 nozzle...
-
Page 9: Operating The Product
OPERATING THE PRODUCT WARNING: Do not smoke, eat, or drink while using the product. Do not spray in the direction of people or animals. Always spray downwind. 1. Install the battery pack. 2. Press the on/off button to turn on the product. - Page 10 4. Press the spray trigger to start the flow of the liquid at the spray wand. Release the spray trigger to stop the flow of liquid. NOTE: The spray wand handle features a lock-on feature that makes using the product convenient when spraying for an extended period of time or when covering a large area.
-
Page 11: Cleaning The Product
CLEANING THE PRODUCT 1. Remove the battery pack. 2. Lift up and release the latches on each side of the product. 3. Remove the motor housing from the tank. 4. Turn the tank cap counterclockwise, and remove it from the tank. Drain the contents of the tank through the fill area. - Page 12 6. Reinstall the motor housing to the spray tank. 7. Fasten the latches on each side of the product. 8. Install the battery pack. 9. Turn on the product. 10. Spray the liquid in a suitable container. Maintenance...
- Page 13 NOTE: Spray until the tank has been completely emptied. 11. Wipe the outside of the spray tank with a clean, dry cloth. Maintenance...
-
Page 14: Cleaning The Nozzle
CLEANING THE NOZZLE 1. Remove the battery pack. 2. Remove the adjustable nozzle from the spray wand. 3. Push a small wire through the cross holes to clear any debris. Rinse the cross holes and nozzle with clean water. NOTE: Wipe the nozzle and cross holes with a clean dry cloth and reinstall the nozzle. - Page 15 STORING THE SPRAYER 1. Remove the battery pack. 2. Wipe the outside of the spray tank with a clean, dry cloth. 3. Wrap the hose around the spray tank and secure it using the holders. 4. Store the product in a cool, dry, and well-ventilated place that is inaccessible to children.
-
Page 16: Product Specifications
RB1820C, RB18L25, RB18L25A, RB18L26, RB18L30, RB18L30A, RB18L40, RB18L40A, RB1840C, RB1840X, RB18L50, RB18L50A, RB1850C, RB1850X, RB18L60, RB18L60A, RB18L90, RB18L90A Compatible BCL14183H, RC18627U, RC18150, RC18150U, charger RC18120, RC18115 NOTE: Visit your local special orders desk or contact RYOBI customer service for replacement parts. - Page 20 31 Gilby Road, Mount Waverley, VIC 3149 Melbourne, Australia Techtronic Industries N.Z. Limited Unit C, 70 Business Parade South, Highbrook, Auckland 2013, New Zealand RYOBI is a trade mark of Ryobi Limited, and is used under license. © 2015-21 Techtronic Cordless GP 961088003-01...
Need help?
Do you have a question about the OWS1880 and is the answer not in the manual?
Questions and answers